Pages
▼
Monday, 31 August 2015
Test Post– Awesomely Artistic Pop Out Swing Card Variant
Another version of my Awesomely Artistic Pop Out Swing Card for you whilst I just test something….
Edited to add.... Just re-read this post! I don't mean that my Pop Out Swing Card is awesomely artistic!! But the stamp set I used is called Awesomely Artistic!! Along with those Timeless Elegance papers.....
Peaceful Pines meets Snow is Falling
Another Sneaky Peek of the new stamp set... Peaceful Pines...
A fabulous collection of trees, accessories & greetings...along with the fantastic set of Perfect Pines co-ordinating dies in a Stampin' Up! bundle (which means 15% off for the bundle!)
This is a set that has attracted the eyes of most when first viewing the new 2015 Autumn Winter/ Holidays catalogue...so I will be running a Peaceful & Perfect Pines class in due course...so there will be more projects to share using this set in the future...Not that you can really see in these photos... but the Snow is Falling embossing is finished off with highlights (blobs!) using my trusty Dazzling Details...rather therapeutic! Giving texture, glitter and dimension all in one go!
And on a final note... the 2015 Autumn Winter/Holidays catalogue is revealed to the world tomorrow, 1st September ...so don't forget to come back tomorrow and check it out!!
I will also be sharing a project or two made with my favourite product from the new catalogue! Warning...I have got quite carried away with one particular product!! Anyone like to take a guess which...
Sunday, 30 August 2015
SWEET SIXTEEN Layered Letters Birthday Card
Had to share this card too.
Imagine the scene... Son & Heir off to a friend's party with 2 minutes notice for me to make a Teen Girl card!
Layered Letters still out from making my Christmas Card Trio...
Well it seemed rude not to.... a quick make I can tell you!
And it went down incredibly well... I later heard the words COOL, AWESOME and TRENDY uttered by the recipient!
My son couldn't believe that one of his friends would describe his mum (and her makes) like that!!!!! Laugh out VERY loud!!
Saturday, 29 August 2015
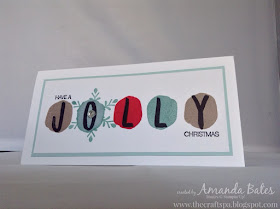
Christmas Layered Letters Alphabet - JOLLY
And the final of the Christmas Clean & Simple Card trio using the Layered Letters alphabet & Holly Jolly Greetings
Colour combination of Lost Lagoon, Tip Top Taupe & Real Red
Wider DL card this time. ( ie 21cm Square card scored at 10.5cm)
Finishing off with the HAVE A and CHRISTMAS greetings & large snowflake from the Holly Jolly Greetings stamp set .. and an Iced Rhinestone embellishment...which is also new in the 2015 Autumn Winter Catalogue
Friday, 28 August 2015
Centre Step Easel Card Tutorial for Fancy Fold Friday
Remember this from last week? The Centre Step Card that doesn't flop down on the mantelpiece!
I meant to have another couple of examples made for you by today...but ...being honest... Christmas crafting with my new goodies turned my head!!
Which is code for lots of new samples made and... AN Other version of this card coming up soon.... I decided not to confuse you with the new variant yet..... maybe next week!
Well here is how to make it... both the Metric (centimetres) version from A4 and the Imperial (inches) from 12x12
14. Decorate as necessary. My papers and mats etc
were as follows…
Base - Paper Polka Dots 14.3 x 8.1cm
Front - Paper Plaid 14.3 x 2cm
Sides - Paper Plaid 2 x 7.3cm (x2)
Front - Card Mossy Meadow 9.5 x 9cm
Front - Card Whisper White 9 x 8.5cm
And apologies for my US readers...
I don't think this card would work from your standard 8 1/2 x 11" cardstock...as there wouldn't be enough of a lip at the front to mount a greeting/stop for the easel card format.
It would work with 12" card however... In which case you would need to do as follows...
Please note that your papers and mats etc would have to be re-sized to suit...
I meant to have another couple of examples made for you by today...but ...being honest... Christmas crafting with my new goodies turned my head!!
Which is code for lots of new samples made and... AN Other version of this card coming up soon.... I decided not to confuse you with the new variant yet..... maybe next week!
Well here is how to make it... both the Metric (centimetres) version from A4 and the Imperial (inches) from 12x12
Centre Step Easel
Card Tutorial ( Metric Version from A4 card)
1.
Cut A4 cardstock to 14.8cm wide ( xA4L ie 29.7cm
long)
2.
PORTRAIT
at 2.5cm on Top Bar RHS ( ie to Right
Hand Side)
3.
Cut 2.5 to 13cm
4.
PORTRAIT at
2.5cm on Top Bar LHS ( ie to Left
Hand Side)
5.
Cut 2.5 to 13cm
So you end up with cuts as so...
6.
LANDSCAPE.
With cuts to Left Hand Side… Score as per dotted lines...
7.
2.5 cm on Top Bar (LHS) Score outside sections ( ie 0-2.5cm; LIFT; 13.3 to
14.8cm)
8.
5cm on Top Bar (LHS) Score outside sections
9.
13cm on Top Bar (LHS) Score outside sections
10.
LANDSCAPE.
With cuts to Left Hand Side…
11.
10.5cm on Top Bar (LHS) Score across middle
section. ( ie 2.5 to 12.3cm)
12.
21cm on Top Bar (LHS) Score across whole card
drop ( ie 0 to 14.8cm)
13.
Fold lightly…
Outer Sections – 2.5 cm Mountain, 5cm Valley, 13cm Mountain
Middle Section at 10.5cm – Mountain
Whole
Section at 21cm – Mountain
Ends up as so...
Base - Paper Polka Dots 14.3 x 8.1cm
Front - Paper Plaid 14.3 x 2cm
Sides - Paper Plaid 2 x 7.3cm (x2)
Front - Card Mossy Meadow 9.5 x 9cm
Front - Card Whisper White 9 x 8.5cm
And apologies for my US readers...
I don't think this card would work from your standard 8 1/2 x 11" cardstock...as there wouldn't be enough of a lip at the front to mount a greeting/stop for the easel card format.
It would work with 12" card however... In which case you would need to do as follows...
Please note that your papers and mats etc would have to be re-sized to suit...
Centre Step Easel
Card Tutorial (Imperial from 12x12)
1.
Cut 12x12 cardstock to 6” wide (ie 6 x 12”)
2.
PORTRAIT
at 1” on Top Bar RHS ( ie to Right Hand
Side)
3.
Cut 1” to 5 1/8”
4.
PORTRAIT at
1” on Top Bar LHS ( ie to Left Hand
Side)
5.
Cut 1” to 5 1/8”
6.
LANDSCAPE.
With cuts to Left Hand Side…
7. 1”
on Top Bar (LHS) Score outside
sections ( ie 0-1”; LIFT; 5-6”)
8.
2” on Top Bar (LHS) Score
outside sections
9.
5 1/8” on Top Bar (LHS) Score
outside sections
10.
LANDSCAPE.
With cuts to Left Hand Side…
11. 4
1/8” on Top Bar (LHS) Score across middle section. ( ie 1-5”)
12.
8 ¼” on Top Bar (LHS) Score across whole card
drop ( ie 0 to 6”)
13.
Fold lightly…
Outer Sections – 1” Mountain, 2” Valley, 5 1/8”Mountain
Middle Section at 4 1/8” – Mountain
Outer Sections – 1” Mountain, 2” Valley, 5 1/8”Mountain
Middle Section at 4 1/8” – Mountain
Whole Section at 8 ¼” – Mountain
Decorate
as necessary.
Thursday, 27 August 2015
Christmas Layered Letters - MERRY & BRIGHT
Continuing on my series of using the Layered Letters alphabet for Christmas.
This time up - it is MERRY & BRIGHT...
So a brighter colour palette of Real Red, Old Olive & Tip Top Taupe
Finished off with a couple of hanging stars from the Holly Jolly Greetings stamp set and some tiny pearls
This time up - it is MERRY & BRIGHT...
So a brighter colour palette of Real Red, Old Olive & Tip Top Taupe
Finished off with a couple of hanging stars from the Holly Jolly Greetings stamp set and some tiny pearls
Wednesday, 26 August 2015
The Clearance Rack has been updated!
Christmas Layered Letters - NOEL
First some exciting news...the Clearance Rack has just been updated...
And don't forget to check out the new week's Weekly Deals too...
Right back to my card...so whilst I was in a Christmassy mood...
I spied my newly arrived Layered Letters Alphabet set - and quickly got to work!
So here we have the start of of a new series of CAS cards...
Starting off with NOEL in Soft Sky, Tip Top Taupe, Mint Macaron & Lost Lagoon.
Finishing the O off with a Winter Wonderland snowflake embellishment and a few snowflakes from the Holly Jolly Greetings stamp set
Tuesday, 25 August 2015
Woodland Merry & Bright
Finishing off my series of cards using the Woodland embossing folder with the Holly Jolly Greetings stamp set.
This time I have gone all shiny!!
And a Tuesday Mini Tutorial for you...
Take your Woodland embossing folder, rub Versamark ink all over the side with the debossed trees, insert card and emboss.
Sprinkle Heat & Stick powder over Versamark - and heat to melt.
Sprinkle Dazzling Diamonds Stampin Glitter over - and heat to set.
Add a couple of little Holly Jolly Greetings...
Job done..simple little very sparkly card... though I am sure these photos will not do it justice...
Monday, 24 August 2015
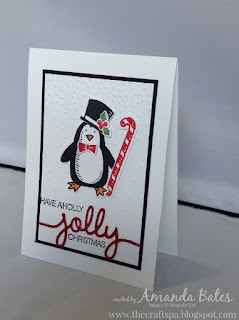
Holly Jolly Snow Place Penguin
So another Sneak Peek - of another fabulous stamp set coming your way from 1st September when the 2015 Autumn Winter Catalogue goes live.
This time up -it is a set called Snow Place which includes this penguin, a couple of snowmen and lots of items to dress them up with! As well as some great greetings...
Along with the Snow is Falling embossing folder of course....and the Christmas Greetings Thinlits dies and co-ordinating Holly Jolly Greetings stamp set
Sunday, 23 August 2015
Woodland Peace on Earth
Another simple idea with the up & coming Woodland embossing folder and Christmas Greetings Thinlits with co-ordinating Holly Jolly Greetings stamp set
Simple embossed centre panel with subtle Soft Sky snowflakes in the sky...
Doubled up die cut greeting - gold glimmer on black to make it pop...
Finished off simply with relevant wording from the Holly Jolly Greetings set - which is so full of great christmassy greetings!