Pages

Saturday, 31 October 2015

Festive Fireplace Centre Step Easel Card

This is actually the version of this card everyone made in classes...
Some where along the way I decided it needed a more homely feel...
So I switched the white furniture & fire to being stamped on & cut from Crumb Cake... we also had some Crumb Cake stockings and bows which also looked really nice... but I seem to have misplaced (or mis-filed!) the photos...
Tutorial  posted for this variant of the Centre Step Easel Card yesterday...  Enjoy!

And I was asked a question about folding & putting the card in an envelope...

Basically you have 3 options... my preference is to use a larger C5 envelope...for 2 main reasons...
(1) I have them so I can!
(2) I think that the recipient is more likely to pull the card out of the envelope, see the tab and pop the centre step section of the card behind it!..

I think the other 2 methods will confuse anyone but a card maker! Same as with all easel cards! Though I did see a "sticker" on the web that you can print and add to assist the recipient when sending an easel card!

So here is my preferred larger envelope method.... no sticker required...

And here are 2 methods of folding and putting in a standard C6 envelope...

Firstly to pop the base/easel section behind the step card (note photo/card upside down so you can see that base section behind!)

And secondly to fold the base up over the front...


Friday, 30 October 2015

Tutorial for Hearth & Home Centre Step Easel Card

Seeing as this card is still getting a huge amount of daily hits.... think it is time for its tutorial! Which I have just realised didn't get posted quite when I thought.... oops...sorry!

I have posted a few more cards using this design.... press on the photo to go to the original posting... and I think there will be some more pretty soon as this is still definitely a favourite card at my classes....


First up...the Metric version from A4 card ... and then the Imperial (inches) version from 12x12 card. 

Go here for another Centre Step Easel Card variant and/or if you would like photos to accompany the step by steps... 

Centre Step Easel Card Tutorial (Metric from A4)
Whisper White Cardstock  14.8 x 29.7cm (ie A4L) OR 14.8 x 28.9cm if you want to tuck the base up into the card for mailing in a C6 envelope

1.       PORTRAIT at 4cm on Top Bar 
2.       Cut 2.5 to 13cm
3.       PORTRAIT at 10.8cm on Top Bar LHS
4.       Cut 2.5 to 13cm

5.       LANDSCAPE. With cuts to Left Hand Side…
6.       2.5 cm on Top Bar (LHS) Score  outside sections (ie 0-4cm; LIFT; 10.8 to 14.8cm)
7.       5cm on Top Bar (LHS)  Score  outside sections
8.       13cm on Top Bar (LHS)  Score  outside sections

9.       LANDSCAPE. With cuts to Left Hand Side…
10.     10.5cm on Top Bar (LHS) Score across middle section. (ie 4 to 10.8cm)
11.     21cm on Top Bar (LHS) Score across whole card drop (ie 0 to 14.8cm)

12. Fold lightly…
Outer Sections – 2.5cm Mountain, 5cm Valley, 13cm Mountain
Middle Section at 10.5cm – Mountain
Whole Section at 21cm – Mountain


And here is the Imperial (inches) version from 12x12 card
I don't think this card would work from the standard US 8 1/2 x 11" cardstock...as there wouldn't be enough of a lip at the front to mount a greeting/stop for the easel card format. 


Centre Step Easel Card Tutorial (Imperial from 12x12)
1.      Cut 12x12 cardstock to 6” wide (ie 6 x 12”)

2.      PORTRAIT at 1 5/8” on Top Bar 
3.      Cut 1” to 5 1/8”
4.      PORTRAIT at 4 3/8" on Top Bar 
5.      Cut 1” to 5 1/8”

6.      LANDSCAPE. With cuts to Left Hand Side…
7.      1” on Top Bar (LHS) Score  outside sections ( ie 0-1 5/8”; LIFT; 4 3/8"-6”)
8.      2” on Top Bar (LHS)  Score  outside sections
9.      5 1/8” on Top Bar (LHS)  Score  outside sections

10.   LANDSCAPE. With cuts to Left Hand Side…
11.    4 1/8” on Top Bar (LHS) Score across middle section. ( ie 1 5/8"- 4 3/8")
12.   8 ¼” on Top Bar (LHS) Score across whole card drop ( ie 0 to 6”)
13.   Fold lightly…
Outer Sections – 1” Mountain, 2” Valley, 5 1/8”Mountain
Middle Section at 4 1/8” – Mountain
Whole Section at 8 ¼” – Mountain


Thursday, 29 October 2015

Wonderland - Plum Trees - and The Purples Round Up

The last of my special purples trio....

I think Perfect Plum has proven to be the favourite shade of my purple-loving new crafters!
Trees stamped in Perfect Plum then re-stamped wothout re-inking off to the right and left...

Stamped panel direct-inked with the Perfect Plum ink pad...
Re matted onto another Whisper White panel...

All tied up with some of the new White Glitter Ribbon...
And laid upon a Perfect Plum card blank that has been stamped all over with Whisper White snowflakes...

And finally... I leave you with the Purples Trio...
Built for Free Using: My Stampin Blog

Wednesday, 28 October 2015

Wonderland - Silent Night in Purples

Another way to use your Wonderland stamps... and going back to my special purple makes!! 
Attempting to show my new purple-loving crafters that just one ink pad can start you off pretty well on your colour journey... Elegant Eggplant used here to give 4 colour shades... starting off by inking up and stamping in the centre then stamping - without re-inking - the 3 words below....
Then I have re-inked - stamped off onto scrap paper once - and then repeated the stamping of the 3 words above
All with the aid of the trusty Stamp A Ma Jig of course!
Well ...I say one ink pad... apart from Whisper White Craft Ink that I have used for the snowflake background on a Wisteria Wonder card blank - but they already have that one!

Finished off with direct inking around the stamped panel ( I just use my Elegant Eggplant straight onto my card panel) and then sticking to a 2nd white panel. And some Wisteria Wonder Seam Binding ribbon....


Built for Free Using: My Stampin Blog

Tuesday, 27 October 2015

Wonderland - Trees in the Snow - and a Pictorial

Another simple Wonderland card suitable for mass production at this time of year...
Trees under snow and in the snow and on the snow!
And a lovely glittery sparkle as well...
And seeing as it is Tuesday - so Tips, Techniques & Tutorials day - here is your step by step pictorial on how this is produced...

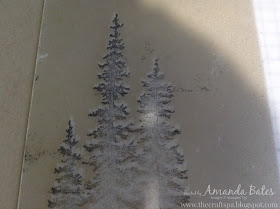
(1) Stamp your trees using Craft Whisper White ink. Set aside to dry...
(2) Place your Stamp A Ma Jig sheet over the top so that you can see the white image over and off to the right
(3) Ink up trees in Mossy Meadow and stamp using your Stamp A Ma Jig
Look lovely snow on your green pine trees... 
(4) Grab your Craft Whisper White ink pad again and a sponge/finger dauber...
 (5) Daub white ink under your trees...
 (6) Ink up & stamp Whisper White snowflakes ...
 
 (7) Daub Whisper White ink around the panel...
(8) Set aside to dry...best left overnight for maximum snow effect ( if the green ink is still a bit wet - the glitter tends to pick up a green tinge)

(9) Ink up & stamp Mossy Meadow greeting and mount onto crumb Cake card blank
(10) Add glue and glitter over your trees 
Tombow or Fine Tip glue plus Dazzling Diamonds the best for maximum sparkle - though Dazzling Details or 2 Way plus Dazzling Diamonds work too
Personally I am torn between my trusty Tombow (which is slightly thicker in line but that dries the most white for my snow) and the new Fine Tip Precision glue
 
Close up of those trees... shows how snow laden they are - but not the glittery effect....
This may be better...
And here are a couple of blurry photos to try to show the overall sparkle off - it is incredibly sparkly in the flesh...
 (11) Add a glue and Dazzling Diamonds snow line to the horizontal too (optional!)
 Simple but effective....


Built for Free Using: My Stampin Blog

Monday, 26 October 2015

Wonderland Antlers #2 - White Embossed

 
Another simple card idea for the antlers stamp... and a BIG THANK YOU later...
Again a trio of antlers on a small panel...
But embossed in white this time... really pops in the flesh...
Finished off with the snowflakes stamped and the panels daubed around the edge in Craft Whisper White... 
And for anyone wondering how it would look not embossed... just using the Craft Whisper White ink pad instead... here you go... though my white pad did need re-inking at the time!! So this can definitely be improved upon with a juicier pad...
And I leave you with a REALLY BIG THANK YOU to a number of my readers - you know who you are! 

On Saturdays' long Winter Wonderland card tutorial post... well... I put a certain sentence on here with my typical UK humour!!! LOL!!

Well I never... You made my day!! You made me laugh!! You made me believe that my little bloggy exploits and shares are worthwhile... You made me love to be part of this crafty world that I am part of! You made me feel appreciated... Actually you made me believe in the general goodness of my fellow man (well women rather!) You are truly AWESOME! I cannot thank you enough for your donations to Amanda's Blog & Inspiration pot... THANK YOU!! And guess which tutorial requests are suddenly going straight up to the top of the list for writing up and publishing... tee hee!!! Again...THANK YOU!

Built for Free Using: My Stampin Blog

Sunday, 25 October 2015

Wonderland Trees in Purples

Now I know a lot of you will be surprised to see me creating in purples again...

But I have quite a lot of new stamping friends who are seriously into their purples - so it had to be done...
And I have to admit it does look rather effective...

So I decided to test their purple preferences out - so I used all 3 on this card... Perfect Plum, Wisteria Wonder and Elegant Eggplant...
The trees were inked up in Wisteria Wonder using a pad - then I grabbed my markers and went over the top for the other 2 trees...


Built for Free Using: My Stampin Blog