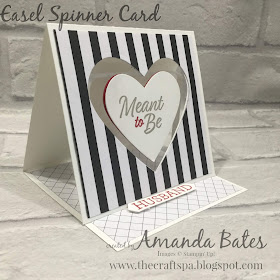
As these cards are destined for husbands rather than for general circulation... So "black", red and white is really the only way to go!
Well it is this year as we have the lovely Golden Honey papers (free with a £45 order during SaleABration)
I always find that the menfolk like a fairly monochrome card... though a Valentine card without red would seem strange! And a card that moves, pops or generally does something interesting!!
And so I had a brainwave... or so I thought! A spinning heart (nothing new there)... but in an easel card... as I hadn't seen one of those before...
Though I have just Googled "Easel Spinner Card" and found a few variants on a theme... so also called Suspension Easel Card, Spinning Easel Card and Easel Suspension Spinning Card... But Easel Spinner Card has already got stuck in my head! And it easier to say! Some of these posts also have tutorials and videos ... but note that these versions appear to be made in a couple of different ways...
Though looking at the photos you can't actually see the aperture... with the invisible thread! It looks more like a grey heart behind the red/white heart!
But rest assured there is an aperture for that heart to spin around madly as the card is opened up... just remember to "prime it" by twisting it around on the thread before inserting it in the envelope...
Craft Spa Recipe
Thick Whisper White 10.5cm x A4L (US* 4 1/4" x 10 1/2"
Papers 9.9 x 9.3cm (US * 4" x 3 1/4")
Inks - Real Red, Gray Granite
Stamps - Meant To Be , Family Party
Dies - Sweet & Sassy (retired) (alternatively use Stitched Be Mine dies OR the new Heart Punch Pack in a differently shaped aperture)
Punch - Classic Label
Invisible Thread x 9cm
* Please note that the US dimensions are the nearest converted equivalent using US 8 1/2" x 11" cardstock... Please use cm measurements with A4 card)
Craft Spa Tutorial
1. Score LANDSCAPE White card panel at 9.9cm (US* 3 1/2") from either side
2. Mountain Fold both scorelines
3. Line top paper onto front/top face of card and die cut aperture through both layers at same time
4. Ink up, stamp and die cut/punch greetings
5. Adhere thread above and below aperture on front (Tip- use your Grid paper to get things straight!)
6. Adhere papers to cover glue for thread
7. Turn front/top face of card over and place white heart (back face) under thread and stick in position with tape
8. Adhere red heart over back
9. Adhere all parts (Note that the HUSBAND is adhered using mini Stampin Dimensionals)


No comments:
Post a Comment
Amanda Bates at The Craft Spa
I hope that you enjoyed this project.
Please use the current Stampin Rewards Host Code (shown at the top right hand side of this blog) when ordering through my on-line store to earn yourself an extra gift for SU! orders over £25 (excluding P&P)
Though if your SU! order is over £150 - then please don't use this code! Please claim your own Stampin' Rewards instead... You will still get a gift from me...!
Any such gifts are from me personally and will be posted separately (about 3 weeks later ) to your Stampin' Up! order... but PLEASE do NOT select NO CONTACT when checking out... as I then do not know who - or where- you are ...