I realised that embossing on foil was a dodgy process... Firstly as it blisters if you don't heat and move quickly enough... and secondly as the glue doesn't dry so quickly... so it makes the assembly of those little baubles much more difficult than it needs to be!!!
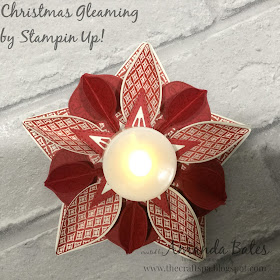
So I had to make a few of my own... as I had had a few other ideas for the use of my ornament ... such as the simple table decoration complete with battery operated tealight you can see here...
And that has given me the chance to provide a photo tutorial too...
Inkup, stamp and punch 15 large and 15 small baubles... plus a 2 1/2" circle and die cut the Stitched Stars...
Score each bauble down the centre and bone fold...and stick three together...
Place a large Stampin Dimensional (3D foam pad) in the centre of the punched circle...
Place and adhere the 5 large trios equally around the circle... just touching the 3D foam pad in the centre
Use your die cut star to eyeball where your smaller baubles need to go...
Place and adhere the 5 smaller bauble trios...
Pop your star on top...
Pop your tea-light on top... You could probably work out a way to stick the tealight onto the star and still be able to operate the switch... but this way works fine too!
Slightly different if you are producing an ornament... or fancy tag! As I have stacked up about 3-4 3D foam pads on top of each other.. and then stuck the star down onto the first 3D pad...
Then the thread gets added... with another plain punched large bauble and punched circle to cover up the back...
And a Metallic Element on the centre to finish...


Another fabulous tutorial Amanda, thank you, and wishing you a speedy recovery from your op on Saturday. Take care xxx
ReplyDeleteThank you Lesley... I’m hoping so too!
Delete