Showing posts with label Garden Trug. Show all posts

Saturday, 4 March 2017

Jems Monthly Blog Hop & Colour Challenge

Hello and welcome to The Craft Spa in the UK from Amanda Bates.

Time for the Team March Blog Hop today - so please join my lovely and very talented fellow team members and have an inspiring hop around... you won't be disappointed...
This month's blog hop theme is inspired by the gorgeous new Sale A Bration Glimmer Papers- you know the ones- the pack of 3 colours of shiny glimmery glittery gorgeousness that has virtually every demo (and customer) visibly drooling!

And available for free with a £45 order... what's not to love! Want to see more of the shine? Then click here to see them in video action
So the pack inspired a Colour Challenge for our theme... so I bring you Bermuda Bay, Mint Macaron and Sweet Sugarplum... oh what a shame... 3 of my current favourite colours!! Perfect for Easter makes... And I went with a glitter theme!

First up... the Easter Trug basket... I picked up these boxes when I dropped off an order yesterday!! Wonder if Heidi will now want them back!! We reckon they are from Hello Fresh or Gousto or takeaway deliveries - so please let me know if you recognise them...as I would like some more!!
So a bit of up-cycling! Stamped a few Kraft card panels with the Hardwood stamp, cut to size and voila! Perfect...

Die cut a few Stylish Stems flowers and leaves using all 3 colours of the Glimmer paper and white or same colour cardstock.

Stamped the plant labels for the greeting using Thoughtful Banners (HAPPY) and Circle of Spring (easter) stamps - and then punched with the Classic Label punch ...
And a quick card to go with the basket... this HAPPY being from Perfectly Wrapped (this is the stamp I cut up into HAPPY and DAY!) and the stamped mat is a Stitched Shapes die cut square...
So that is it from me for today...

Time to pass you onto Karen Watt's Krafting K blog ...
OR Katy Harrison's The Stamping Shed blog if you are going in reverse  - or have missed one!
And as just requested - here is a list of all our participants and all their links...
6. Amanda Bates (You are here!)


Sunday, 5 April 2015

Garden Trugs using the Berry Basket die – and a Tutorial for an Extended Basket using less cardstock

Amanda Bates at The Craft Spa 606
Happy Easter to you all…I hope the Easter Bunny has been generous…
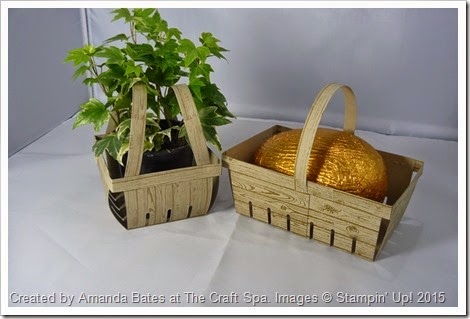
As my Easter Sunday Share - here is my Garden Trug range! With a tutorial for you too!
The extended double basket is slightly smaller than the previous double berry basket shared. I wanted the trug to fit my egg better so it wouldn’t roll around…but I kind of failed as the Egg is still slightly smaller than my trug! So much for my measurements!! But an oval aperture in an insert inside quickly fixes that!
But I did work out how to use less cardstock in the making of an extended basket! Details shared at the end of this blog post…
I also had a fail with the plant I bought for the single version too … the pot is slightly higher than the Berry Basket! So on the search for a lower pot….
So onto the extended Berry Basket…. see the link above for a video on a full Berry Basket…. but here are my tips…
Die Cut 2 Basket sides… Stamp as required…
Amanda Bates at The Craft Spa 524
Apply glue to one side of one Basket side ( I used Sticky Strip so you can see it!)
Amanda Bates at The Craft Spa 525
Adhere 2 Basket sides together… Note that I have positioned the sides so that all 6 slats are spaced apart equidistantly – which makes the basket narrower than the full Double Berry Basket version linked…
Amanda Bates at The Craft Spa 526
Cut 2 partial basket sides using 2 cardstock pieces of a minimum 3 1/2” Square size… I just used a scrap so it is slightly longer… Note I have just photoed one being cut so you can see what I am talking about…but you can easily do both at the same time (on top of each other or to each side of the die – or even cut one full side and then cut in half!)
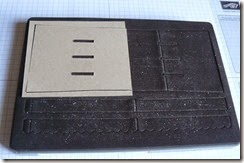
Amanda Bates at The Craft Spa 523
Apply glue to bottom side of partial bases
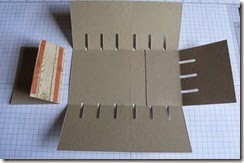
Amanda Bates at The Craft Spa 531
Adhere one to each short Basket side. You could then even cover this base with a card piece (mine would be a piece 3” x 5 1/2”)
Amanda Bates at The Craft Spa 532
And to finish off… you will need 3 of the die-cut straight basket tops in total ….
Amanda Bates at The Craft Spa 534
The long Basket sides of my extended Basket were 5 3/4”.
Amanda Bates at The Craft Spa 535
Add 1/2” to allow for the overage on either side of the Basket when assembled… Which makes 6 1/4”.
Amanda Bates at The Craft Spa 536
Trim one Basket top length so that it is 6 1/4” long plus the small end tab. ( see RH length in photo)
Adhere the other 2 (folded on the score-lines as the die intended) using the small tabs.
Amanda Bates at The Craft Spa 537
Trim the other long side as necessary as the last part of your assembly..
Amanda Bates at The Craft Spa 538
You will notice that I assembled the short sides first and then the long… easier for me to eyeball that way!
One other thing to note… this was another project rejected for my production-line Easter Baskets class… this time because of the stamping…. lining up the Hardwood slats in bulk would have proven far too hard!!