Wednesday 28 February 2018

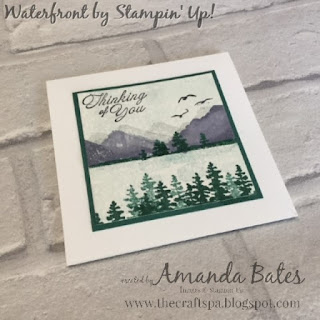
Waterfront Wednesday... on Watercolor Paper...

By using Watercolor Paper you add a natural texture...and can build a bit more of a scene with your Waterfront stamps as you can add more ink or blend with water in an Aqua Painter to soften or merge aspects together....

Though I was amused in classes ... as this was either the favourite or least favourite card to make... 
So what's different I hear you ask!!

(1) Clear Block stamping of sky with Soft Sky and Spritzer... though less ink and more water seemed to be the more successful combination for us on the Watercolor Paper... and I think most would have preferred just using the stamps! 

My sky on my original sample was beautiful... my next as demoed in class not so good!! But I quickly used my AquaPainter to move out and soften the ink... dabbing with a tissue as I went to soften even further... Panic over!

(2) Heightened front mountains to the right hand side... stamping one in Wisteria Wonder... then reinking and stamping another above and to the right to extend the height... and then doing a spot of blending with the Aquapainter to blend the 2 into one mass...
(3) Sea stamped in Soft Sky... in from the left and then in from the right to overlap slightly... leaving a white gap down the centre... just adds a bit of extra definition and clarity of the final trees...

(4) Tranquil Tide trees stamped from the bottom... ink up... stamp... then re-stamp behind and to the right to create more shadowy trees... then re-ink and repeat...  Starting with the shorter trees to the left and going across to the taller trees to the right... 

Greetings from Sale A Bration Heartfelt Blooms... birds from High Tide...both stamped in Memento Black

Rest of inky and stamping details as per this card here... 

Again on a 10.5cm (US Letter 4 1/4") small square card blank... 3" (7.5cm) Square Watercolor Paper panel with a 3 1/4" (7.5cm) Tranquil Tide mat...


Tuesday 27 February 2018

Small Square Springtime Foils Z Fold Card with Tutorial

So back to this card shared earlier and the details for you... as per a number of requests...

It has proven very popular via Pinterest...and "in the flesh" so I am happy to say that it will be one of the cards being made in March classes at The Craft Spa... just hope I can get enough Springtime Foils paper for everyone... as these are exclusively available for free with a £45 order...

So the card is a Small Square Z Fold card... though I had to tweak the measurements so that the paper sizes were the same as the Double Gatefold card shared here with the Tutorial... to keep class prepping easier...
But in hindsight ... I will just use inches for my next classes... but as this inches conversion (3 1/2" square) as shown in blue text is slightly smaller than my actual 9.8cm (3 7/8") square card.... I will go up to a 4" Square card for this one and use the 12x12 cardstock version for the Double Gatefold.... hence the 2nd inches/imperial measurements shown in green for you here! Yup.. that is definitely easier...

But if you like a smaller card... just follow the blue text instead!
Now in class everyone gets to choose the colour of the card blank... as long as it co-ordinates with one of the current Stampin Blends colours... so I used Calypso Coral...

Craft Spa Recipe
A4 Calypso Coral 19.6 x 9.8cm (7" x 3 1/2") or (8" x 4")
Paper Dots 4.5 x 9.3cm (x2) (1 1/2" x 3 1/2 [x2]) or (1 3/4" x 3 3/4" [x2])
Paper Flowers 9.3cm Square (3 1/4" Square) or (3 3/4" Square)
Thick Whisper White 6cm (2 1/2") Square (for die-cutting the Stitched Square)

Dies - Stitched Shapes Framelits
Stamps - Picture Perfect Birthday
Ink - Versamark & Copper Embossing Powder
Embellishments - Tutti Frutti sequins
Ribbon - Silver Metallic Edge (16"). Though the Gold/Vanilla one would probably work better

Craft Spa Tutorial
1. Score LANDSCAPE Calypso Coral at 4.9 & 9.8cm (1 3/4", 3 1/2") or (2" & 4")
2. Bone Fold as a Z Fold (ie mountain/peak for front (1/4 way) score line and valley for central/half-way score line

3. Copper emboss the greeting on the Whisper White panel
4. Die cut as 2nd largest Stitched Shapes square

5. Colour flower papers as desired using Stampin Blends
I used the Dark and Light Calypso Coral and Old Olive Blends... and found that part colouring the image with my Light Blend, then adding some Dark Blend on top as a highlight... and then blending out in a circular motion with the thin end of my Light Blend worked best for me... and the paler flowers were just coloured using the Light Calypso Coral marker...

6. Add Stampin Blends spots to the spotty papers...
I used both Dark & Light Calypso Coral Stampin Blends... thin end...
7. Colour length of White Metallic Ribbon...
I carefully and lightly dragged the thick end of my Dark Calypso Coral Stampin Blend along the length of the ribbon... only one pass required...

8. Colour Tutti Frutti sequins with Stampin Blends... delicate touch with brush end easiest...
I used the Dark Calypso Coral & Dark Old Olive on the yellow sequins - 3 Coral and 2 Olive)

9. Adhere papers
10. Adhere Stitched Square (think about where you don't want your glue!)

11. Cut Ribbon in half... wrap one half around left hand side of card... starting at the front from the  the top left corner of the Stitched Square...
12. Make a bow and cover where you started...
13. Add a coloured sequin to the centre of the bow...
I used a Calypso Coral one on my card...so you probably can't see it!

14. Add the other sequins to your card...
Mine has 2 on the Stitched Square and 2 on the flowers paper to the top and right so you can see them when the card is closed...

Monday 26 February 2018

Super Simple Misty Waterfront Trees...

So back to the wonderful Waterfront stamp set...

This card was the ice breaker in classes... a few simple inks and "strokes" of the stamps... and a simple little square card was born! In less than a minute...

So just Memento Black and Soft Sky ink pads...
And a very quick step by step!

(1) Ink up "single line" stamp with Memento Black... stamp just below half way down at the right hand side...and just over half way across from the right hand side...

(2) Clean your stamp!!!! Re-ink in Soft Sky...

(3) Stamp in from left hand side.. so that you fill in the horizon...

(4) Re-ink and stamp 2-3 more single lines under your land mass... to the right hand side... decreasing the amount stamped in from the right hand side each time...

(5) Ink up your "sea squiggle" stamp in Soft Sky... stamp off onto scrap paper... and stamp your sky up from the horizon... straight edge to the bottom...

(6) Ink up your "sea squiggle" stamp again... stamp off.. and stamp over your tree trio... and so raise the sky line...
Finished off with a Memento Black greeting from the Sale A Bration free and exclusive Heartfelt Blooms set... though in class everyone could add whatever greeting they wished to use...

10.5cm Square card blank... 7.5 cm square Whisper White stamping panel... 8cm square Basic Black mat... OR US Letter 4 1/4" card blank... with 3" square White panel... and 3 1/4" Black mat...

Love this one... even with my inky mistake!!
Spot the somewhat more greyish Soft Sky sea line to the left of the land mass... oops! Had to quickly clean my Memento Black off my Soft Sky pad with a baby wipe quickly after this!

Sunday 25 February 2018

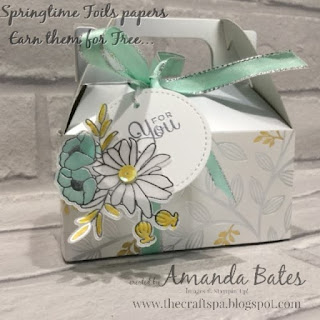
Springtime Foils & Sweet Soiree Silver Gable Box

Lovely merger of a few products... including a Stitched Shapes circle frame of course!

Mini Silver Gable Box... with a 2" high paper wrap using the 12x12 Sale A Bration Springtime Foils paper (these papers are only available free with a £45 order) ... 

Tied up with Pool Party Stampin Blends coloured Silver Metallic Edge 3/8" Ribbon... which covers the slight gap you have from the 12" length of paper...
Finished off with a Stitched Shapes die cut circle... silver embossed with a greeting from Cake  Soiree... 

Plus one of the vellum Sweet Soiree Embellishments (coloured with Stampin Blends and a quick add of a yellow Tutti Frutti Adhesive Backed Sequin to define the daisy)... 

All tied on with a bit of Silver Bakers Twine 
Lovely box... and thanks to the Stampin Up Events Team as we made one of these using Sweet Soiree papers at the last On Stage event... too good not to CASE for some of this years Easter treats...

Saturday 24 February 2018

Waterfront ... out of the Frame...

So ... some of the classes here last week were focused on the Waterfront stamp set... with the chance to go step by step as everyone had the stamps! Which is something that has not happened for a while...

I think this card was my overall favourite... but there again I do have a thing about going "out of the frame"
Again a 10.5cm (US Letter 4 1/4") small square card blank... with a 7cm (2 3/4") Soft Sky mat...

Stamping details pretty much as per this card... apart from

(1) sticking the die cut largest Stitched Shapes square frame straight onto the card blank with temporary glue before doing all the stamping... and yes you do get gaps at either side... but that it what the 7cm (2 3/4") Soft Sky mat covers up!

(2) Wisteria Wonder mountains twice... in from the left and then in from the right...  with 2nd stamping ones behind too (ie ink & stamp... say the mountains coming in from the left... then lift your stamp up... raise slightly upwards and shift to the left slightly... then stamp... with no inking in between aka 2nd Stamping... )
(3) Smoky Slate mountains in the centre... to the back... with 2nd stamped ones behind those to the right and to the left... which means that the second lot of paler mountains were inked and then "stamped off" onto scratch paper before stamping onto my scene...

(3) the addition of a little line to define the land/horizon... which makes such an enormous difference! Simply a partial inking of the "single line" stamp... ie place the stamp along the edge of the Tranquil Tide inkpad so that you only ink about 1-2 mm (1/16" ish!) on the edge of the stamp... and then use that inked area along your horizon line... in from the left...  and then in from the right...

Though beware of "unintended clear block inking disasters"... having a tissue at the ready to clean your block is definitely a good idea!!! Says 8/10 people here this week... including me virtually every time!! Single line and mountains too...
(4) Greetings from the Sale A Bration Heartfelt Blooms stamp set in Memento Black... I really do love the greetings in from the set... the flowers appear to be Marmite! You either love or hate them... but please look past them at the greetings if you are a hater! They are free with a £45 order after all...

(5) No sun... no sky...

(6) Birds from High Tide... and yes I did quickly snip my "flock of birds" stamp into two... as I do so like the little trio in my Waterfront scenes... and not just for covering "blobs" (which is why I used them in the first place!)

And here are a couple with different greetings...both from Heartfelt Blooms...
And for those of you looking for some of the others I have just posted on Facebook... click on the photo below to go to the details for that card... 


Friday 23 February 2018

Fancy Fold Friday Tutorial for Large Square Pop Out Swing Card - The Fully Opening version...

So having re-made some Pop Out Swing cards... or Lever cards as they are also known... for class projects last month... I went back to the drawing board ... as my original design does not fold out flat when assembled... and you know that I prefer a card that opens out fully! And I also wanted to have apertures in different shapes to the standard square too...

So here is the first... in quite a long series of card shares over the next few weeks...

And seeing as it is Fancy Fold Friday today... here is the step by step tutorial for you... for the Large Square (5 1/2" or 14cm) Pop out Swing Card (Fully Opening!) In both centimetres (metric) and inches (imperial)...
But I will admit that getting these to fully open was a real tweak with the measurements!  Which is code for some precise cutting and scoring dimensions being required! Thank heavens for the Personal Trimmer to make it all easy! 

Also slightly different mat size increments compared to my standard 5mm/ 1/4" ones...

PS If you prefer it to not fully open...  and/or you prefer simpler scoring/cutting measurements! Click here for the original 14cm/5 1/2" Square Card tutorial...  Or click here for the 6" Square Card from 12x12 cardstock... both with a standard square aperture...
Craft Spa Recipe
Card Blank - Cardstock Thick Whisper White 28 x 14cm (11" x 5 ½" )
Insert - Cardstock Powder Pink 20.4 x 13.6cm (7 7/8" x 5 1/4")
Tabs - CS Thick Whisper White 2 x 13.6cm (3/4" x 5 1/4") (x2)
Paper for Front of Card 13.2cm Square (5" Square)
Paper/Card for Inner Panel 6.4 x 13.2cm (2 3/8" x 5")
Card for stamping front centre panel 8 x 9.9cm (3 1/4" x 4")

Papers- Springtime Foils... Available exclusively and for free during the Sale A Bration promotion
Dies - Cafe Builder

Note that normally I would have added a Powder Pink mat to the front of the card... but the metal dies will not fit through 3 layers of card and paper to cut the aperture in one go... so I didn't! As I sadly couldn't! And lining up this die shape twice on separate pieces of card/paper would definitely have been too hard!
Craft Spa Instructions
1. Score LANDSCAPE larger (white for this card) card blank panel at 14cm (5 ½”) Bone Fold.
Tabbed Pop Out Swing Card Tutorial, Amanda Bates @ The Craft Spa 001
2. Score smaller (Powder Pink for this card) insert panel at 6.8 & 13.6cm (2 5/8" & 5 1/4")
3. Bone Fold as concertina/Z-fold ( ie one as mountain & 1 as valley fold)
Tabbed Pop Out Swing Card Tutorial, Amanda Bates @ The Craft Spa 002
4. Score 2 smallest (white) panels at 6.8cm (2 5/8")

5. 
Adhere paper to front of card blank...
6. Die cut Aperture in card blank front  …
Tabbed Pop Out Swing Card Tutorial, Amanda Bates @ The Craft Spa 004
7. Adhere Z folded panel to RHS of open card blank (note: valley fold of Z Fold panel to LHS when stuck )
Tabbed Pop Out Swing Card Tutorial, Amanda Bates @ The Craft Spa 008
8. Fold over front of card blank. (with Z folded panel folded)
9. Apply glue through aperture to top of Z fold panel ( ie to RHS of aperture) Note I have used Sticky Strip just so you can see where the glue needs to be…..
Tabbed Pop Out Swing Card Tutorial, Amanda Bates @ The Craft Spa 009
10. Adhere stamped and die-cut wreath through the aperture (making sure it can swing through the aperture)
 Tabbed Pop Out Swing Card Tutorial, Amanda Bates @ The Craft Spa 010Tabbed Pop Out Swing Card Tutorial, Amanda Bates @ The Craft Spa 015
So now for the Tabs to attach it all together….. and allow it all to pop out and swing…

10.Open up Card blank. Open out Z folded panel to the right.
 Tabbed Pop Out Swing Card Tutorial, Amanda Bates @ The Craft Spa 016
11. Apply Glue to one side of the 2 Tabs
Tabbed Pop Out Swing Card Tutorial, Amanda Bates @ The Craft Spa 017
12. With folded edge of Tabs to outer/RH edge of Z panel - adhere one side of Tabs to top and bottom of Z fold insert panel  (ie above and below the die cut panel) ensuring that these tabs are clear ...

(a) above and below the aperture shape
and
(b) the Z fold insert panel LHS score line.
Trim if necessary
 Tabbed Pop Out Swing Card Tutorial, Amanda Bates @ The Craft Spa 018
13.Fold top layer of Z Fold panel back over & open the Tabs out towards the central score line of the card blank.
  Tabbed Pop Out Swing Card Tutorial, Amanda Bates @ The Craft Spa 019
Check that the Tabs will clear the central score line of the card blank.
Tabbed Pop Out Swing Card Tutorial, Amanda Bates @ The Craft Spa 020
Trim if necessary
Tabbed Pop Out Swing Card Tutorial, Amanda Bates @ The Craft Spa 021
14. With the Tabs opened out, apply glue to top side ( ie facing you)
Tabbed Pop Out Swing Card Tutorial, Amanda Bates @ The Craft Spa 022
14. Fold front of card blank shut to close down onto tabs
Tabbed Pop Out Swing Card Tutorial, Amanda Bates @ The Craft Spa 023
And there you have it…one safely attached swing out card mechanism….
Tabbed Pop Out Swing Card Tutorial, Amanda Bates @ The Craft Spa 024Tabbed Pop Out Swing Card Tutorial, Amanda Bates @ The Craft Spa 025
Now depending on the colours you have used for the card blank and the insert panel... some of you won’t like the fact that you can see the Tab on the back of the white Z folded panel…
Tabbed Pop Out Swing Card Tutorial, Amanda Bates @ The Craft Spa 026
3 ways to work round that …
(1) have the card blank and tabs in the same colour (as I have with this card) so that you can't see the colour difference when you open the card... 
(2) have the card blank and Z folded insert panel all in the same colour ... so no colour difference anywhere!
(3) cut two extra 2 x 6.8cm (3/4" x 2 5/8") Tabs in the same colour as your Z Fold insert panel…and just stick over the top!
Tabbed Pop Out Swing Card Tutorial, Amanda Bates @ The Craft Spa 030
Tabbed Pop Out Swing Card Tutorial, Amanda Bates @ The Craft Spa 031
Look vanished! 

So there you have it… finish off your decoration to the front section… and you have a simple looking card with a WOW on opening… and it is simple to make too… especially by the third run...

Thursday 22 February 2018

Springtime Foils Double Gatefold Card & Tutorial

Such a simple card... but everyone loved this one...

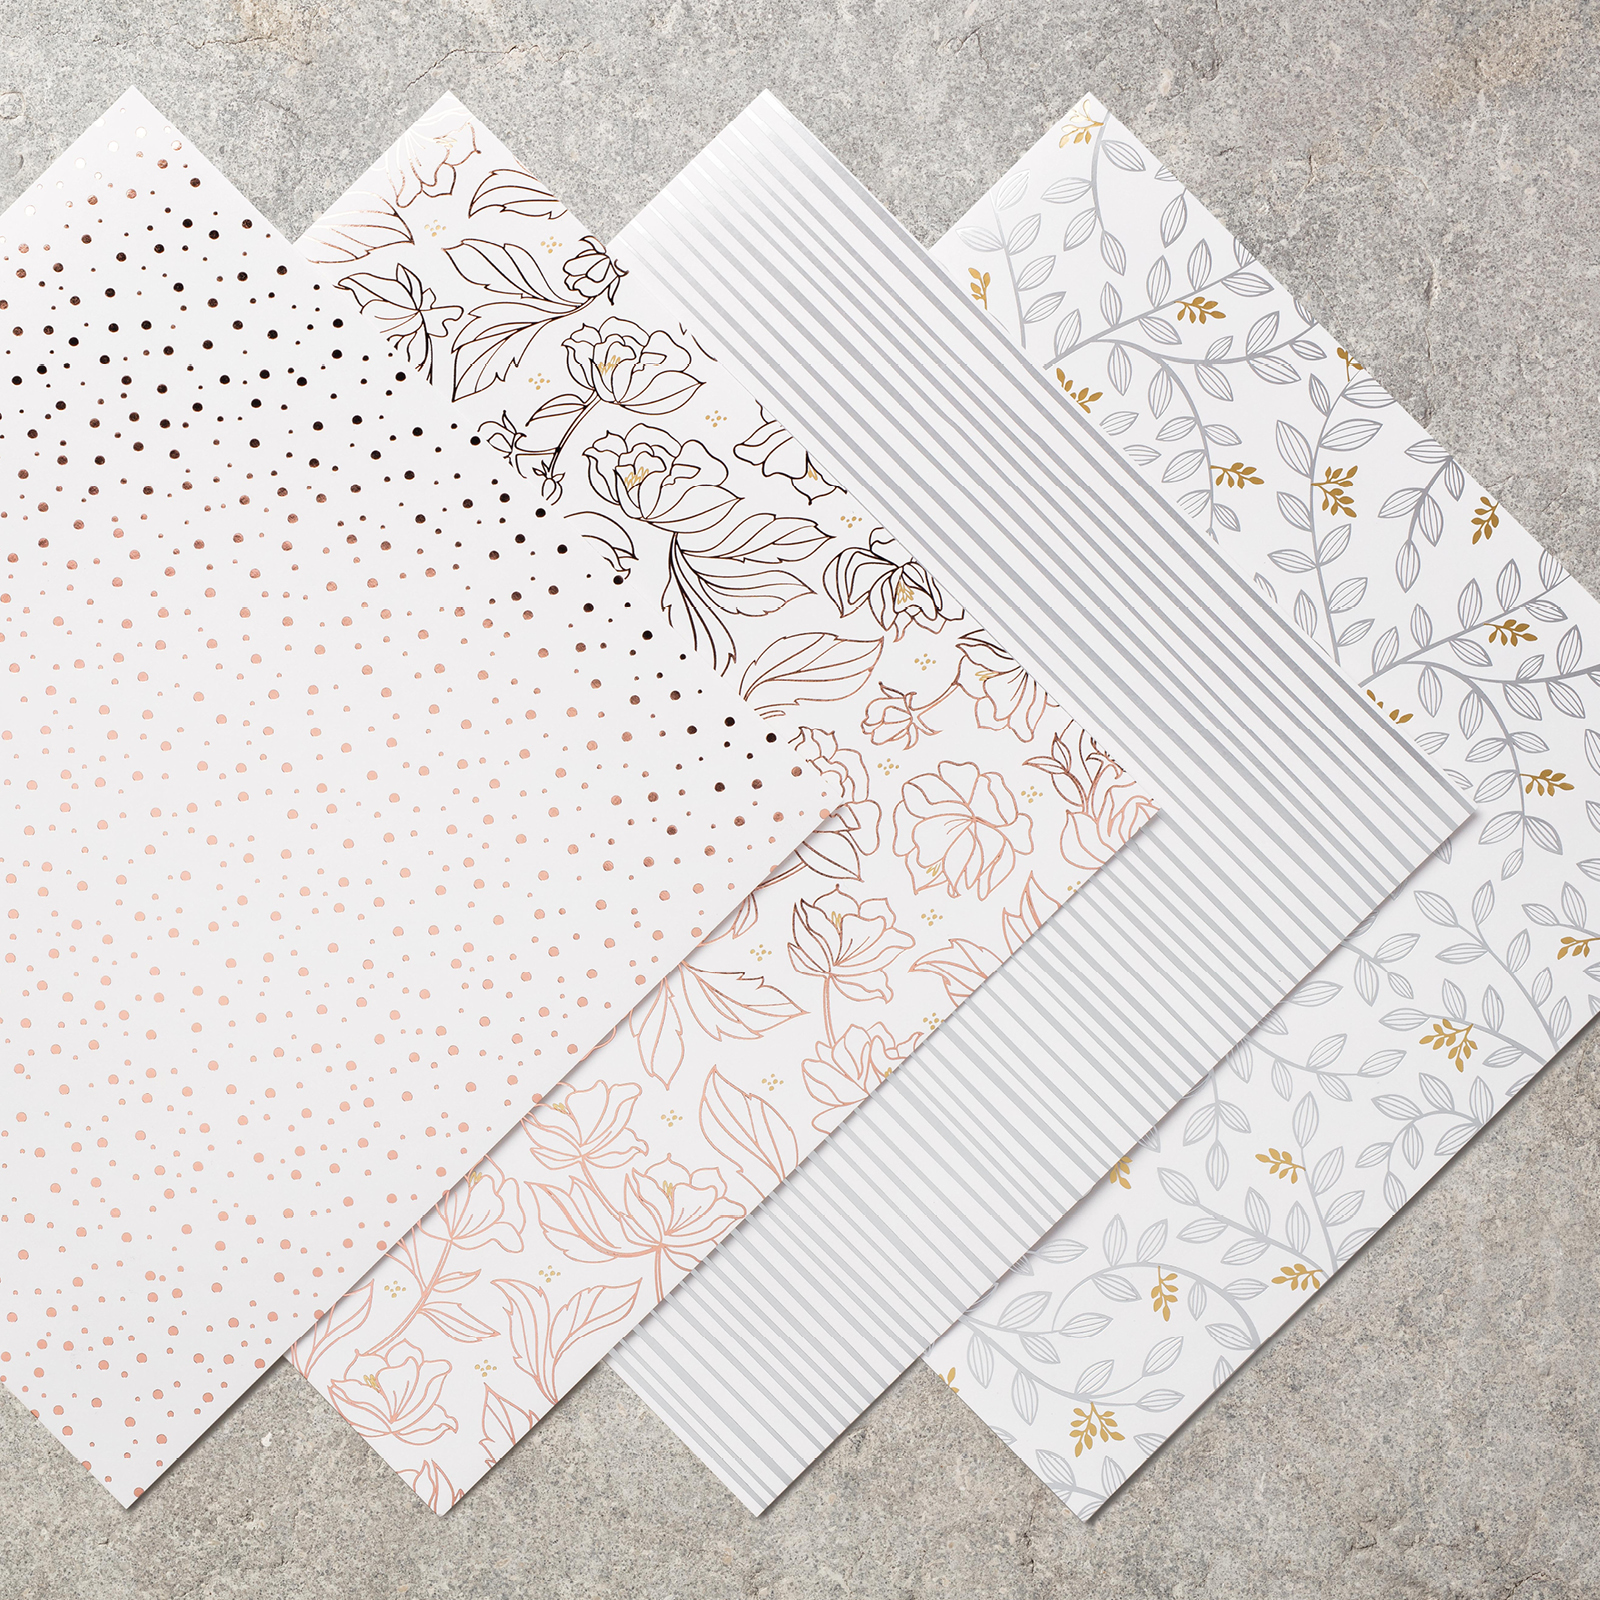
Thanks to the wonderful Springtime Foils foiled papers that can be yours exclusively for free during Sale A Bration... one pack for every £45 ordered...
And a quick tutorial for you... well actually three versions... from A4 card, US Letter card...and then from the easier for us all 12x12 card...

Note that I trimmed a small amount off my A4 card length as I didn't want to have to tell everyone to do 1/2 mm (1/32"ish) line ups on their trimmer in class!!
Note that these 2 papers are actually Rose Gold foiled... but I find that the Copper Embossing Powder is similar in colour... though I would not have been so happy to use the Copper Foil with it... 
Springtime Foils Specialty Designer Series Paper
Craft Spa Recipe (A4 card)
A4 Pink Powder card 29.4 x 9.8cm (or whatever colour you fancy!)
Paper Dots 4.5 x 9.3cm (x4)
Paper Flowers 9.3cm Square
Thick Whisper White 6 cm Square (x2) for die cutting
Stitched Shapes Framelits
Perennial Birthday (greetings)

Craft Spa Tutorial (A4 card)
1. Pink card LANDSCAPE (ie long side along top)
2. Score at 4.9, 9.8, 19.6 and 24.5cm
3. Bone Fold Mountain/Valley/Valley/Mountain

4. Die cut 2 of the second largest Stitched Squares
5. Copper emboss greetings

6. Adhere papers
7. Adhere one Stitched Square (Tip - think where you DON'T want your glue!)
8. Open and reclose your card blank so that the stuck on Stitched Square frame is behind half of your card blank
9. Adhere other Stitched Square lining up perfectly over first one... (Same tip re glue!)

10. Colour and fussy cut a flower (I used Stampin Blends dark & light Pink Pirouette here)
11. Adhere...
And for my US Followers... from US Letter sized cardstock... although it would be a bit smaller than mine... I would do... 

Craft Spa Recipe (US Letter)
US Letter Pink Powder card 10 1/2" x 3 1/2" (or whatever colour you fancy!) 
Paper Dots 1 1/2" x 3 1/4" (x4)
Paper Flowers 3 1/4" Square
Thick Whisper White 2 1/2" Square (x2) for die cutting
Stitched Shapes Framelits
Perennial Birthday (greetings)
Copper Embossing Powder & Versamark

Craft Spa Tutorial (US Letter)
1. Pink card LANDSCAPE (ie long side along top)
2. Score at 1 3/4", 3 1/2", 7", 8 3/4"
3. Bone Fold Mountain/Valley/Valley/Mountain

4. Die cut 2 of the second largest Stitched Squares
5. Copper emboss greetings

6. Adhere papers
7. Adhere one Stitched Square (Tip - think where you DON'T want your glue!)
8. Open and reclose your card blank so that the stuck on Stitched Square frame is behind half of your card blank
9. Adhere other Stitched Square lining up perfectly over first one... (Same tip re glue!)

10. Colour and fussy cut a flower (I used Stampin Blends dark & light Pink Pirouette here)
11. Adhere...
Or of course... it would actually be easier for us all with 12x12" cardstock... with the card being slightly larger than mine! Think my next class prep will be using this version if I can get enough of the 12x12!

Craft Spa Recipe (12x12 card)
Pink Powder card 12" x 4" (or whatever colour you fancy!)
Paper Dots 1 3/4" x 3 3/4" (x4)
Paper Flowers 3 3/4" Square
Thick Whisper White 6 cm/2 1/2" Square (x2) for die cutting
Stitched Shapes Framelits
Perennial Birthday (greetings)

Craft Spa Tutorial (12x12 card)
1. Pink card LANDSCAPE (ie long side along top)
2. Score at 2", 4", 8" & 10"
3. Bone Fold Mountain/Valley/Valley/Mountain

4. Die cut 2 of the second largest Stitched Squares
5. Copper emboss greetings

6. Adhere papers
7. Adhere one Stitched Square (Tip - think where you DON'T want your glue!)
8. Open and reclose your card blank so that the stuck on Stitched Square frame is behind half of your card blank
9. Adhere other Stitched Square lining up perfectly over first one... (Same tip re glue!)

10. Colour and fussy cut a flower (I used Stampin Blends dark & light Pink Pirouette here)
11. Adhere...