Showing posts with label Small Card. Show all posts

Monday, 14 May 2018

Pinks Petal Passion Pop out Swing card

Another version of the wee little A7 Pop Out Swing card for which the Tutorial was shared here...
So just more colour added to the Petal Passion papers & extra Lots of Happy flowers...

And here you have the coloured and uncoloured versions side by side... which do you prefer?

Saturday, 28 April 2018

Super CAS Hopeful Thoughts

Now I did actually share this the other day in my "Sad to see these Going Part 2" round up post... but I have just realised that I never actually posted it with the details on the blog...

So here you go.... a real quickie but with atmosphere card... suitable for any occasion... featuring Hopeful Thoughts (aka Thoughts & Prayers)
Small Square Thick Whisper White card blank (A4 10.5cm/ US Letter 4 1/4") with a 8cm/3 1/8" Basic Black mat and a 3" (7.6cm) Watercolor Paper panel.
Dapper Denim ink [retiring] applied with an Aqua-painter for the background
Tree and part-greeting stamped in Basic Black (Archival[retiring] or Memento)
For the part-greeting - I masked off the part of the greeting that I didn't want with a sticky/post-it note... inked up the stamp... removed the sticky note... and stamped... though alternatively I could have inked up the part I did want with a Basic Black marker pen...


Friday, 27 April 2018

A7 Pop Out Swing Card with Tutorial aka The Small, Wee One!!

Definitely a card on the cute scale in the flesh!! Proving that small can be so beautiful!!
And seeing as it is Fancy Fold Friday... here's a tutorial for you...
Craft Spa Recipe
And sorry to my US followers as this is very specific to rest-of-the-world A4 card/C7 envelopes and centimetres measurements... as preciseness is key... I will try to convert for a sensible card from US Letter cardstock/envelope... but in the meantime can anyone tell me the size for a standard US envelope about half your A2 size!?

Card Blank - Thick Whisper White -14.8 x 10.5cm  (5 7/8" x 4 1/8")
Inner Panel - Thin Whisper White- 10.8 x 10.1cm
Tabs - Thin Whisper White- 7.2 x 1.3cm (x2)

Paper Front 7cm x 4" (10.1cm)
Paper In-Sides 3.2 x 9.7cm (x2)

(D) Basic Black Card 5cm x 6cm  
(St) White Card 4.5cm x 10cm pp

where (D) is for die- cutting and (St) is for stamping & punching and pp is per person

SU! Products used
Petal Passion Papers (RETIRING SOON)
Lots of Labels dies (RETIRING SOON)

Everyday Label Punch
Lots of Happy Card Kit stamps (fussy cut flowers)
Perennial Birthday (greeting)

Tutorial
  1. Place larger (Card Blank/14.8cm L) cardstock panel LANDSCAPE onto trimmer
  2. Score at 7.4cm
  3. Bone fold (valley)

  4. Place smaller (Inner Panel /10.8cm L) cardstock panel LANDSCAPE onto trimmer
  5. Score at 3.6 & 7.2cm
  6. Z Bone fold (mountain/valley)

  7. Place smallest (Tabs/7.2cm L) cardstock LANDSCAPE onto trimmer (x2)
  8. Score at 3.6cm (x2)
  9. Bone fold (mountain) (x2)

  10. Decorate all panels.... 
  11. Die cut front of Card Blank (Tip for easier/straighter cutting...
    I used a piece of Grid Paper and marked out a 3.7cm line (ie half of the 7.4cm width) to aid the eye... this was temporarily stuck onto the underside of my thin (Metallic die) plate so everyone could use it all the classes... worked like a charm!
  12. Die cut Basic Black Lots of Labels frame

  13. Stamp greeting AND Everyday Label Punch 
  14.  Faux Stitch using thin end of your Basic Black Stampin Marker (Tip- just draw 3 stitches at a time- easier and faster - and neater too!!

    NOTE - this Tutorial assumes that you have already created a Pop Out Swing card and so know how to stick the parts & Tabs in ...  but if not... then please visit this Tutorial here for further pictorial instruction...  points 7-17
  15. Adhere Z folded Inner Panel to RHS of open card blank (note: valley fold of Z Fold panel to LHS when stuck )
  16. Fold over front of Card Blank. (with Z folded panel folded)
  17.  Apply glue through aperture onto top of Z fold panel (ie to RHS of aperture) 
  18. Adhere Basic Black Label frame

  19. Open up Card blank. Open out Z folded panel to the right.
  20. Adhere 2 Tabs to top and bottom (fold to outside)
  21. Open up Z fold section with Tabs out to left, apply glue on top of Tabs and fold Card Blank onto the glued Tabs

  22. Adhere all other parts... 

Tuesday, 27 February 2018

Small Square Springtime Foils Z Fold Card with Tutorial

So back to this card shared earlier and the details for you... as per a number of requests...

It has proven very popular via Pinterest...and "in the flesh" so I am happy to say that it will be one of the cards being made in March classes at The Craft Spa... just hope I can get enough Springtime Foils paper for everyone... as these are exclusively available for free with a £45 order...

So the card is a Small Square Z Fold card... though I had to tweak the measurements so that the paper sizes were the same as the Double Gatefold card shared here with the Tutorial... to keep class prepping easier...
But in hindsight ... I will just use inches for my next classes... but as this inches conversion (3 1/2" square) as shown in blue text is slightly smaller than my actual 9.8cm (3 7/8") square card.... I will go up to a 4" Square card for this one and use the 12x12 cardstock version for the Double Gatefold.... hence the 2nd inches/imperial measurements shown in green for you here! Yup.. that is definitely easier...

But if you like a smaller card... just follow the blue text instead!
Now in class everyone gets to choose the colour of the card blank... as long as it co-ordinates with one of the current Stampin Blends colours... so I used Calypso Coral...

Craft Spa Recipe
A4 Calypso Coral 19.6 x 9.8cm (7" x 3 1/2") or (8" x 4")
Paper Dots 4.5 x 9.3cm (x2) (1 1/2" x 3 1/2 [x2]) or (1 3/4" x 3 3/4" [x2])
Paper Flowers 9.3cm Square (3 1/4" Square) or (3 3/4" Square)
Thick Whisper White 6cm (2 1/2") Square (for die-cutting the Stitched Square)

Dies - Stitched Shapes Framelits
Stamps - Picture Perfect Birthday
Ink - Versamark & Copper Embossing Powder
Embellishments - Tutti Frutti sequins
Ribbon - Silver Metallic Edge (16"). Though the Gold/Vanilla one would probably work better

Craft Spa Tutorial
1. Score LANDSCAPE Calypso Coral at 4.9 & 9.8cm (1 3/4", 3 1/2") or (2" & 4")
2. Bone Fold as a Z Fold (ie mountain/peak for front (1/4 way) score line and valley for central/half-way score line

3. Copper emboss the greeting on the Whisper White panel
4. Die cut as 2nd largest Stitched Shapes square

5. Colour flower papers as desired using Stampin Blends
I used the Dark and Light Calypso Coral and Old Olive Blends... and found that part colouring the image with my Light Blend, then adding some Dark Blend on top as a highlight... and then blending out in a circular motion with the thin end of my Light Blend worked best for me... and the paler flowers were just coloured using the Light Calypso Coral marker...

6. Add Stampin Blends spots to the spotty papers...
I used both Dark & Light Calypso Coral Stampin Blends... thin end...
7. Colour length of White Metallic Ribbon...
I carefully and lightly dragged the thick end of my Dark Calypso Coral Stampin Blend along the length of the ribbon... only one pass required...

8. Colour Tutti Frutti sequins with Stampin Blends... delicate touch with brush end easiest...
I used the Dark Calypso Coral & Dark Old Olive on the yellow sequins - 3 Coral and 2 Olive)

9. Adhere papers
10. Adhere Stitched Square (think about where you don't want your glue!)

11. Cut Ribbon in half... wrap one half around left hand side of card... starting at the front from the  the top left corner of the Stitched Square...
12. Make a bow and cover where you started...
13. Add a coloured sequin to the centre of the bow...
I used a Calypso Coral one on my card...so you probably can't see it!

14. Add the other sequins to your card...
Mine has 2 on the Stitched Square and 2 on the flowers paper to the top and right so you can see them when the card is closed...

Sunday, 18 February 2018

Charming Cafe Wreath Card... and a colour challenge...


A quick little share of a card made for a Team Colour Challenge... though I didn't think I would get time to create anything as I am on a 4 class creating marathon this week...

But the colour combination was too good not to play... Night of Navy, Soft Sky, Chocolate Chip, Crumb Cake and Tranquil Tide... completely "up my street"...

Though some of you may spot that I did actually forget to use Tranquil Tide and Chocolate Chip!! I blame the fact that I was using Stampin Blends and so had to use Memento Black Ink... though that is a white lie... as I did just forget!
And I do have to laugh at myself... 3 stamp sets on such a simple card!!!  

I had made and coloured the Charming Cafe wreath parts and Lots Of Happy flowers & leaves earlier in the week... and then I used my "chopped up" Perennial Birthday greeting stamp when pulling it all together today... as that happened to be out looking at me... 

More details on my greeting stamp "chop up" here...
Oh and I also forgot the Soft Sky bit too... and popped my panel onto a Pool Party card blank at the very last minute! 

In fact it was a bit of a comedy of errors... as I made another minor mistake too... but I will admit to that when I create what was intended... as I am being quite picky with myself... 
Luckily I love my simple little card! Mistakes and all... So I am quite happy for a quick re-make along the same lines...

Friday, 16 February 2018

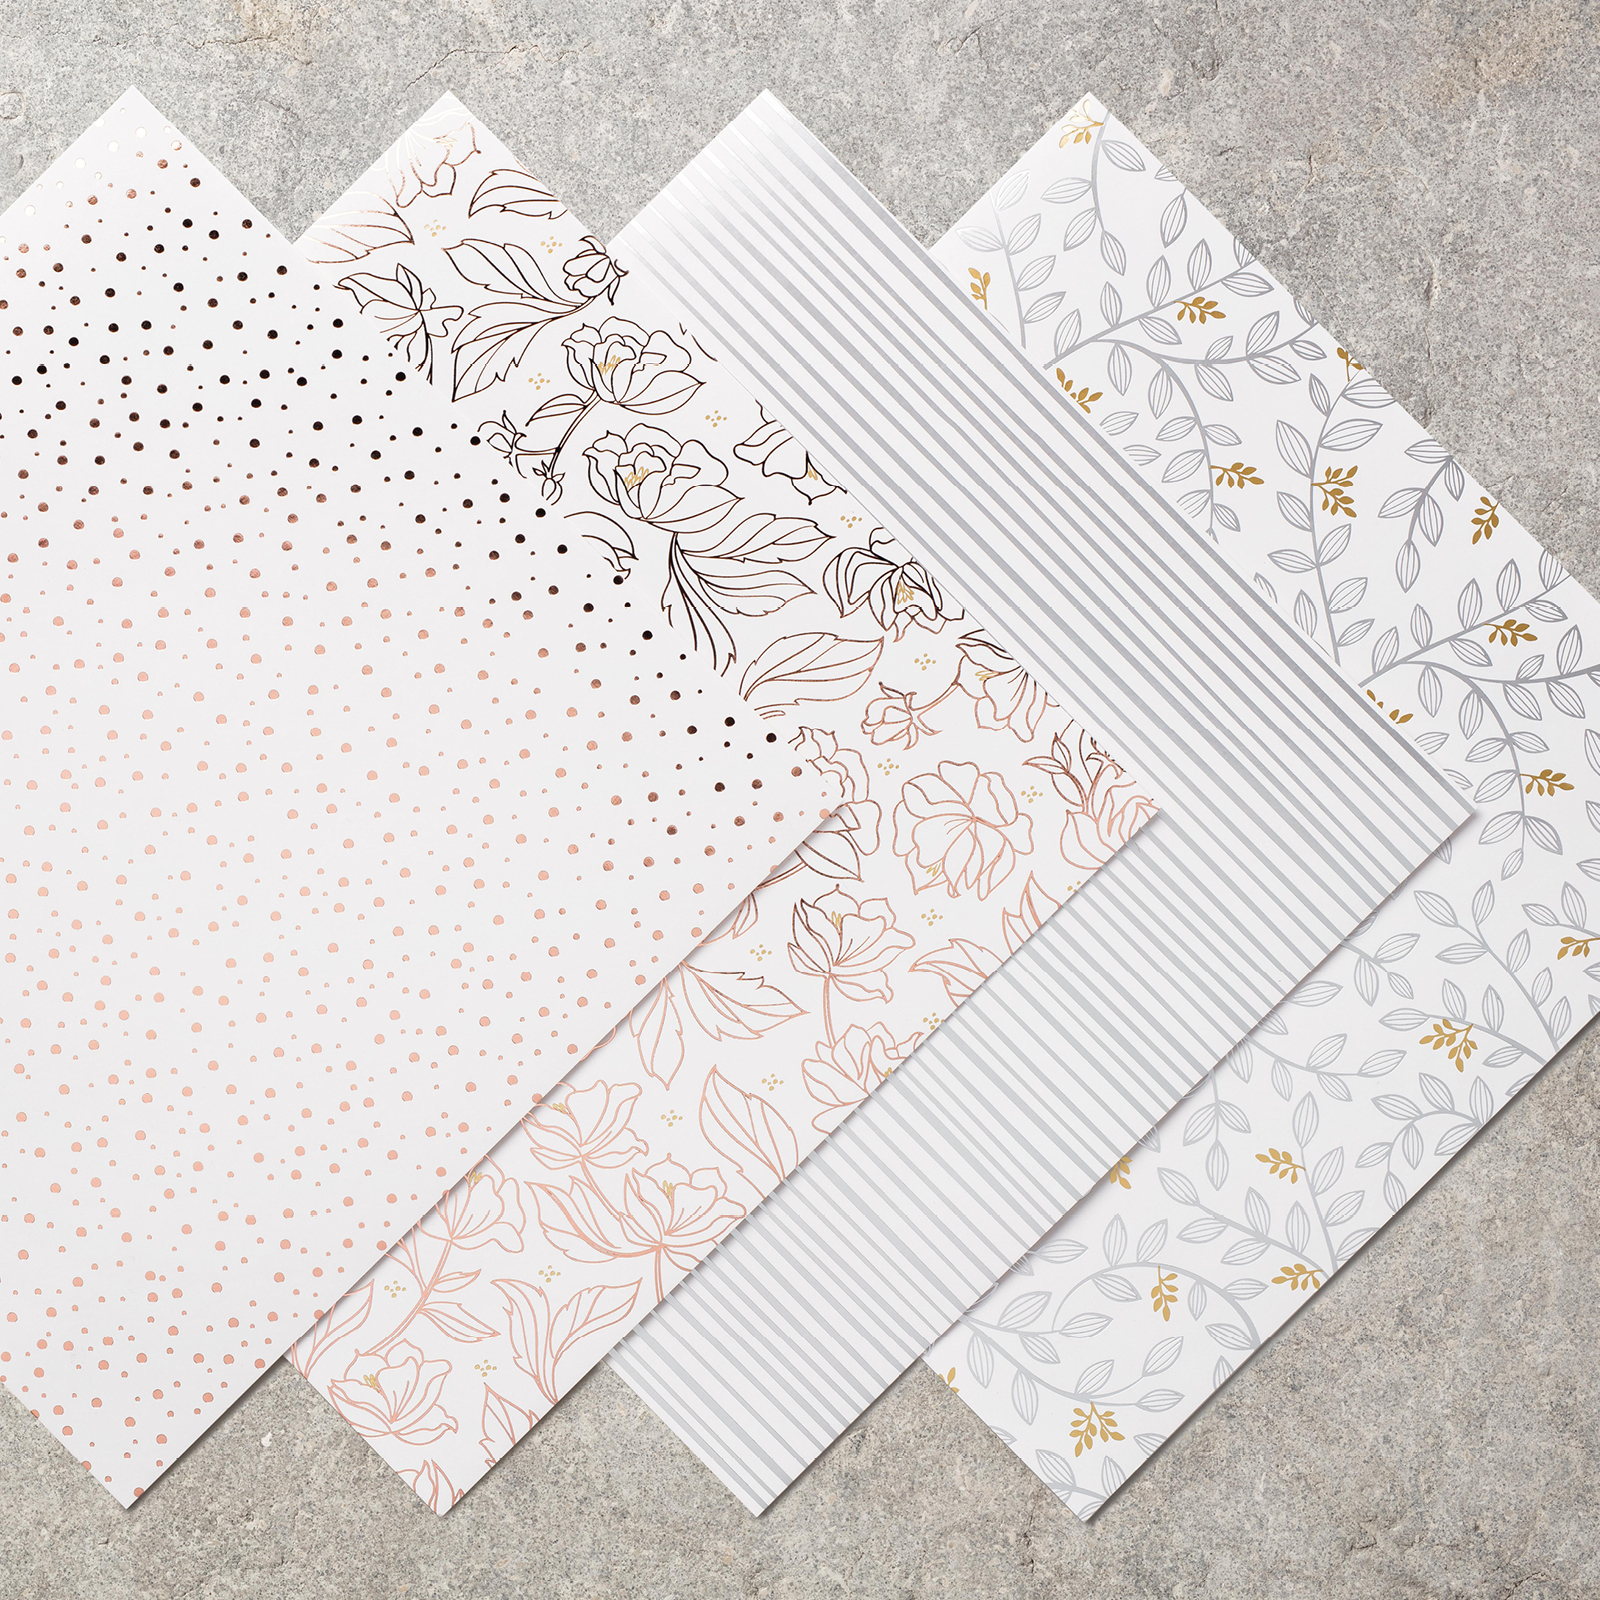
New Sale A Bration Springtime Foils papers

What can I say... these Springtime Foils speciality papers are SO stunning... hope Stampin' Up! have lots and lots in stock...as I have a feeling these are going to be enormously popular!

EDITED TO ADD... Card Tutorial now posted here... 
Exclusive to the Sale A Bration promotion... so earn one pack for free with every £45 ordered... Just pop to my Online Store to earn yours straightaway and be at the front of the queue...

Use them plain... or colour them up as I have here... what is not to love!

And here are the 4 patterns for you... 3 sheets of each in a pack...
Springtime Foils Specialty Designer Series Paper
I will be back with the details of this card another day... and hopefully a better photo... sorry really must dash today!


Sunday, 21 January 2018

Picture Perfect Birthday Gift Bow Narrow Gift card

I am loving the new Whisper White Narrow Notecards and Envelopes... and great seeing as my class ladies seem to be on their "do it small" kick for the New Year!

So a simple little card for you today... with Berry Burst and Pool Party/Bermuda Bay gift bows using the two-step stamping pair from the Picture Perfect Birthday stamp set... love the wording in this set... truly great little set...
And again those little Stampin Spots work a treat... aren't these a lovely little colour set...
Spot that I stamped off my Berry Burst inked "filler" stamp onto scratch paper before stamping/filling in the bows... ie using the top right stamp in the set image above
As Stampin Up says about these notecards...
Make someone smile by sending them a note on one of these cute little cards. 
* Small and narrow 
* 20 Thick Whisper White cards and 20 envelopes 
* Note card: 2-1/2" x 4-1/2" (6.4 x 11.4 cm) 
* Envelope: 2-3/4" x 4-3/4" (7 x 12.1 cm)


And as my local Post Office says... 
Fine to post in the UK... but be aware that smaller envelopes can get lost in the system more easily... so you may wish to pop into a standard sized envelope if it is something important...
And an admittance... my ladies last week didn't realise these were gift bows.... which is code for a completely different usage for these coming sometime soon... 

Wednesday, 28 June 2017

A CUTE Whole Lot of Lovely Trio!

Love these little A7 cards... so much so I had to create 3 with my Whole Lot of Lovely paper leftovers!... I think you can safely say I don't have a lot left from my 6x6 training kit....

So what is an A7 card... well half an A6 one in size... so 4 cards from one sheet of A4... what is not to love!
(1) Pick up a piece of A4 card
(2) Cut in half  PORTRAIT (short edge along top) at 10.5cm
(3) Cut in half  LANDSCAPE (long edge along top) at 14.8cm (so you now have a 14.8 x 10.5cm panel!)
(4) Score in half (LANDSCAPE) at 7.4cm
(5) Repeat until you have 4 cards!
So cute!

And for my US readers... that is the equivalent of half your A2 card! Is there such a thing?
Wording on this last one from the fabulous Colorful Seasons ... lots more on that set another day!

Decoration using the co-ordinating Lots of Love stamp set, Shimmer Pear Pizzazz ribbon and Gold Mini Sequin Trim