Wednesday 31 August 2016

This Christmas Cantilever Box

Just thought I would share another one of the Handled Cantilever boxes made recently using my tutorial (details here)

This has been created by Nicola Carson over in Ireland using the This Christmas Speciality papers...

I think it is truly stunning in these papers... and I am sure you will too... so please feel free to pop over to Nicola's blog here and tell her so...
Now I know Nicola is planning on putting cookies and hot chocolate in hers... but what would you put in yours?

Thanks so much for sharing with me Nicola - and for letting me share to my world...

Tuesday 30 August 2016

Autumn Winter Catalogue live soon! And major video Spoilers!

HolidayPreOrder_DemoSite_CatalogPage_UK
1st September sees the go-live of this year's Autumn Winter Catalogue... full to the brim of new products for Christmas, Autumn and Halloween... and some great new All Occasion ones too...

There are a number of ways you can see the catalogue...
(1) The on-line pdf version will be released here at 1am UK time on 1st September (this Thursday!)
(2) Come and collect a hard copy from my Launch & Grand Sale events. So much to show you!
Mon 5th September 10-12am 
Wednesday 7th September 1-3pm
(3) Come to a September Christmas Cardmaking or Project Life/BYOP Class. Dates here.
(4) Request a postal hard copy if you can't make my Launch/Class dates ...

But in the meantime... Stampin Up! have provided us with some wonderful videos of up and coming products... so if you can't wait till Thursday... here you go!

And 3 of my favourites... Just click on the picture to go and see the products in the video... the first 2 videos are just 3-4 minutes (and for those of you that know me and my attitude to watching videos... yes even I have managed to watch them!!) The last one is somewhat longer (13mins) as it shows you how to make the project too
Oh how me is this!!!!?
Make tiny houses using the Home Sweet Home Stamp Set. Stamp on cards or memory keeping pages. Or combine it with the Sweet Home Framelits Dies to create 3D packaging or home décor! Learn how you can combine these products to make fun projects all year long.
Create custom tags for gift giving using the Here’s to Cheers Stamp Set. Combine it with the Cheerful Tags Thinlits Dies for simple crafting! Learn how you can combine these products for quick tags.
Decorate your mantelpiece with festive trees and seasonal decorations. This kit makes three trees in two sizes—one 13" (33 cm) tall, two 11" (27.9 cm) tall—each individually trimmed with handmade ornaments. See for yourself how kits make for easy creativity!

Monday 29 August 2016

Ombre Wonderful Year Trio

Very quick share today.... 

Another quick little threesome from my play with Wonderful Year and the Bermuda Bay Ombre pad... plus more of the snowflake from the Tin of Tags 
These are all a variant on a theme from my recent postings...so if you want product details or technique details please just go back a few day's posts... or type "ombre" in the Search box at the top right hand side... and up they should all pop... 
The white die cut snowflake is from the Botanical Builder dies.... and the sequins are from the new and coming soon Fancy Frost sequins


Sunday 28 August 2016

Ombre Sponge Brayering Emboss Resist...

Another idea with the Bermuda Bay ombre pad... 

White embossed Wonderful Year greeting and couple of large Tin of Tags snowflakes...
Sponge brayered ink from the ombre pad for the Emboss Resist Technique .... 

Ombre-inked large snowflakes at random to finish off... plus Soft Sky Fancy Frost sequins... I have to admit that these Tin of Tags snowflakes are going to get plenty of action here at The Craft Spa...
I hope you are all having a wonderful August Bank Holiday...and managing to get a rest (or not as the case might prefer to be!)

And here is a group shot of the last 2 days' cards...

Saturday 27 August 2016

Ombre Stamping

Keeping on my ombre theme...which means more in Bermuda Bay as the other pads haven't arrived here yet!

I inked up the large Wonderful Year greeting stamp with the Bermuda Bay ombre pad... pale at the top... dark at the bottom.
I also ombre-inked up the gorgeous large snowflake from the Tin of Tags stamps set... and the little snowflake trio from Greetings from Santa... so some pale and some dark... All these stamp sets coming soon... 1st September...

And then I finished off with a few small snowflake trios in Smoky Slate and the Fancy Frost Sequins again
Simple, quick and easy card with the help of the Ombre pad... so much so I had to order more!


Friday 26 August 2016

And Some Like it Hot!

Same card as yesterday... but a completely different bright and vibrant look...

As this time I was having a play with my Bermuda Bay Ombre ink pad.... starting off with the Direct to Paper technique... This ink pad is great for this technique as you have 5 shades to work with in the one pad...
I swiped my ink pad with the palest end to the centre (darker to bottom) and then repeated from the other side (palest to centre again, darker to top) ... I then swiped the darkest portion again at the very top and bottom... hence the not so smooth graduation of darker colour to the top and bottom edges...
Bermuda Bay Ombre Stampin’ Pad
The graduation is really smooth but again I could have got an even smoother effect had I used  my normal Whisper White cardstock (or no doubt even better with Shimmery White) but that will have to be for another day... another series!
Now watch this space...as once that Ombre pad was out... I had a good play!!

So do you like it hot? or cold?
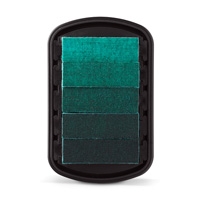
Oh and before I go... not a Bermuda Bay lover... well also available in Rich Razzleberry and Calypso Coral... and shhh.... I am going to let the cat (or rather ink pad!!) out of the bag.... coming soon in Black and Emerald Envy

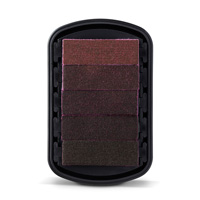
Rich Razzleberry Ombre Stampin’ PadRich Razzleberry
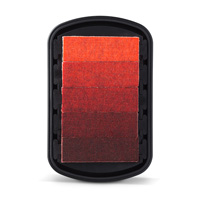
Calypso CoralCalypso Coral Ombre Stampin’ Pad

Thursday 25 August 2016

And the Winner is....


It is time to announce the winner of my 7 year Blog-A-Versary candy...

Note that this is my second post today... scroll down if you just want to see today's creative post...

So drum roll please... the draw said... D'Ann in the USA
D' Ann said.... Happy Blog-aversary! I am in the US and follow your blog by email for about a year now. Your cards always have the wow factor and are so gorgeous & always inspiring! I love that you provide measurements in imperial. I would love to see you create holiday treat bags or boxes. 

So D'Ann... you have won the 2 tutorials for the Handled Cantilever Box and the Suitcase Mini Album...
Retro Fresh Man Bag, Briefcase, Make Note, AmandaBates,CraftSpa 029
But wait... I have not finished... I double dipped!!!!

I then decided to do a UK only draw too as the SU! goodies were sitting there all forlorn and in need of a better home....
So another drum roll please..... the 2nd draw said ...
Ali in the UK...
Ali said ... Happy anniversary, I am in the UK and follow your blog daily you are a must go to blog, I love your makes and find them very inspiring

So yes Alison... you have won the booty (although you can still choose to have the 2 tutorials as an alternative)

If D'Ann and Alison would like to click here and email me ... then your blog candy will be on its way to you both very soon.... congratulations! And thank you for your really lovely comments... blush!

Thank you so much to everyone that left a comment... your feedback was so useful to me when thinking about what to post in the future... and I have a few new ideas to try now.... Though some of the other comments made me blush too!! You are all so kind and so lovely.... I will be back to you with a reply to your comments... my other life just completely took over after I posted my blog candy post.... maybe end of next week!

I am glad to see that I am still posting a lot of crafty inspiration for so many of you.... and that many of you are learning from me and getting use of the tutorials I post. It makes it all worthwhile - as well as enjoyable!

Some Like It Cold! Botanical Snowflakes...

Lovely little simple card to share today... 

Again using the fabulous Wonderful Year stamp set for the greeting that says it all!! But white heat embossed this time...
Then the Sponge Brayers were out for a bit of first time inky fun for the Emboss Resist technique... charged up with Soft Sky ink and just rolled across until I was happy with the effect... 

Note that my embossed panel is actually Thick Whisper White as this is my go-to cardstock... but with hindsight I would have been better using normal Whisper White... or even Shimmery White... next time!
The fabulous snowflakes are indeed the flowers centres from the Botanical Builder dies... just perfect! You can thank my wonderful downline Moya for this little inspiration... 

Laid on a white mat on a Soft Sky card blank...  and finished off with the new and coming Fancy Frost sequins in Soft Sky...plus a few rhinestones too


Wednesday 24 August 2016

Wonderful Year & Embossed Debossed Pine Boughs Part 4

Embossed debossed pine boughs this time... yes seriously!

Just a delicate swipe of Versamark on the raised face of the Pine Boughs embossing folder before winding through the Big Shot...
Then a liberal dusting of copper embossing powder on the ink on the de-bossed face ... rough tap off... brush off as much of the rest as possible... then heat to melt...

Finished off with the other greeting in the Wonderful Year stamp set... again copper embossed. And all on a Copper Foil mat...
Not 100% clean & crisp heat embossing... but effective none the less
PS Back to normal posting time today!!! Last 2 weeks have been a bit of a challenge to keep up...so some posts some days have been very late!! 

Tuesday 23 August 2016

Wonderful Year & Embossed Pine Boughs Part 3

Two for one today... and note there is a group shot at the end of this post...

So back to my intended use of the BIG wording in the Wonderful Year stamp set... 2 to choose from...
As the greetings are so large ... a larger white mat was required...and then I realised I am getting already low on my Copper Foil Sheet stash... really should have just pre-ordered 3 packs!

So instead I wiped the Versamark pad thickly along each edge of the embossed Pine Boughs panel, added copper embossing powder, tapped off and heated to melt...
Not a neat edge on either card for my taste... as I couldn't wipe exactly (maybe not patient enough!)... but could be a way round whilst you are waiting for your Copper Foil sheets ... so I thought I would share in any case...
And as I know you like these... here is a group shot for you... so far!
Another in this series tomorrow as I thought of something else after the group photo...

And then still loving this stamp set... which is code for more coming...

Monday 22 August 2016

Wonderful Year & Pine Boughs Embossing Part 2

So here is the clean & simple card I was intending to make in the first place....

Just a copper embossed greeting from the fabulous Wonderful Year stamp set...coming soon...
Plus a dry embossed pine bough from the Pine Boughs Embossing Folder... coming soon...

All on a Copper Foil mat...coming soon...
And finished off with Fancy Frost sequins... coming soon... Now these are actually Sweet Sugarplum (ie quite pink!) but in the flesh they take on a copper hue...so I reckon they do the job rather nicely! the pack also has Soft Sky and White Gold sequins (just so you know for 1st September!)

Sunday 21 August 2016

Copper Embossed Wonderful Year & Pine Boughs

Another spoiler alert!

So whilst I had the copper embossing powder and Copper Foil sheets out for the Baptism card... A quick little christmas card using the new and coming Wonderful Year stamp set popped into my head...
But bear in mind everything was going wrong that day... so I cut my mats wrong!! Which meant 2 things... firstly I couldn't use the intended (very large) greeting  - and secondly the mats were short!

Not one to be beaten... I remembered my dotty copper washi tape in the Affectionately Yours pack and my white mini Pom Pom Trim... so a quick dressing up and a bit more depth later... and here you go...
So much coppery shine!!

Though I'll attempt to cut things right tomorrow and have another go!!