Showing posts with label Petal Passion. Show all posts

Thursday, 24 May 2018

3D Thursday - Chocolate in a Suitcase!

Just sharing a lovely project made for me by fellow team member Nic Baker...

Isn't this gorgeous... using the Petal Passion papers and Petal Palette stamps... papers only available for another week (or while supplies last if sooner!) Petal Palette carries over... but not as the stamp & die bundle with that 10% off if you order before 31st May....
Nic is a real love... she always makes me and gifts me a treat when we see each other at the 6 monthly Stampin' Up! On Stage events... her way of saying thanks for all the projects and "stuff" I share on here... I know she finds some it of it useful! Love that my shares inspire others!

Again thanks Nic... simply stunning... and the chocolate was rather yummy too!!!

Monday, 21 May 2018

Petal Passion & Stampin Blends Quad of Cards...

Wanted to share something bright with you today ... as the weather in the UK is beautiful this Sunday as I write this. 

The sun in is out with just a bit of a breeze... and I have just come back from a walk in the beautiful countryside where I live... so thought I would write Mondays blog post before I start on the more mundane Sunday roast dinner duty... 
Also just realised that I hadn't shared this card made back in January at our Quarterly Training event... a really lovely & stunning but simple card by Julie... 

These Petal Passion papers just scream out for colouring... even though I do like them just black and white too....
Stampin Blends were used on this card... which aren't available today.. but they will be in 10 days time... in the initially released colours (aka "old")... and lots more!!! (aka "new")

So I will be starting 2 Stampin Blends Clubs... spread over 3 months... one for the new... and one for the old... click here to contact me to register interest... no obligation at this time whatsoever...
Yup... still love this card... and rather proud of my colouring on it too!!
And here are the links to the other 3 cards in the quad on display! Just press on the individual card photo to go to the post and more details...

And gosh... as I searched for these... I have just realised how much "mileage" I have got out of my Petal Passion papers... so many cards and projects made with them.... 


Monday, 14 May 2018

Pinks Petal Passion Pop out Swing card

Another version of the wee little A7 Pop Out Swing card for which the Tutorial was shared here...
So just more colour added to the Petal Passion papers & extra Lots of Happy flowers...

And here you have the coloured and uncoloured versions side by side... which do you prefer?

Sunday, 13 May 2018

Happy Mothers Day in the USA

So although ours is long gone... it is Mothers Day in the US today... and in a few other countries too... so a perfect opportunity to share this card that I made a while ago... and to wish everyone a lovely Mothers Day - or just a lovely Sunday... wherever you may be...

So another Double Pop Out Swing Card... for which you will find other versions and the Tutorial here...
Note that this was the first prototype card I made to test the new card fold I had designed... and that I just used the Everyday Label punch to create the apertures on this one...

I then quickly brought out the Lots of Labels dies for the follow up cards... as getting the apertures central and straight was a bit hit and miss with just the punch! Shame!
Stampin Up Products used
Petal Passion papers
Labels to Love stamps
Thoughtful Banners stamps
Brushwork Alphabet stamps
Everyday Label Punch
Lots of Labels dies (not used on this sample... but makes the card easier!)


Friday, 27 April 2018

A7 Pop Out Swing Card with Tutorial aka The Small, Wee One!!

Definitely a card on the cute scale in the flesh!! Proving that small can be so beautiful!!
And seeing as it is Fancy Fold Friday... here's a tutorial for you...
Craft Spa Recipe
And sorry to my US followers as this is very specific to rest-of-the-world A4 card/C7 envelopes and centimetres measurements... as preciseness is key... I will try to convert for a sensible card from US Letter cardstock/envelope... but in the meantime can anyone tell me the size for a standard US envelope about half your A2 size!?

Card Blank - Thick Whisper White -14.8 x 10.5cm  (5 7/8" x 4 1/8")
Inner Panel - Thin Whisper White- 10.8 x 10.1cm
Tabs - Thin Whisper White- 7.2 x 1.3cm (x2)

Paper Front 7cm x 4" (10.1cm)
Paper In-Sides 3.2 x 9.7cm (x2)

(D) Basic Black Card 5cm x 6cm  
(St) White Card 4.5cm x 10cm pp

where (D) is for die- cutting and (St) is for stamping & punching and pp is per person

SU! Products used
Petal Passion Papers (RETIRING SOON)
Lots of Labels dies (RETIRING SOON)

Everyday Label Punch
Lots of Happy Card Kit stamps (fussy cut flowers)
Perennial Birthday (greeting)

Tutorial
  1. Place larger (Card Blank/14.8cm L) cardstock panel LANDSCAPE onto trimmer
  2. Score at 7.4cm
  3. Bone fold (valley)

  4. Place smaller (Inner Panel /10.8cm L) cardstock panel LANDSCAPE onto trimmer
  5. Score at 3.6 & 7.2cm
  6. Z Bone fold (mountain/valley)

  7. Place smallest (Tabs/7.2cm L) cardstock LANDSCAPE onto trimmer (x2)
  8. Score at 3.6cm (x2)
  9. Bone fold (mountain) (x2)

  10. Decorate all panels.... 
  11. Die cut front of Card Blank (Tip for easier/straighter cutting...
    I used a piece of Grid Paper and marked out a 3.7cm line (ie half of the 7.4cm width) to aid the eye... this was temporarily stuck onto the underside of my thin (Metallic die) plate so everyone could use it all the classes... worked like a charm!
  12. Die cut Basic Black Lots of Labels frame

  13. Stamp greeting AND Everyday Label Punch 
  14.  Faux Stitch using thin end of your Basic Black Stampin Marker (Tip- just draw 3 stitches at a time- easier and faster - and neater too!!

    NOTE - this Tutorial assumes that you have already created a Pop Out Swing card and so know how to stick the parts & Tabs in ...  but if not... then please visit this Tutorial here for further pictorial instruction...  points 7-17
  15. Adhere Z folded Inner Panel to RHS of open card blank (note: valley fold of Z Fold panel to LHS when stuck )
  16. Fold over front of Card Blank. (with Z folded panel folded)
  17.  Apply glue through aperture onto top of Z fold panel (ie to RHS of aperture) 
  18. Adhere Basic Black Label frame

  19. Open up Card blank. Open out Z folded panel to the right.
  20. Adhere 2 Tabs to top and bottom (fold to outside)
  21. Open up Z fold section with Tabs out to left, apply glue on top of Tabs and fold Card Blank onto the glued Tabs

  22. Adhere all other parts... 

Saturday, 7 April 2018

Treasure those Memories for Jems Blog Hop...

Hello and welcome to the April Jems Blog Hop... featuring Memory Making aka Scrapbooking... to Treasure Those Memories...
Now scrapbooking is something I haven't done for ages!! And I used to really enjoy those classes....
So for today I have two pages for you ... and this maybe the only opportunity you get to see me!! As I am incredibly camera shy!!!

Albeit these photos being taken over 20 years ago on my wedding day! Gosh don't we both look young!!!
And I have to laugh at the word Smile... which is just one of the large stickers in the pack... that I have stuck to the top of a large photo... and that photo is stuck onto the top of some of the pockets rather than cutting a large photo up and inserting into pockets (as per the TOGETHER photo to the right)

As the memory comes flooding back ... of my mother-in-law telling both of us off on the day for smiling and laughing too much!!! Isn't that how a wedding day should be!!?? Though I have to admit that the biggest laugh was when I had to say Jon's middle name for the first time... and I kind of shouted it... and then we both got uncontrollable giggles!!! Yup... right in the middle of the wedding vows... 

I used the Petal Passion card pack...
Petal Passion Memories & More Card Pack
Just one of the fabulous Memories & More range of products stocked by Stampin'  Up!

Memories & More is so easy to do... find your photos... pop cards and photos in pockets... add a few stickers and transparencies that come with the kit... and 10 minutes later memories saved...

This kit also co-ordinates with the Petal Passion 12x12 papers...
Petal Passion Designer Series Paper
So you can easily mix traditional 12x12 scrapbooking with Memories & More photo-pocket scrapbooking... What's not to love?

And here is a lovely photo of the full Petal Passion suite from the SU! display boards... spot that you can add any colour to liven things up as you require... I think there may a bit of So Saffron added to my pages next week...

So it is now time to say Goodbye... and pass you onto the lovely Lynn... just click on the big arrow below to go straight to the post...

Worth a quick trip around... as there only a few of us taking part as many of us demos are away celebrating together at the Stampin Up! On Stage event as this posts...  

Yes by the time you read this... I will have seen the new catalogue!!! Happy dance!!!
Oh and just in case of any link problems that we won't be able to sort on Saturday... as we are in a busy room of 500-600 UK demos... here is the full list for today's Blog Hop...


  • Umalini Kathirgamanathan
  • Samantha Webster
  • Sarah Lavelle
  • Amanda Bates (YOU ARE HERE)
  • Lynn Smith


  • Thursday, 5 April 2018

    Petal Passion & Palette Double A6 Card

    A really simple but WOW Double A6 Fancy Fold... take 2 A6 cards (or A2 if you are in the US) and stick them together in the centre... and this is what you get...

    Decorate as you see fit... panels of Petal Passion papers here on a Pool Party or Old Olive mat... with a bit of Stampin Blends action to really make them come to life (or Stampin Markers  whilst the Blends are out of Stock... coming back in May... ) ... using Pool Party, Rich Razzleberry and Old Olive...
    Finished off with a stamped Petal Palette greeting and flowers on a Stitched Shapes Oval... and some Stampin Blends or Stampin Markers coloured 1/4" Organza White Ribbon at the sides...
    Thanks go to my fabulous upline, Julie Kettlewell... as this is another of our lovely Quarterly Training makes... and a card fold that I will definitely be repeating at a class coming soon...

    Monday, 2 April 2018

    Petal Passion & Palette Bridge U Fold Card

    Apologies that yesterday's Happy Easter post was late... techno-bomb!!

    Now who said these Petal Passion papers were just black and white!! Reckon that this card might be bright enough to dispel that myth...

    U Fold card... aka Bridge Fold Card... for which the tutorial can be found here....  though this time I only used the one box section/insert for the birdie perch.... so that was scored at 1.5cm from each side from a 11.5cm x 2.5cm high panel...
    Spotty papers coloured with Blends or Markers... back paper panel brayered with Pool Party and stamped with Old Olive marker thumped veins on Lemon Lime Twist inked leaves... and a couple of extra leaves stamped separately on Whisper White and then fussy cut... 

    Memento Black Petal Palette stamped images with Stampin Blends colouring of leaves (Old Olive) and flowers (Rich Razzleberry & Pool Party) and then die cut with the Petals & More dies

    And lovely die cut Petals & More frame in Pool Party (under the Classic Label punched Thoughtful Banners greeting to the bottom right hand side)

    Sunday, 18 March 2018

    Sweet Sunday.. Box for 2 Chocolate Bars with Tutorial

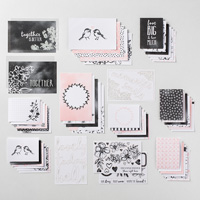
    So lots of these were made this week... as my ladies got their Easter Makes on! A box designed from one piece of A4 card... to hold 2 Milka or Cadburys Dairy Milk chocolate bars... or any of the more widely available "thinner taller chocolate bars" with the frilly bit at either end...

    The ladies in this week's class all have big family gatherings for Easter... and so like to spend some time with me decorating lots of Easter Treats for the table...  So I have to keep things decorated simply... as they don't want to have to stay overnight!!!
    This is a project I was determined to make this year... all of my friends and family Easter makes and sends in the past have been something lovely and decorative... and usually cute... but with... not a lot of chocolate!!

    So this year I will send lots more chocolate... 2 Milka bars going in all mine... But something simpler and more stylish for presentation... as (apart from 2) they are all getting too old for cute Easter chicks and bunnies... Though I did have to laugh as... for once... I loved the pop of bright colour for the boxes... Lemon Lime Twist particularly doing it for me!! And everyone else as it happened...

    I used the 
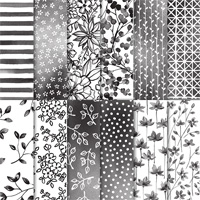
Petal Passion papers... as then everyone can colour as much or as little as they wished....
    Craft Spa Recipe
    A4 Card 25 x 21cm (ie A4 width)(9 3/4" x 8 1/8")
    Papers - Top 10.5 x 14cm (4 1/8" x 5 1/2"); Bottom 5 x 10.5cm (US 4 1/8" x 2")

    Craft Spa Instuctions
    1. PORTRAIT(short edge at top). Score 1, 9, 11 & 19cm (3/8", 3 1/2", 4 1/4" & 7 3/8")
    2. LANDSCAPE(long edge at top) with the narrow section at the bottom. Score 2, 4 & 23cm (3/4", 1 1/2" & 9")
    3. Bone Fold all lines

    4. Cut as per Template (Note the thin red lines for sections you want to dart as you cut. Neater if you keep those wider bottom sections as straight as possible...)
    5. 3/4" Circle Punch as per Template

    6. Apply glue and adhere Box together as per Template in following order for ease/neatness.. we used Tear & Tape for all sections apart from the lid... where we used Tombow Multipurpose
    (1) Lid sides first checking they fold in nicely! (TIP- partially doubling them up this way makes for a  stronger lid)
    (2) Narrow side section (TIP- line up tape glue along the fold edge rather than in the centre or open edge)
    (3) Small bottom side tabs
    (4) Back bottom wide tab (TIP - use a ruler to go into box to bottom so you can apply some pressure up against the ruler to stick things together firmly...)
    (5) Front bottom wide tab (TIP - again using your ruler)

    7. Cut 1.5cm (1/2") from either side of the papers (when PORTRAIT ie short edge along top)
    8. Adhere longer pieces
    9. Adhere side shorter pieces
    10. Adhere ribbon to wide shorter piece (TIP - colour first as required! Blends or Markers will do the job... but let marker coloured ones dry a bit!)
    11. Adhere centre/wider paper piece

    11. Decorate as required...
    We used a die cut Stitched Shapes circle (2nd smallest) and then stamped using just the leaves from the Sale A Bration Amazing You flower stamp in Lemon Lime Twist... plus a silver embossed Easter greeting from the retired Springtime Blossom set... though some were made using Happy from Perennial Birthday and Easter from Teeny Tiny Sentiments ( but too much faff to actually use in a bulk making class!)

    And here are about half of them all neatly assembled and ready to go... the rest were a little bit of homework after all!!
    Please note that the inches (imperial) are a literal conversion of the project rather than one tweaked to US Letter card... so either can be used... but do cut & score in the same system!.... Though personally ... even though I am an inches girl... I just found this one easier in metric (centimetres)!


    Tuesday, 13 March 2018

    Petal Passion Small Square Double Gatefold Card

    Another of these Small Square Double Gatefold cards... simple to make... simple to decorate... but a WOW in the flesh...

    I used the Petal Passion papers and the co-ordinating Petal Palette stamps & dies bundle on this version... with a bit of help from Rose Wonder and Perennial Birthday for the sentiments... as they both happened to be out and on clear blocks... and the 2 sentiments worked well together...
    And this version used the largest Stitched Shapes square... though personally I prefer the next size down... as used on the Springtime Foils version shared a few weeks ago... 

    Love that you can leave these papers black & white for the neutrals-loving-folk but can simply colour in for those that like their colour! Using Stampin Blends or your Many Marvellous Markers... Though I used my Rich Razzleberry, Old Olive and Bermuda Bay Stampin Blends on this card...
    Though I did first Sponge Brayer the centre piece of paper with Soft Sky... a lot faster that way! Just be aware that you can't then get away with Pink Pirouette or the palest colours for your flowers!! Yes that is why my light Bermuda Bay flowers on the central paper have a "strange" tint to them ...

    Want to make one of your own... then just click here for the Tutorial(s)... for A4, US Letter and 12x12 cardstock... though my next one in March classes will definitely be using the 12x12 version... as so much simpler!
    And I should have taken a photo... as Jill brayered Lemon Lime Twist in class instead of the Soft Sky... and it looked fabulous! Lovely and fresh... and just right for Spring...