

Click here for more details on the decoration of this and on the original Sahara Sand version shared last week

And a bit of class feedback on this card... my poor little apostrophe was moved every time someone came to stamp the 'S at the end... So click here for background information on the Mother's Day and the apostrophe S debate (Mother's Day, Mothers Day, Mothers' Day) for those of you that are interested in things like that!
I would love to see what you make with this card fold... so please do feel free to share your makes with me and/or the world!... just remember to link back here to further share the method to the creative world...
Double Tri Display Card Tutorial © Amanda Bates at The Craft Spa
You will
need:
Main Card: 12x12
Cardstock 12” x 5 ¼
Front Card Panels:
2” x 5 ¼” (x2)
Back Card
Panel: 2 ¾”
x 2 ½” (ie for writing on!)
And papers to
decorate:-
Front Panels: 1 ⅞”W x 5⅛”H (x2)
Central 6 Panels: 1⅜”W x 2⅝”H (x 6)
Top & Bottom Panels: 1⅜” x 1⅛”
1)
Line up 5¼” x 12” piece of cardstock PORTRAIT at
1¼” on Top Bar
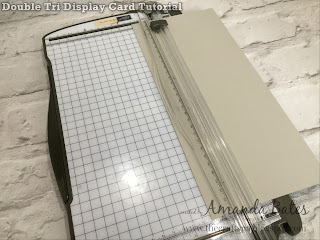

2)
CUT from ¾” to 5¼” (1.9-13.3cm)
3)
LIFT
the cut bar!
4)
CUT from 6¾” to 11¼” (17.1-28.6cm)
5)
Line up PORTRAIT at 4” on Top Bar


6)
CUT from ¾” to 5¼” (1.9-13.3cm); LIFT!; CUT from 6¾” to 11¼” (17.1-28.6cm)


7)
LANDSCAPE. SCORE whole of card at 10½”, 9”, 7½”,
6”, 4 ½”, 3” and 1½”


8)
LANDSCAPE. SCORE outer sections at 6¾” & 5¼”
(ie top and bottom sections)


9)
LANDSCAPE. SCORE inner sections at ¾” & 11 ¼”
(ie central section)


10)
Peak/Mountain Bone Fold the central 6” score
line
 11)
Holding your card PORTRAIT and starting from the
front edge… lightly fold the central section score-lines as Peak, Valley, Peak,
Valley
11)
Holding your card PORTRAIT and starting from the
front edge… lightly fold the central section score-lines as Peak, Valley, Peak,
Valley

12)
And the outer section score-lines as Peak,
Valley, Peak, Valley


13)
Fold over towards the centre (ie 6" peak folded score-line) until it all just
neatly folds on itself…
14)
Bone Fold
15)
Repeat 11-14 from the other side


16)
Apply glue to outer/front C-section(s) (I have used Tear & Tape so you can see where in the photo - but personally I use Tombow so I have a bit of slide! And I apply glue & assemble one side at a time)


17)
Adhere Front Panel (2” x 5 ¼”) with edge lined
up with first peak fold (ie not the outer edge of the card!)


18)
Repeat for other side

Just a note... This version is sized to best incorporate the Large Letter alphabet die sizes... based on using one width of 12" card... The finished
card size is 4”W x 5 ¼” H which fits perfectly into a Stampin’ Up! Medium CrumbCake envelope for posting…
And a pictorial of the cut & score lines on the main card for you...

And then it is just about the decoration...

Folded up...

And the back... I might even decorate this side too another day! Note that I scored that Very Vanilla 2 ¾” x 2 ½” greeting panel in half at 1 3/8" so that the fold line was slightly neater...


8 comments:
Oh my, thanks so much for sharing. This is absolutely gorgeous. A great Mother's Day card!
Oh wow Amanda, I can see where I'm going to be busy this weekend. LOL! Thanks so much for the tutorial. I don't have a blog, so can I email you with my results??? ...Ann in Canada
Thank you Jenny...hope you get to make use of the tutorial....
My pleasure Ann! And enjoy... and yes please feel free to email me with your results! That will make me happy....
Thanks for sharing, beautiful card!
Thanks Sharon... and my pleasure!
Love this. TFS. :)
Thanks Lilian... hope you get a chance to try one out for yourself....
Post a Comment