Yes you read that right... 3 Z Fold cards from one piece of A4 cardstock... quick & simple but a card loved by all who travel here! Whether physically for my classes... or virtually via the blog...
But before I start... don't forget that the Retiring List will be published at 8pm tonight...
So I decided to make these as my swap card for the Stampin Up! On Stage event held yesterday... I wouldn't usually think about doing a fancy fold card for a swap card... but SU! asked us for full cards instead of card fronts... and this one is seriously simple enough... and as you score for 3 cards at a time.... they are fast... so I went for it...
I made the cards in 4 of the 2017-19 In Colors... as funnily enough there were no Tranquil Tide papers left in my Fresh Florals pack!! And I have to admit that I had forgotten how nice these papers are...
Here is my box of swaps before I started swapping!!
And thank you to all of you that swapped with me on Saturday... I have some beautiful new samples to share with my team and customers... and lots of new inspiration for up and coming classes... and here is the tutorial as promised...
Craft Spa Recipe
In Color/Thick Whisper White A4 Cardstock
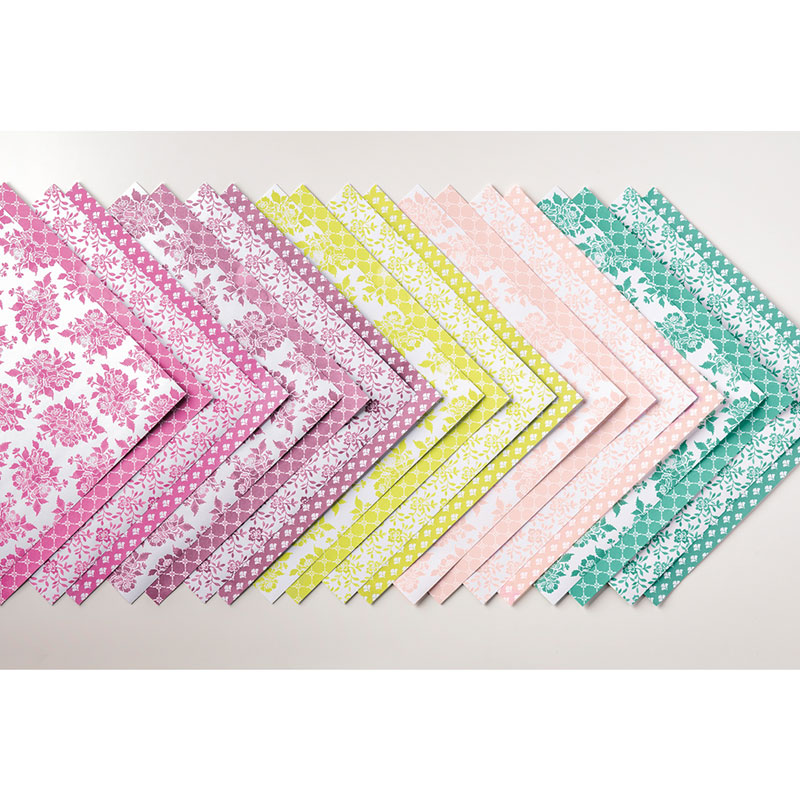
Fresh Florals Papers - Front 4.5 x 9.4cm; Back 9.4cm Square
Inside Panel 4.5 x 9.4cm (not necessary when using White card for the blank)
Other SU! Products
Ribbon - In Colors 1/2" Finely Woven Ribbon
Dies - Stitched Shapes 2nd largest square
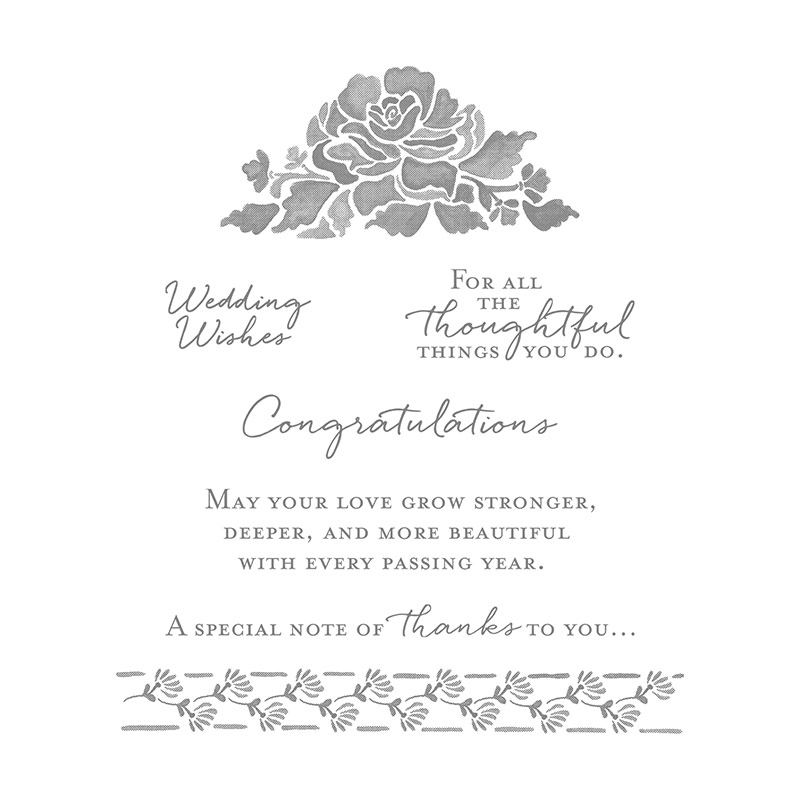
Stamps - Better Together
Again apologies to my US readers... as this tutorial/card is sized specifically from/for A4 card stock... so it wouldn't make sense with your US Letter sized card...
Tutorial.... Blink and you will miss it!!
1. Place A4 card PORTRAIT on trimmer
2. Trim to 19.8cm wide
3. Score PORTRAIT at 4.95* & 9.9cm
(And an extra TIP... this card folds so much better if you score on either side of the cardstock... so I actually scored on the wrong side at 9.9cm...and then turned the piece of card over onto the right side and scored at 4.95cm)
4. Place LANDSCAPE on trimmer
5. Cut down to 3 x 9.9cm card blanks
6. Bone Fold as Mountain then Valley (ie starting from the left)
7. Adhere papers & die cut greeting
8. Tie a bow and adhere
Don't like lining up at 1/2mm*... then go here and use this 9.8cm square card version tutorial... and to do 3 in 1 you would need to cut the portrait A4 card down to 19.6cm wide, score as directed... and then place the card LANDSCAPE on your trimmer and cut your 3 card blanks down to 3 x 9.8cm
Showing posts with label 2017-19 In Colors. Show all posts
Sunday, 8 April 2018
Sunday, 9 July 2017
Label Me Pretty for All Occasions
Seem familiar? Look again...
The small A7 cards shared yesterday had a quick make-over using the new Label Me Pretty stamps and the co-ordinating Pretty Label Punch... so now cards for all occasions...
So in Tranquil Tide... You're the Best...
In Fresh Fig... From My Kitchen to Yours...
In Berry Burst... Thank You for caring...
A more floral Happy Birthday label...in Lemon Lime Twist... (Though I have to admit this doesn't do it for me!!! Really does need more Berry Burst than Powder Pink...)
And finally remaining as the original Happy Birthday Gorgeous stamped label... in Powder Pink...
The small A7 cards shared yesterday had a quick make-over using the new Label Me Pretty stamps and the co-ordinating Pretty Label Punch... so now cards for all occasions...
In Fresh Fig... From My Kitchen to Yours...
In Berry Burst... Thank You for caring...
A more floral Happy Birthday label...in Lemon Lime Twist... (Though I have to admit this doesn't do it for me!!! Really does need more Berry Burst than Powder Pink...)
And finally remaining as the original Happy Birthday Gorgeous stamped label... in Powder Pink...
Saturday, 8 July 2017
2017-19 In Colors introduction!!
Oh how rude of me... I haven't formally introduced you all to the new In Colors!! Which I have been using for a few weeks so they may not seem so new after all!!
But seems like a good time for a quick colour show and tell using some ever-so-cute and simple Fresh Florals , Pretty Label & Happy Birthday Gorgeous A7 cards we made in Julie's training a couple of months ago! These cards may be small and super simple but they have caught the eye of everyone that has seen my display...
Plus a round up of projects posted over the last week or so- just click on the project photo to go to those as they all have tutorials too...
First up...Tranquil Tide.... I do have to admit to loving all these new in colors... I think they are the best collection we have ever had... but this is my overall favourite new colour...
Oops - 2 other Tranquil Tide projects made but not posted yet... and I am really not in a tutorial writing zone today! So guess what is coming next week!!
Secondly... the bright and exciting Lemon Lime Twist... try feeling sad after you use this colour... impossible!!
Thirdly... the colour I have actually used the most... Berry Burst... a really deep pink... but lovely and bright... and my favourite pink of all the pinks...
Fourthly , the deep and fruity Fresh Fig...
And last ...but not least... Powder Pink... my perfect pale pink... between the more vintage Blushing Bride and the lighter but brighter Pink Pirouette...
And here they are all together again... such cute cards. Click here for a quick A7 card tutorial if you need one...
Friday, 30 June 2017
Fresh Florals & Phrases Double Z Joy Fold Card
Quick share of another A6 Double Z Joy Fold card today... as well... have to admit this week is one of those weeks! Particularly with son and heir having just finished his A levels... Lots of things not been to my plan... but hey... it is his time to have a great week celebrating!
So moving onto the Powder Pink papers in the Fresh Florals papers that co-ordinate with our new lovely In Colors... and using the also co-ordinating Floral Phrases stamp set...

Simply decorated card... with the ease of the final dressing using the Itty Bitty Bow and the Black Mini Sequin trim to the bottom left... I would highly recommend both of these!
And here is a link to the Tutorial for this actual card.... though the eagle eyed may spot that I actually made a mistake... as it was supposed to be the fully opening version for which the tutorial was shared here... I recommend the latter....
And for my US readers... never fear... the US card version tutorials are coming very very soon... I can only blame my son's somewhat unexpected daily celebrations (and resultant mum taxi service!! Disadvantage of living in the countryside!)
Saturday, 24 June 2017
Floral Statements Duo
A simple but lovely little duo for you today...
So the new Floral Statements set has just the 2 big stamps... HELLO and THANKS... intertwined with flowers... and they do simply do what the name says... make a statement with flowers...
First up.... THANKS... and the cabbage rose....
Stamped in Archival Black to get it as black as can be... then coloured in with Berry Burst and Pear Pizzazz markers... simples...
Then moving onto HELLO... and the old fashioned rose... or christmas rose... (or for me generally... Mock Orange or Philadelphus as my garden is full of its lovely smell at the moment) or actually... it is amazing how many plants it could be!!
Again stamped with Black Archival ink... and coloured in with Pear Pizzazz and Powder Pink marker pens... then the Aqua-painter pulled out to colour in the flower centres and shadows with Berry Burst...
Finding the shadow areas is easy... as the artist has cross-hatched it all for us!! In fact this stamp set is really simple, quick and easy to say the words when we need to... highly recommended if you like your flowers....
And look... "wonky matting"... maybe a first on here.... but there was actually a good reason!!! I had stamped the image at an angle... so instead of getting a new white panel & stamping again... I thought what the heck... stick the word on straight but the mat at an angle... and it looks alright... and different for a change.... but I am going to giggle at all the "wonky matters/stampers!" in the future...
Friday, 23 June 2017
The other A6 Double Z Joy Fold Card with Tutorial
This is an update to the "not-fully-opening A6 version of the card" for which the tutorial was shared here back in April... which has proven very popular... but it was so worthy of this tweak!!
And for my US readers... click here for the A2 card fold tutorial from US letter cardstock...
Oh and click here for the A6 portrait orientation one with tutorial from A4 that I posted earlier this week.... or click here for the A2 portrait one from US Letter cardstock...
Craft Spa Recipe
A4 Card Thick Whisper White 10.5cm x A4L (ie 29.8cm)
A4 Card Basic Black 26.1 x 7cm H
A4 Whisper White 10.8 x 6.5cm H; 6.9 x 6.5cm H
Papers - Front 6.9 x 10cm H; Back 14.3 x 10cm H; Inside 6.9 x 6.5cm H
1. Score Thick Whisper White LANDSCAPE panel at 14.8 & 7.4cm
2. Z Bone Fold. Valley for halfway/centre... Peak for quarter-way
3. Score Basic Black LANDSCAPE panel at 14.8 & 7.4cm
4. Z Bone Fold. Peak halfway-ish (front) fold... Valley for Quarter-ish (back) fold
5. Adhere papers
Now to sticking the two Z Fold parts. Think about what needs to go where!!! Otherwise you will just stick your whole card together and it won't open after all!! Suggest a dry run with no glue the first time... then it should all become obvious... So...
6. Adhere back section of smaller Z Fold onto back face of main card - make sure the left/inside valley fold of the smaller Z section panel is behind your front/central peak fold of the main card/larger Z section ie slip the smaller Z in behind the larger Z panel central fold as you stick it down/line it all off on the front...
7. Adhere front part of smaller Z Fold onto main card front (think about where NOT to put your glue!?)
8. Decorate as desired
Other SU! Products Used
Stamps - Floral Statements; Confetti Celebration
Papers - Fresh Florals
Inks - Powder Pink, Tranquil Tide, Archival Black, Berry Burst & Aqua-painter
Marker Pens - Powder Pink, Tranquil Tide, Smoky Slate
Embellishments - In Color Bitty Bows, Black Mini Sequin Trim
Sunday, 18 June 2017
A6 Double Z Joy Fold Card with Tutorial & Happy Anniversary Moya
Happy 2 year Stampin' Up! Anniversary Moya...
Sharing a card I made especially for the lovely Moya in my team who is celebrating her 2 year Anniversary as a Stampin' Up! demonstrator today... it is truly a pleasure to know you Moya... and I hope that this card arrived yesterday as planned so I don't spoil the surprise!
So this is a re-sized and re-worked version of the fully opening Large Square Double Z Joy Fold Card for which this tutorial is proving very popular on here at the moment...
But this one is re-sized to to an A6 card so that it fits in a standard C6 sized envelope and it is also adapted to neatly fit one die-cut Large Number on it...
The card introduces the new Berry Burst In Color and the gorgeous co-ordinating Fresh Florals In Color 12x12 paper stack.... Don't forget to check out my In Color Bundles details here if these colours are of interest...
And a lovely excuse to get my new Crafting Forever stamp set out... and make a stamp and scissors with bright pink handles for Moya! Love them....
Directions
1. Score Thick Whisper White LANDSCAPE panel at 5.25 & 10.5cm
2. Z Bone Fold. Valley for halfway/centre... Peak for quarter-way
3. Score Berry Burst LANDSCAPE panel at 5.25 & 10.5 cm
4. Z Bone Fold. Peak halfway-ish (front) fold... Valley for Quarter-ish (back) fold
5. Adhere papers
Now to sticking the two Z Fold parts. Think about what needs to go where!!! Otherwise you will just stick your whole card together and it won't open after all!! Suggest a dry run with no glue the first time... then it should all become obvious... So...
6. Adhere back section of smaller Z Fold onto back face of main card - make sure the left/inside valley fold of the smaller Z section panel is behind your front left peak fold of the main card ie slip the smaller Z in behind the larger left fold as you stick it down/line it all off on the front...
7. Adhere front part of smaller Z Fold onto main card front (think about where NOT to put your glue!?)
8. Decorate as desired
Sharing a card I made especially for the lovely Moya in my team who is celebrating her 2 year Anniversary as a Stampin' Up! demonstrator today... it is truly a pleasure to know you Moya... and I hope that this card arrived yesterday as planned so I don't spoil the surprise!
But this one is re-sized to to an A6 card so that it fits in a standard C6 sized envelope and it is also adapted to neatly fit one die-cut Large Number on it...
The card introduces the new Berry Burst In Color and the gorgeous co-ordinating Fresh Florals In Color 12x12 paper stack.... Don't forget to check out my In Color Bundles details here if these colours are of interest...

And for my American readers... don't fret... another version follows in due course... but converting this one would not make any sense - as you wouldn't have an envelope to fit it in! EDITED TO ADD - Click here for the US A2 version from US Letter cardstock...
Craft Spa Recipe
A4 Thick Whisper White 21 x 14.8cm
A4 Berry Burst 16 x 9.8cm
A4 Whisper White Front 5 x 9.3cm; Back 4.7 x 9.3cm
Paper Left Front 4.7 x 14.3cm
Paper Right Back 10 x 14.3cm
Paper Centre 4.7 x 9.3cm
Directions
1. Score Thick Whisper White LANDSCAPE panel at 5.25 & 10.5cm
2. Z Bone Fold. Valley for halfway/centre... Peak for quarter-way
3. Score Berry Burst LANDSCAPE panel at 5.25 & 10.5 cm
4. Z Bone Fold. Peak halfway-ish (front) fold... Valley for Quarter-ish (back) fold
5. Adhere papers
Now to sticking the two Z Fold parts. Think about what needs to go where!!! Otherwise you will just stick your whole card together and it won't open after all!! Suggest a dry run with no glue the first time... then it should all become obvious... So...
6. Adhere back section of smaller Z Fold onto back face of main card - make sure the left/inside valley fold of the smaller Z section panel is behind your front left peak fold of the main card ie slip the smaller Z in behind the larger left fold as you stick it down/line it all off on the front...
7. Adhere front part of smaller Z Fold onto main card front (think about where NOT to put your glue!?)
8. Decorate as desired
Subscribe to:
Posts (Atom)