Showing posts with label Happy Birthday Gorgeous. Show all posts

Tuesday, 29 August 2017

Foil Frenzy DVD Gift Box

Back to another Foil Frenzy papers & Happy Birthday Gorgeous project...

These papers really do lend themselves to gift packaging and simple fancy fold cards as they are just that more robust... as well as decorative ... and therefore don't need layers to stiffen or fancy everything up!

Great sized box to share today... perfect for fitting a DVD or a photopolymer/clear mount stamp case in!!
This is another project that we made at our last Quarterly Training ... the box decoration being CASED from the catalogue... but Julie's own box design ...

I just changed the greeting on the tag so that it was all shiny too... as it is just cut from another of the Foil Frenzy papers...

Recipe
A4 Card Berry Burst 29.5 x 19cm (Scored 2.5cm on all 4 sides & LANDSCAPE 5cm from each side)
12x12 Foil Frenzy Paper 27.7 x 22.2cm (Scored 2 & 4 cm on all 4 sides)

Sunday, 6 August 2017

Petal Garden Memories & More Large Double Z Joy Fold card

The last of the trio of Double Z Joy Fold cards using the Petal Garden Memories & More card pack and Petal Garden papers today...

A large 14.8cm Square (almost 6" for my US readers) card... with simple decoration care of 3 of the Memories & More cards for an easy make!
I just have to add a greeting to the inside when the time is right... as the Happy Birthday Gorgeous "It's Your Day" sentiment on the front will suit most occasions...


Friday, 4 August 2017

Memories & More Petal Garden Garden Bench #3

Onto Day 3 of my series of greeting cards made from a Memories and More card pack series....

Oh I couldn't believe how well 2 of the cards from the Memories & More Petal Garden card pack could be simply cut to produce this little scene on a re-sized U Fold card... (original sized U Fold version tutorial shared here)
Bench seat created using the Wood Crate dies and Window Sheets... greetings from Happy Birthday Gorgeous and little heart from Bookcase Builder

All finished off with roses fussy cut from the Petal Garden papers... though small flowers could be just as easily stamped to avoid the fussy cutting if that isn't your thing!!!
Remember to email me if you are interested in a Class in the Mail (UK & Europe only) or a Tutorial Bundle... happy to oblige if sufficient interest... 

And I can hear some of you asking ... which cards did I use from the Memories & More Petal Garden pack? Well these cards... one of the large and one of the small.... 

Saturday, 29 July 2017

Another Foil Frenzy Panel Trio card

Ok back to birthdays - and Foil Frenzy... Here is another quick card made from the 1" wide leftovers from making boxes and the like...

Dotty Soft Sky Foil Frenzy paper strips left and right with a dotty Lemon Lime Twist one in the centre.... Happy Birthday die cut in Pool Party and Lemon Lime Twist stuck slightly offset for the greeting... and finished off with a hand-cut Pool Party flower and Lemon LimeTwist leaves from the Happy Birthday Gorgeous stamp set...
Another Quarterly Training make designed by Julie... though my final decoration was different in the end...

Craft Spa Recipe
A4 Thick Whisper White A6 Card Blank
Foil Frenzy Paper 1" x 13.5cm ( x3)
 And here is the round up photo of the 3 Foil Frenzy cards shared over the past couple of weeks...


Thursday, 20 July 2017

Happy Birthday Gorgeous Balloons & Foil Frenzy Card

Simple panel trio card from some 1" strip Foil Frenzy paper leftovers for you today... leftovers from the sides of the die cut Window Boxes and the Gift Bag shared over the last 2 days...

Greeting and punched balloons care of Happy Birthday Gorgeous as I thought it was about time the balloons in this set took centrestage... the Hooray balloon being stamped in Archival Black which worked a treat on the shiny foiled elements of this paper...
Greeting label using the new 2 1/4" Circle Punch...  a punch that a few of you have told me you had overlooked!

Balloon strings care of the new Pool Party Bakers Twine... and finished off with the Pool Party 3/8" Shimmer Ribbon again

Light, bright and ever so shiny... makes a young heart sing!
Craft Spa Recipe
A4 Thick Whisper White A6 Tent card blank (ie 10.5cm x A4L, Scored LANDSCAPE at 14.8cm)
A4 Pool Party 10 x 14.3cm
A4 Lemon Lime Twist 9 x 10.5cm
A4 Thick Whisper White 10 x 3cm
Foil Frenzy strips 1" (2.5cm) x 10cm


Wednesday, 19 July 2017

Foil Frenzy Happy Birthday Gorgeous Gift Bag

 
Another shiny make care of the Foil Frenzy papers... this time a simple Gift Bag using the Gift Bag Punch Board

So this is a medium-sized bag about 4 3/4" finished height from half a piece of 12" paper... Simply decorated with Lots of Labels die-cuts and a bit of Happy Birthday Gorgeous stamping
And a tip... these Foil Frenzy papers are actually Soft Sky... but Pool Party is used for the ribbon and stamping instead... as it kind of works better! The shimmery nature of the ribbon and the brightness of Pool Party just co-ordinating with the shine of the papers better!

This is a project we made at Julie's last Quarterly training... and I have to admit that it took me a while to remember how to use the Gift Bag Punch board!!
For those of you feeling the same!! Here is the Stampin' Up! video to remind you... But fear not... mine is still out in my crafty space and it may be used a few times in the near future!

Simple, quick but effective make (once you remember how to use your punch board!)... and a robust gift bag care of the fabulous Foil Frenzy papers... what's not to love!

Craft Spa Recipe
Foil Frenzy Paper 6" x 11". Score at M (medium) for front & back...

Tuesday, 18 July 2017

Foil Frenzy Window Gift Box

Foil Frenzy papers meets Window Box dies... with the Happy Birthday Gorgeous stamps to decorate...

With lots of 1/2" Finely Woven Berry Burst ribbon to finish it off... 
Circles punched using the new 2 1/4" punch and the 2" punch

And a tip for you for the top hexagon panel ... I drew round the decorative Window Box die on Lemon Lime Twist card and then cut out by hand.

I then die cut a white panel with the same die and then hand cut that too... there were even lines caused by the pressure around the die to guide me!! Easy peasy!
All in all....  a pretty and shiny box!

Wednesday, 12 July 2017

Flower Shop & Fresh Florals U Fold Card

Quick post today... as Wimbledon calls!!

Another U Fold (aka Bridge Fold aka Centre Box Fold) card... click here for the tutorial... this one using the 3cm high front panel again...
Using Fresh Florals papers, Flower Shop & Pansy Punch, Happy Birthday die, Silver Glimmer Paper and Clear Faceted Gems - and the new 2 1/4" Circle Punch...

Happy Birthday die cut and then snipped into 2 to form a long thin greeting instead of the short fat as it comes version .... aqua-painted Tranquil Tide on white for the Happy.... and Silver Glimmer for the Birthday...
Simples...

And it all folds flat for putting into your standard C6 envelope...

Tuesday, 11 July 2017

Tranquil Tulips for Tuesday!

Lovely little colourful trio for you today....

A Tranquil Tulips set we made at Julie's Monthly Training a few weeks back...

This stamp set is a Host exclusive one ... but it can be yours for free if you order £100 (excl P&P) over the next 2 months through my Online Shop ... remembering that a £45 order this month will get you a £4.50 Bonus Days coupon to spend for free in August...

So thinking about it... if you were to do it in one go this month... a £100 order this month... would deliver you £9 free product of your choice on your August order with the Bonus Days offer plus a free Tranquil Tulips stamp set (£14 value) from me under separate cover... free plus more free... what is not to love!

First up... the super CAS card....
Second up... the stepped up card.... with added double -punched Pretty Label label and Fresh Fig ribbon... greeting from Happy Birthday Gorgeous...
And last but not least the accompanying gift bag... care of the Gift Bag Punch Board... so glad I had a refresher on using the board!! Quite timely now I am thinking of Christmas... it is just so good at what it is designed to do! Finished off with with a Gold Library Clip & Berry Burst ribbon
And here they are all together again... remember this stamp set can be yours for free...plus even more free... feel free to shop here...!

Sunday, 9 July 2017

Label Me Pretty for All Occasions

Seem familiar? Look again...

The small A7 cards shared yesterday had a quick make-over using the new Label Me Pretty stamps and the co-ordinating Pretty Label Punch... so now cards for all occasions...

Label Me Pretty Clear-Mount Stamp Set
Label Me Pretty bundles available with 10% off - clear mount here and wood mount here

So in Tranquil Tide... You're the Best...
In Fresh Fig... From My Kitchen to Yours...
In Berry Burst... Thank You for caring...
A more floral Happy Birthday label...in Lemon Lime Twist... (Though I have to admit this doesn't do it for me!!! Really does need more Berry Burst than Powder Pink...)
And finally remaining as the original Happy Birthday Gorgeous stamped label... in Powder Pink...

Wednesday, 5 July 2017

Wood Words Double Z Joy Fold card & the other US A2 card tutorial

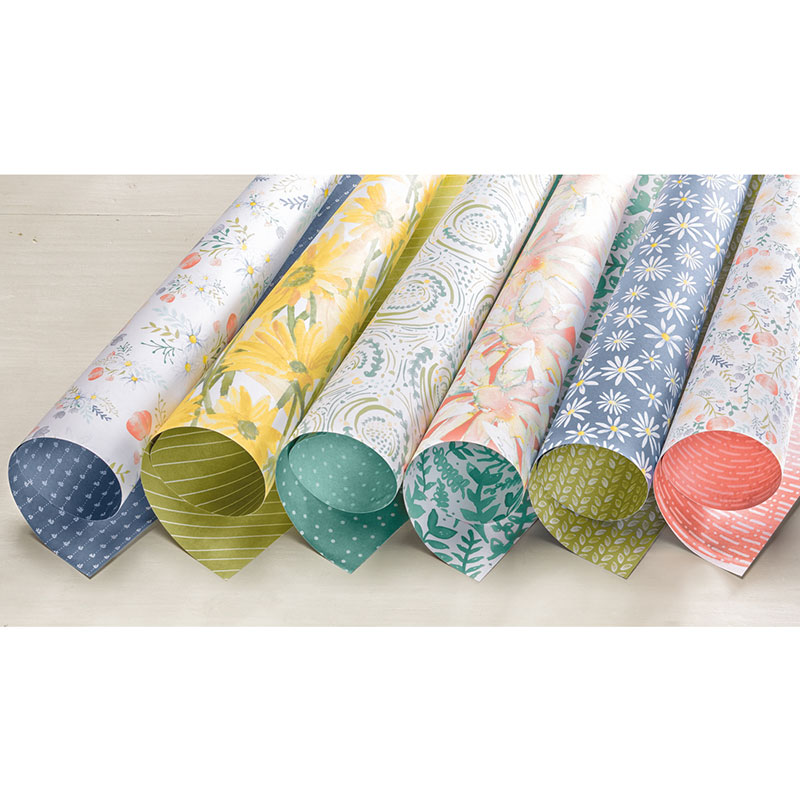
Have to laugh at myself... I have been desperately trying to find the time over the last week to make further samples of the two A6 Double Z Joy Fold cards so I could share the US measurements and directions... and then I just found this Fresh Florals  one that I made weeks ago!

So without further ado... here is the tutorial for the portrait orientation fully opening Double Z Joy Fold card converted from our A6 size (from A4 card) to the US A2 size (from US Letter 8 1/2" x 11" card)... this is a design sized to nicely fit one or two of the Large Numbers die cuts on the front panel....
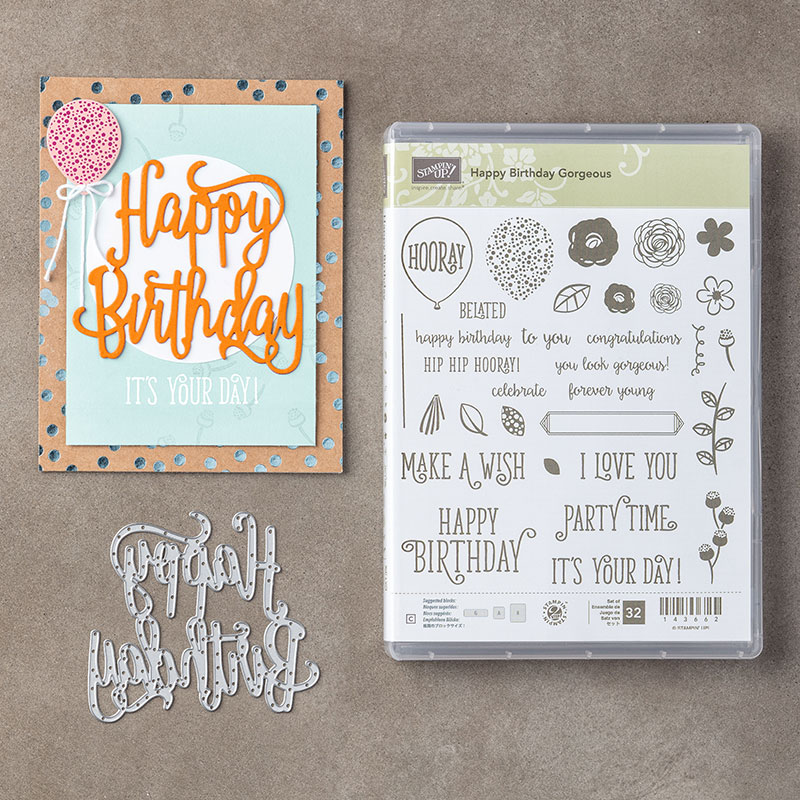
The front panel is simply decorated on this one with a stamped greeting from Happy Birthday Gorgeous and the gorgeous flowers from Wood Words...

Click here for the original card with the die-cut number and for the A6 Tutorial in centimetres from A4 card...
Also note that I shared the tutorial for the US converted landscape orientation Joy Fold card yesterday.... Click here for the US A2 version and here for the Rest of the World A6 version (in centimetres)

So back to this one!

Craft Spa Recipe 
US Letter Card Thick Whisper White 8 1/2" x 5 1/2"
Berry Burst Card 6 1/2" x 3 3/4"
Whisper White Card Front 2" x 3 1/2"; Back 1 7/8" x 3 1/2"
Paper Left Front 1 7/8" x 5 1/4"
Paper Right Back 4" x 5 1/4"
Paper Centre  1 7/8" x 3 1/2"

Craft Spa Directions
1. Score Thick Whisper White LANDSCAPE panel at 2 1/8" & 4 1/4"
2. Z Bone Fold. Valley for halfway/centre... Peak for quarter-way
3. Score Berry Burst LANDSCAPE panel at 
2 1/8" & 4 1/4"
4. Z Bone Fold. Peak halfway-ish (front) fold... Valley for Quarter-ish (back) fold
5. Adhere papers

Now to sticking the two Z Fold parts. Think about what needs to go where!!! Otherwise you will just stick your whole card together and it won't open after all!! Suggest a dry run with no glue the first time... then it should all become obvious... and see the step by step photos in yesterday's post if you need a visual...

6. Adhere back section of smaller Z Fold onto back face of main card - make sure the left/inside valley fold of the smaller Z section panel is behind your 
front left peak fold of the main card  ie slip the smaller Z in behind the larger left fold as you stick it down/line it all off on the front... 

7. Adhere front part of smaller Z Fold onto main card front (think about where NOT to put your glue!?)

8. Decorate as desired


Friday, 16 June 2017

Delightful Daisy Delight Double Z Joy Fold Happy Birthday Card

Time for another Large Square Double Z Joy Fold card using the gorgeous Delightful Daisy papers... Tranquil Tide taking centre-stage this time... I do SO love this new colour...
Delightful Daisy Designer Series Paper
Dressed up with a simple white-embossed and punched Daisy Delight daisy... colouring care of Soft Sky & Tranquil Tide marker pens... with a Daffodil Delight stamped flower centre for a pop of colour... (Note that the Daisy Delight bundle and punch are un-orderable at present - stocks expected back  in the European Stampin Up! warehouse at the beginning of July. Stamp set still available to order)
And a die cut Happy Birthday...which I think may just become my most used die of all time... finished off with a bit of Tranquil Tide sponging for an ombre effect...

Plus a greeting from the co-ordinating Happy Birthday Gorgeous stamp set
Happy Birthday Gorgeous Photopolymer Bundle
Click here for the Card Tutorial...