Showing posts with label Graveyard Gates. Show all posts

Friday, 8 December 2017

My favourite Detailed Gates Christmas Card!

So I remade my Christmas Gates card that I shared here (with the Tutorial for you...) as I wanted to use the Boxwood Wreaths... and make it a quicker and simpler card in a class with lots of other projects going on...

Though luckily my brain kicked into gear before I attached the Boxwood Wreath as...with all that dimension... it would never have fit in a standard C6 envelope if I had... so the Christmas Around the World papers came out again... and a simple die-cut but flat wreath & bow was added instead...
And of course... luckily the Halloween Night papers are still in the Clearance Rack for us in Europe.. so the brick sheet in there made the gate posts really easy! I have to admit that more on their way to me and that I have bought a lot of these papers since they have been in the Clearance Rack...

Rest of the details are the same as the original ... apart from the Lanterns which are also care of the Christmas Lamppost dies... which are retiring (sniff! I am so gutted!)... but they are reduced in the Year End Sale by nearly £4...
Though the Full Bundle with the co-ordinating Brightly Lit Christmas stamps is still marginally cheaper if you want the stamps too...

And I will dash a few more of these off prior to my Christmas post... quicker to create than they look... and some already prepped and ready to go ...


Friday, 10 November 2017

Detailed Gates Lanterns...

Remember these cards... well it turns out that they aren't just a card after all...

Pop a tealight in with your card and the recipient can have a  beautiful lantern/light display too...
Just remember to wrap washi tape around your tealight to make it look so much more special...
Simples!

Finally back to normal scheduling time today so as to hopefully hit a few fellow demo's blog feed before they dash off to On Stage events around the world this weekend... see you there (in the UK!) and hope you all enjoy!


Friday, 3 November 2017

Detailed Gate U Fold Card Tutorial for Fancy Fold Friday

So back to my Detailed Gates cards... I had an unexpected (and great!) night out on that Friday - so I had to suddenly stop my blog post mid flow...  And then it was a busy weekend! And then a very very busy week - or three!

But here is the card tutorial for you finally... which is slightly resized to fit the gate perfectly... sorry for the delay!

Craft Spa Card Recipe
Main Card - Smoky Slate card 21 x 
8.6cm H (8 1/4" x 3/3/8" H)
Box Sections - Smoky Slate card 12.6 x 2cm H (5" x 3/4"H) & 14.2 x 2cm H (5 3/4" x 3/4" H)
Background Panel - Whisper White Card 14.5 x 8.1cm (5 1/2" x 3 1/8"H) 

Card Directions
1. Large Smoky Slate panel LANDSCAPE (long edge along top). 

2. Score at 2.5cm and 5cm (1" & 2")

3. Turn 180 degrees
4. Score at 2.5 & 5cm (1" & 2")


Where required (ie in the event of inner sections as in the Halloween Gate Card)...

5. Score narrower LANDSCAPE Smoky Slate Box Section panel at 0.8cm (3/8") from each side

6. Score wider LANDSCAPE Smoky Slate Box Section panel at 1.6cm (3/4") from each side

7. Adhere Box Section panels to each other 
8. Make stamped background panel and trim when LANDSCAPE to 2, 10.5 and 2 cm (3/4", 4" & 3/4")

9. Adhere trimmed background elements to 3 inner faces
10. Fold Card as Mountain, Valley, Valley , Mountain
11. Adhere Box Section panels to inside of card (where relevant - none in this card) See photos for steps 15-18 here for more guidance if necessary

12. Assemble the Gate across the Front  section

13. Double stamp the gateposts (above and below each other in opposite directions!) using a Stamp A Ma Jig stamp positioner. Cut out by hand & trim as necessary. 
14. Adhere to sides of card front. Decorate as required.
Please see my Full U Fold Card Tutorial here if you need more guidance and visuals as to what goes where for this type of card fold... and yes it does all fold flat to go in the envelope!

And here are the 3 Gate cards made so far... just click on the photo to go to the relevant post with more details on the decoration... Oh and another one out in my craft space for another day!


Monday, 9 October 2017

Christmas Detailed Gate & Hometown Greetings Card


And finishing off the 3 day series with one for Christmas... with a few extra stamp sets thrown in for good measure!!
And this time I remembered to take a photo off the little scene behind the gates... 
Whisper White panel white embossed with stars from Christmas Pines, trees from Lovely as a Tree and then brayered with Dapper Denim... and I have just realised something else clever about the Sponge Brayers... I don't have to mask the horizon... I have enough control over the brayer to form the horizon myself!

And finished off with a die cut Hometown Greetings church panel... with the lights on this time..!(Wink of Stella & Crushed Curry ink)

Gateposts and lanterns care of Graveyard Gates... which is the coordinating stamp to the Detailed Gate dies used for the gate!
And then I grabbed yet another stamp set & co-ordinating dies! At Home with You... for the trees in pots, the holly garland (door garland snipped at the corners to get a straight run...) and the Classic Label punched greeting...  

And finally finishing off with some tiny 1/8" Real Red Ribbon bows and Rhinestones as baubles on the trees in pots...


Sunday, 8 October 2017

Detailed Gate & Hometown Greetings Wedding Card

Another day... another theme for the beautiful Detailed Gate... a quick and easy card for Mr & Mrs on their wedding day...

The same Bench U Fold card fold... but simpler than yesterday's more spooky card... as no extra box sections at the base... and just a simple die cut church scene to be seen when you peer through that gate...

The longer gate posts are created using the stamp in the Graveyard Gates set... just lining up & stamping one above another (in opposite directions!) to get the extra length... and then just trimming as required...
The inner decoration scene is just a simple trimmed Pool Party brayered Whisper White panel (though I could have used a Soft Sky panel to make the job even easier!)... with a Smoky Slate Hometown Greetings church border... finished off with some die cut Tranquil Tide trees....Forgot to take a photo before assembly... hence the strange shot below!

Front finished off with handcut Smoky Slate Graveyard Gate lanterns (though I could have used my die cut Brightly Lit/Christmas Lamppost ones instead) which are coloured in using a Clear Wink of Stella and Pool Party ink...

Plus a few Sheer 1/8" White Ribbon bows and a Smoky Slate Cheers to the Year greeting punched out using the Classic Label Punch


Saturday, 7 October 2017

Jems Monthly Blog Hop - Trick or Treat (but not for necessarily for Halloween!)

Welcome to our Monthly Team Blog Hop featuring a lovely play on the words "Trick or Treat"... as suggested by the very clever Uma....
Could be something for Halloween.. but could otherwise be a ...
* Trick - an illusion, a fun fold, a surprise or something unexpected in the project...
* Treat - so Treat Packaging or indeed a cake, chocolate, sweets...


So I didn't intend to do a Halloween project at all... but here you have one!
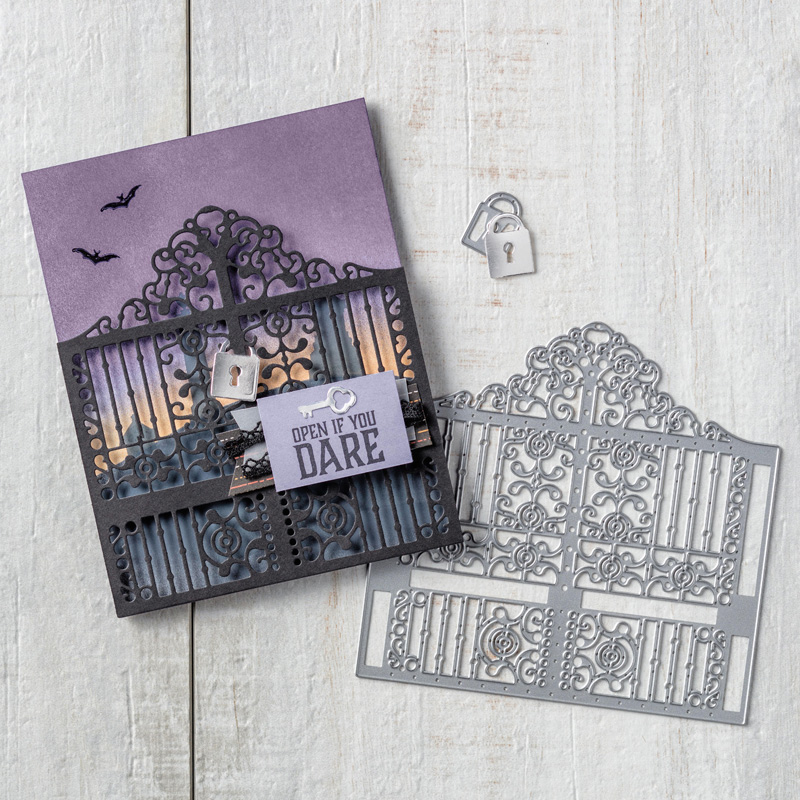
I absolutely LOVE the Detailed Gate die cut and so the Graveyard Gate bundle was beckoning me to play with it... and thus I made my (probably) first Halloween card ever! Keep watching this space for a few other non Halloween options as the weeks pass by!

I will go back to calling this a U Fold Card (as it is a Bridge Fold card without the bridge across the front! The Gate does the job instead...)... and spookily the dimensions for my latest Bridge U Fold Card were perfect... click here for that Tutorial... I just cut the Smoky Slate card to 8.6cm (3/3/8" for my US readers) high instead of 10.5cm(4 1/8")
As always the card does lay flat to go in an envelope... though I think I will have to write Scaredy Cat on the back ( or something) ... as this gate doesn't actually open!

I plan to be back with an updated Tutorial for the card and all the decorative details for this one shortly... but in the meantime here is a shot of the simple little scene behind the gate! Though I would colour in the church windows if I did a re-make!
Click here to go to my earlier post for more details on the Detailed Gate & Graveyard Gate products... 

And so it is now time to pass you onto the lovely Tracy... till next time!


Introducing Detailed & Graveyard Gate...

Had to pop on and introduce my second favourite product in the Autumn Winter Catalogue, Graveyard Gate stamps & Detailed Gate dies ... available separately or as a bundle in both Wood Mount and Clear Mount.

You will understand more why shortly!

In the meantime... this is such an incredibly versatile product... and I have to say that I am cutting these beautifully without the Precision Plate.... just an extra couple of layers of paper with my replacement Big Shot platform is doing the trick... I know a few of you were worried about that!

So here is the product image... check out the lock and key dies... and all those chess pieces in the stamps!
Graveyard Gate Wood-Mount Bundle
And here are a few projects the Stampin Up! concept artists made for us.... I LOVE all of these... and I don't even make Halloween projects as a rule...

Graveyard Gate Clear-Mount Bundle
And click on the image below for the direct link to the video showing you much more...
Back with more on this product very shortly...