Showing posts with label Hearth & Home. Show all posts

Friday, 18 May 2018

Fiftieth Birthday Conservatory card...

So an up-graded card to last week's Greenhouse card (for which the Tutorial was posted here) for a fellow demo friend... on her special birthday...
I added a bit more furniture... a couple of chairs using the Seasonal Layers dies & the Wood Textures papers... and a Big On Birthdays greeting on the table top...

And a tip... I had to give my chairs legs so that they were the right height! Easy to create from the left over bits from the tables... about 2 cm/3/4" in height...
And then I added the sentiments for the 50th special birthday... from Milestone Moments (Retiring!!)... on both the front of the windows and the flower pots... though you will have to look closely at the flowerpots to see it!
But that is where I came unstuck... as OMG.... I was a whole year early!!! Oh my... what am I like... Luckily she loved it.... and reckons it is even better in the flesh than these photos portray... 

And more importantly in the circumstances... it has thoroughly amused both of us... though I get the feeling that I will NEVER EVER live it down!!! 


Friday, 11 May 2018

Fancy Fold Friday - The Greenhouse Card Tutorial

Otherwise known as the Conservatory card... OR the New Extension card!! And great for a New Home card too...

Well this one proved very popular when I shared it here last weekend... so... by popular request... here is the Tutorial as promised...

Craft Spa Recipe
Thick Whisper White 20 cm x 10 3/8" (7 7/8" x 10 3/8")
Window Sheet 20 cm x 6" (7 7/8" x 6") NOTE - this works best if slightly shy of 6" H
Sahara Sand 14cm x 1 1/2" (5 1/2" x 1 1/2")
Embossing Paste & Soft Suede ink refill
(D) Thick Whisper White 7.4cm x 21 cm (x3) for the windows
(St) Thick Whisper White 6 x 18cm for the 3D'd hanging baskets & plant-pots
where (D) is for die-cutting and (St) is for stamping

Stampin Up Products used
Hearth & Home dies
Hanging Garden stamps
Bookcase Builder stamps
Barn Door stamps

Pattern Party Masks
Embossing Paste & Palette Knives
Wood Textures papers
Window Sheets
A4 Thick Whisper White card
Inks - 
Memento Black ink; Early Espresso, Cajun Craze, Old Olive, Always Artichoke
And Stampin Blends or Many Marvellous Markers for colouring


Craft Spa Tutorial

1.       Mix a few Soft Suede ink drops with the Embossing Paste
2.       Mask & apply the embossing paste to form the bricks
3.       Remove the mask (and quickly clean everything up!)
4.       Leave to dry (I reckoned they were touch dry after 30-40 minutes or so –maybe sooner)

5.       Score large Whisper White panel LANDSCAPE (long side across top) at 1 ½”, 2 ¾”, 4” & 10”
6.       Turn scored card over (so mountain fold to top) and lay down PORTRAIT (short side across top) with the thin/1cm score line to the top
7.       Ink up & stamp the 3 hanging baskets (Memento Black) down from the top score line
TIP: mark along top score line at 7, 10 & 16cm if you want to stamp the baskets equidistant (1 ½”, 3 15/16” & 8 7/8”)… though I have my stamps all lined up on my Stamparatus tool so that it is a quick job for my ladies in class

8.       Optional –for 3D baskets…  Ink up and Memento stamp the 3 hanging baskets again on scrap Thick Whisper White & colour as necessary with Stampin Blends – and fussy cut!! Does look really nice…
9.       OPTIONAL : for 3D pots on the table… Ink up and stamp Cajun Craze pots and Old Olive/Always Artichoke grasses… and fussy cut!

10.   Ink up & stamp Early Espresso Barn Door on a piece of Wood Textures paper
11.   Cut Table as shown below


12.   Die cut 6 Thick Whisper White windows
13.   Make up a door (Quick pictures for you here… but click here for the full door tutorial)
And sorry - I do not know why they have turned on their sides!! But it is the same pic after all...

14.   Make up 2 windows (Again pictures here…but click here for more step by step  - though note that I used a double joining “slat” for this one)

15.   Trim the brick wall piece to 7 cm (2 ¾”)wide (x2)

16.   Grab all your decorative parts… and lets make the card!!

17.   Bone Fold main card -  Bottom Front= Valley, then Peak, then Valley and last one/thin Top Front section = Peak
18.   Pencil mark centre of Bottom Front section 3 cm (1 ¼”) down… and then at 7 and 13cm (2 ¾” & 5 1/8”) across at 3 cm (1 ¼”) down. Cut out notch

19.   Apply Tear & Tape adhesive to back of Top Front/narrow section  & back of Bottom Front ( ie at the top edge to either side of the notch)
20.   Stick in the acetate to top and bottom ( I didn’t but… you may find you need to trim a sliver off the height to get it all to lay flat… depends on your prepping/scoring… )
21. Finish internal decoration... there are also the terracotta pots on the table... but these are missing from this shot as I have made another as a surprise for someone... and they would give the game away...
22.   Stick brick panels to the Bottom Front sides
23.   Stick in windows to left and right hand side
TIPS:-
(a)the tops line up with the top of the card and the bottoms just cover the bricks….. AND
(b) the outside edge of the window moulding (top and bottom) is lined up to the outside edge of the card…so you can see the acetate to the side of the main part of the window… you can trim this if you like…I didn’t bother… keeps the card stronger that way
24.   Stick in door so that it covers the windows very slightly to left & right (well that’s the plan!!)
And the eagle eyed will have noticed a slight addition to the internal decoration in this tutorial... but more on that another day... again a surprise... 

Sunday, 6 May 2018

The Greenhouse Card... aka Hearth & Home final outing..?

A quick share from me today as I try to catch up with a few things over our Bank Holiday weekend in the UK...

But this card made us all very happy in class today... so I wanted to share with you straightaway...
Originally intended as a Greenhouse Card... hence the simplicity of the decoration.. but also suitable as a Conservatory Card too... 

Edited to Add... click here for the Tutorial

In the meantime... I used...
Hearth & Home dies
Hanging Garden stamps
Bookcase Builder stamps
Barn Door stamps
Pattern Party Masks
Embossing Paste & Palette Knives
Wood Textures papers
Window Sheets
A4 Thick Whisper White card
And Stampin Blends or Many Marvellous Markers for colouring
Can this really be the final class outing for my lovely Hearth & Home dies... definitely my "saddest to see these go" product on the retiring list! Enough so... I could actually cry!!!!

I just don't think you can beat these for making special  - and fancy - and clever - decorative cards... as well as simple ones too!
And have to admit that I loved using the Embossing Paste again... so you may see more of that in the not too distant future... 

Monday, 23 April 2018

Retiring List - So very sad to see these going!

Last-Chance Products
I have been asked by a few people to highlight products I am very sad to see going from the Stampin' Up! range... so I will attempt this over a few parts...

First up... some products that I know I will struggle to create without in the future ahead!! Call them my Top 10 of Retiring Must Haves! Not including any stamps...

Now most of my ladies already have most of these... but if not... please do think about ordering them now... as they will soon be gone... All still available now... but only while supplies last (or 31st May latest) And for my locals... I will be placing my next orders late tonight Monday, 23rd April and then 2nd May...

Just click on the product photo to go straight to the item in my Online Store...

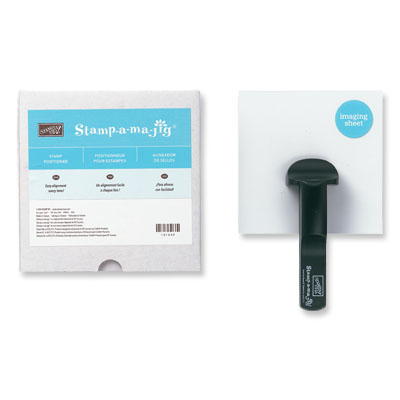
Stamp A Ma Jig... 
Stamp-A-Ma-Jig
What no stamp positioner to use with our Wood Mount stamps!! 

The new Stamparatus tool is brilliant... but it does not replace the Stamp A Ma Jig for wood mount OR for a one-off greeting... Whilst it will not disappear from use in my classes... life with your stamps at home will not be the same without it!!

And fellow demos... please feel free to add your voice to the Product Sandbox for this tool to continue... I know many of us have already...

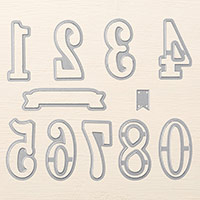
Large Numbers dies
Large Numbers Framelits Dies
Most used dies in classes... and most used by my ladies at home too... what is a special card without shouting out the age or number of years after all!! And the Large Letters will still be available... so if you like to have everything matching... then please get them now...

And fellow demos... Sandbox!? Again many of us have already...

Hearth & Home dies
Hearth & Home Thinlits Dies
GULP!!! Personally my most creatively used dies over the years... a round-up post on these would be very long! Though may have to be attempted before they go!! In the meantime I have linked a few in the sentence below!!!

Not just for Windows (of all shapes & sizes) ... but also for Doors... and Fireplaces... and Wardrobes... and Gates... and iPads... and Tardis... and Telephone Box... and Chests of Drawers... and Super Extra Large Letters!! GULP AGAIN!! Very SAD face on here...

Love these ... and used these... so much... that I actually have 2... can't believe I am going to have to create for classes etc without them... Actually I think I may have to Sandbox again!! Though I think this one is a more personal loss!!!

Brick Wall embossing folder
Brick Wall Textured Impressions Embossing Folder
Gulp again! Perfect for so many of my architectural and flowery creations over the years... and for those wonderful Graffiti cards for the men and boys...

Bow Builder Punch
Bow Builder Punch
So perfect for doing the bow-creating job it does... it will be so missed...

Glimmer Paper
Myths & Magic Glimmer Paper 6 x 6 (15.2 x 15.2 cm)
Now I didn't spot this one straight away... but suddenly I saw a few bulk buys going on!! Yes... the Glimmer Paper as we know it is retiring...

But not all is lost with this one... as there is an alternative coming... described as "thinner"... mmm time will tell... and I will keep you posted as and when I can... but in the meantime... feel free to stock up too... Gold and Clear (Dazzling Diamonds) still available... and the Myths & Magic multi-pack ... but Silver already all gone...

Bloomin Heart dies
Bloomin' Heart Thinlits Dies
Very special... and beautiful... making for easy cards for all occasions... and I know they are still on a few Wish Lists... 

Sweet & Sassy dies
Sweet & Sassy Framelits Dies
Can't tell you how useful I found these recently... again make for super easy cards for all occasions... and I know they are still on a few Wish Lists...

1 3/8" Circle Punch
1-3/8" (3.5 Cm) Circle Punch
One of my very first Stampin Up! buys... and yes I know that there are dies... but they are just not the same as a punch when you just need to quickly punch and go! Mine is still in constant use every week...

Fast Fuse adhesive
Fast Fuse Adhesive
Fast Fuse Adhesive Refill
Whilst this is not my personal favourite... I know that there are a lot of you that are going to REALLY miss this glue system SO much... so please don't delay in stocking up if you have come to love it... Holder and refills still available for us in Europe... though not elsewhere in the world I believe...

Friday, 24 November 2017

What's in Your Wardrobe....? And the Tutorial...

But first...  a belated Happy Thanksgiving to my US readers... I hope that you had a lovely day with family & friends... and are now enjoying the madness of Black Friday!

So back to my wardrobe... though I think that my regular blog readers will already know this year's answer!
For me... it has to be a Narnia-esque scene from the The Lion, The Witch & The Wardrobe... a favourite book of mine when I was young... and this was my first thought when I spotted the Christmas Lamppost dies in the Autumn Winter catalogue... and so glad it was... as it has been the class favourite this year...
And so glad it all came together in this way... just a shame that I hadn't photographed the wardrobe shot when I first shared the alternative Narnia scene... it kind of spoilt the overall plot!! Just click here for that variant using Card Front Builder dies instead of the embossed white trees...

And  I do so wish that I could share the glittery sparkle on this card better ... as that is what really sets this all off to Narnia perfection!!

Want to make one for yourself ... well here you go! And apologies for the laughing heard around these parts for one of the later steps in the how to make a more Narnia-esque lamp!
Craft Spa recipe
Thick Whisper White A4L x 16.5cm H (US Letter 11" x 6 1/2")
Paper 28.1 x 12cm H (US 10 1/4" x 4 3/4")
Lamppost - Basic Black card 2.5 x 14.8cm (US 1" x 5 1/2")
Lamp Glass - Vellum 2 x 4cm (US 3/4" x 1 1/2")
Doors - Thick Whisper White x A5 (ie 14.8 x 21cm)(US 5 1/2" x 8 1/2")

Stamps - Lovely as a Tree; Snowflake Sentiments
Dies - Christmas Lamppost; Hearth & Home; Seasonal Layers
Paper - Christmas Around the World
Punch - 1 1/2" Circle Punch
Dazzling Diamonds Glitter & Glimmer Paper
Wink of Stella Clear
Stampin' Blends marker - dark Daffodil Delight

Craft Spa directions

Making your card
1. Large A4L (US 11 x 6 1/2") Whisper White panel LANDSCAPE
2. Score at 7.4cm from both sides (US 2 3/4")
3. Valley bone fold both score lines

Decorating the little scene
4. Mark bottom of paper at 6.9cm & 21.2 cm (US 2 1/2" & 7 3/4")
5. Ink up & stamp tallest Tranquil Tide trees up from those marks
TIPS
(a) avoid stamping the ground level part of the image onto the paper
(b) "second stamp" a smaller tree to the side whilst you are it... ie stamp a second smaller tree without re-inking the stamp... so that you get a faded tree in the background
(c) Always Artichoke inked trees also looks nice... hence the sample card shared here yesterday...

6. Continue stamping and second stamping green trees as desired...
7. Swoosh with your embossing buddy
8. Ink up & stamp Versamark trees and white emboss...
9. Add glue & liberally cover with Dazzling Diamonds glitter
10. Leave paper panel to dry for a while! Otherwise you will have very gluey/glittery fingers, card and worktop!!!!

Making the Doors
11. Die cut 4 x Heart & Home windows
12. Make into doors as shown here...
13. Die cut a Seasonal Layers large snowflake in Foil (Champagne Foil used here) and pull the small circles out from the waste to add as door knobs... I just use a really really tiny drop of Tombow and add the circle on top...

 Making a more Narnia-esque lamp
14. Colour vellum with dark Daffodil Delight and die cut (that's the 3 plant pot flat looking die!!)
15. Die cut other Basic Black Lamppost parts... hopefully this picture will paint a 1000 words... for the bits to cut... and the next few assembly steps (16-22)...
16. Colour your yellow lamp glass with clear Wink of Stella to add that shine..,.
17. Apply glue very sparingly to back of black lamp and pop onto the lamp glass
18. Tiny dab of glue onto the centre of the 3 prong twirly/ partial bit and stick lamp on top
19. Trim off the 2 side arms at bottom of base
20. Tiny dab of glue onto top of lamppost & stick lamp on top
21. Tinier dab of glue about 1cm (US 3/8") down the lamppost & stick cross-member on top
22. Crop the cross-member to the left (LOL!!! Maybe I should say cross-piece... nah... leaving it so some of you can have a laugh too... ! Though I did change the word trim to crop and put the cross- back in the member...!!! So glad this is not in video format... )

Finishing off
23.. Cut Landscape paper panel down to 6.9 cm and 14.3 cm (aka 6.9cm from either side) (US 2 1/2" & 7 3/4" - aka 2 1/2" from each side)
24. Adhere to inside of card
25. Ink up & stamp Black greetings
26. Adhere punched Glimmer circle & Lamppost...

Friday, 17 November 2017

Christmas Lamppost Narnia card

As soon as I saw the Christmas Lamppost dies in the Autumn Winter catalogue I knew this card was coming... and I couldn't wait to share it with you today... all set on a simple little gatefold card (14.8cm Square or US Letter 5 1/2" Square as nearest equivalent)

Edited To Add 24th Nov- Tutorial now posted here 

Christmas Around the World papers... Tranquil Tide stamped fir trees from Lovely as a Tree ... Die cut Clear Glimmer (mounted on Tranquil Tide) trees & silver deer using Card Front Builder dies ... Die cut Christmas Lampost lamp .... Greetings from Snowflake Sentiments... all doused with a lot of Dazzling Diamonds glitter...
And oops ...so annoying... forgot to photo the front... so I will be back with that ... and a slight variant I made to speed up the card in class... and more details... sometime very soon... including the little tweak to make the lamp more like the Narnia one....

Monday, 5 June 2017

The Potting Shed Bench Fold Card by Louise & Kate

I had another lovely creativity-is-so-worth-sharing and WOW moment last Friday ... as 2 of my lovely class ladies, Louise & Kate messaged me with photos of their creation inspired by the Tool Bench card they had made at our last class a few weeks ago..

When I had first shown them the Tool Bench card.... there was an immediate squeal of delight of "Oh it could be a potting shed" ... and yes absolutely!

So last Thursday night they got together and had a crafty play.... and didn't they do SO well.... here you have a fabulous Potting Shed with some amazing details... may be CASEing a few of those myself girls!
Too many details to point them all out... but check out the wellies... all the pots... trowel to the left ... and the seed packets and gloves on the bench top... too cute!

And just for those that may not know the terminology... a potting shed is a garden shed...or... "a shed which is used for potting plants and in which plants and garden tools and supplies are stored"

Really love it Louise & Kate... and thank you SO much for sharing with me and letting me share to the world on here too... and this is another Bench Fold Card design ticked off my eve growing list!

Click HERE to go and order the tutorial (s)... though please note there isn't a specific Potting Shed one...