Showing posts with label Helping Me Grow. Show all posts

Tuesday, 21 March 2017

Watercolor Pencils #10 - Back to Lovely as A Tree...

Back to the "Trees mini series" within the Watercolor Pencil series! Can't believe I am already on number 10...

Here is another quick & simple little landscape care of Lovely as a Tree and the Watercolor Pencils...
Pacific Point & water wash of the sky... by which I mean... Scribble pencil on a plastic sheet (such as your Stamp A Ma Jig sheet - unfortunately the clear blocks don't work so well...)... add a few drops of water from your Aqua Painter- and mix for a watery wash to subtly colour in that sky area...

Old Olive pencil & Aqua Painter colouring of grass and leaves on the trees...
Real Red dots on the 2 smaller trees to represent apples (Note- no water applied afterwards so as to ensure a "hard" dot...)

3 ticks in the sky for the birds... using the Basic Black pencil
SU! Products Used
Stamps - Lovely as a Tree, Helping Me Grow
Watercolor Pencils & Aqua-painter on Watercolor Paper
Ink - Staz On Black


Saturday, 11 March 2017

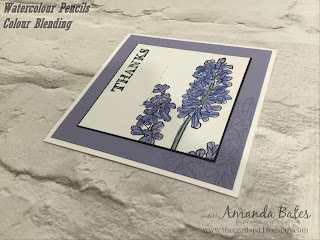
Watercolour Pencils #2 - Colour Blending

Another quick and simple card from my Watercolor Pencils Introduction class...   I am truly having great fun for this class and am loving coming up with different ideas on how to use your pencils... a real value investment in a box....

But wait... there is no purple colour pencil in the Watercolor Pencils box...
So instead... take your Pacific Point and Rich Razzleberry pencils and shade over each other before adding your water to blend them out... and this is what you get...

It will of course be different every time depending on how much of each colour you add... and what base you use ( I used Watercolor Paper with my Aqua Painter here) but these Helping Me Grow flowers are perfect for practicing a bit of blending... as the differences make the flower heads look all the more realistic...
And please ignore the "smidge"... I really should always take my photos before my classes...

And some Bonus Tips for you....

(1) I cut my Watercolor Paper down into 2" squares... that way I get 6 panels from each sheet... plenty to play around with... and a great size for making up into a small square card (10.5cm Square - or 4 1/8" [alternitavely 4 1/4" Square from US standard card size!])

(2) I used Memento Black ink as these stamps are photopolymer... and left the stamped panel a short while to dry just in case! Or dried off with the aid of a heat gun in class.... though I would always use Staz On black ink for watercolouring with rubber (ie wood or clear mount) I could also have used Archival Black ink... but again I would make sure things had dried just in case!

(3) in case you don't spot... the flowers are stamped to the bottom right corner of the Wisteria Wonder panel using Wisteria Wonder ink...

Friday, 10 June 2016

Helping Me Grow Notecards

Love these... so simple... so quick and so effective... so I had to share... But hold on... I didn't actually make the first one pictured....

This was the gorgeous thank you card from Kelly in the Stampin' Up! UK office... that I picked up at registration at On Stage Telford... and then rushed immediately over to Kelly to say thank you! Now admittedly Kelly didn't make this herself either!!!

Which reminds me of the days I first started cardmaking... I used to find that many friends and relatives rang me up to thank me for their hand made christmas card... used to tickle me pink... got to love this creative world and the special feelings it gives to us and the recipients of our makes... Sorry I digress....
But I did make the second one... and so did my ladies at classes last month... can you spot the difference!! The Washi Label punch used on the first had retired and all stocks had gone!

So I used the Decorative Label punch instead... we stamped on a narrow strip of Sahara Sand card... and then punched using the central part of the punch... works a treat and will be used again this way... As they say ... from adversity... comes a great idea!!

And then I had a play with a Crumb Cake note card... embossing the flowers in white this time - and Aqua-Winking with my Gold Wink of Stella again
 
Though (oops) I have only just spotted that I grabbed the washi punch for this one.... Silly me... And BTW... the 1/2 " Circle Punch punches that notch on the left hand side... 
And finally an admittance... this is not what I was planning on posting today... I had rushed around with new stash... made a few lovely projects... took the photos... was eager to share... and then yes... you guessed it... technology decided to do its own thing... and I can't access the photos on my PC for now.... hey ho!! Manana...


Tuesday, 10 May 2016

Dinner anyone?

Sadly... soon to be retiring A Nice Cuppa dies (with co-ordinating stamps)... but I will be keeping my cups & cutlery....

Make a great invitation for dinner...
Or even a Thank You for dinner at a friends or a treat out!
Hope you like my bone china (paper) plate! Plate itself all care of a 1 3/4" and 2 1/2" circle punches.... (2 1/2" retiring and now all gone... though I do have a spare new one here....) And sorry but Serene Silhouettes china plate stamp now all sold out!! 
Papers from the Botanical Gardens pack, Stamps ...You're Invited from A Dozen Thoughts (Wood and clear mount on Retiring List - but wood mount cheaper as reduced!!) Thanks from Helping Me Grow

Tuesday, 3 May 2016

Handbag Mini Book in Sweet Sugarplum

Moving back to the new Sweet Sugarplum... this is a mini book in a bag I created for the Stampers Showcase display at On Stage Telford... showcasing the new 2016-18 In Colour Sweet Sugarplum designer series paper and the gorgeous new ruched ribbon...
 
But I don't think many people actually saw what it was... instead just seeing a plain bag sat there... I must have opened it up at least 3 times during the course of the day....
Though I still have to laugh at the random photos I used... I just don't have any girlie photos to fill a pinky project...so I had to think hard... and came up with any pinky/purply flowers from a trip round last Year's Open Gardens in the village... the lilac does work particularly well colour wise..
Want to make one for your self... here is the link to one with the tutorial I posted earlier...