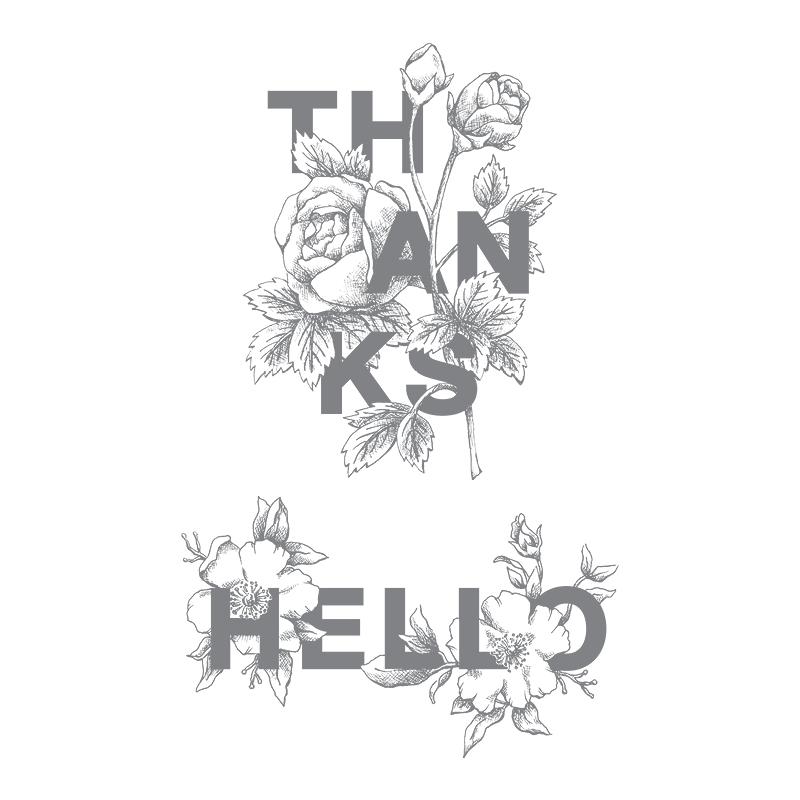
Couple of simple little Floral Statements cards that I made earlier in the year ...
First up... Memento Black stamped HELLO image plus Aqua Painter water colouring... on a simply blank Very Vanilla notecard...
And second up ... a white embossed THANKS on a Crumb Cake panel...with a bit of Aqua Painter colouring in... mounted onto a Powder Pink mat and then onto a Thick Very Vanilla A6 card blank ...with a Powder Pink felt In Color Bitty Bow to finish off...
Actually this is the card that I made and then decided to start Whisper White aqua-painting before colouring in... as in this card here...
Showing posts with label Floral Statements. Show all posts
Wednesday, 27 December 2017
Sunday, 17 December 2017
Floral Statements Duo
Edited to Add... the Clearance Rack has just been updated... more details on today's post here...
First up ... just white embossing on Crumb Cake... with white craft ink coloring on the flowers then Aqua Painter water-coloured over with Tranquil Tide, Pink Pirouette and Berry Burst... Matted onto white... set on a Crumb Cake card...
Second up ... the same... but plus Crumb Cake sponged Fresh Florals Designer Paper... set on a Tranquil Tide card blank...
Monday, 25 September 2017
Floral Statements oh so simple...
Simply white embossed on Crumb Cake... on a Whisper White panel... onto a Crumb Cake card... you really don't need to do anything more with this beautiful greeting!
Though I do highly recommend colouring in the flowers if you have a bit more time... click here for details on that...
The coloured version was so popular I thought I should share the even simpler one!
And a couple of tips for you if you like "looking" around my blog...
I couldn't find the coloured flowers version by searching in the Search box on here... but I remembered my Pinterest board onto which I pin all my projects... and it took me seconds to find it on there! Click here for the "Made at The Craft Spa" board...
Or click here for my "Tutorials at The Craft Spa" board... I am adding to that one somewhat more ad-hocly at the moment... but they will all get on there eventually! 30 or so on... 100s to go!
Or just click here to follow me on Pinterest....
And finally.... I should be back to normal service very soon... been such a busy few months... my feet will be so glad to see the ground for a change!
Monday, 28 August 2017
Floral Sentiments - Subtle Colour on Neutrals...
Just realised I didn't share this card with you when I posted my series of Floral Sentiments cards earlier in the year...
This was a simpler more straightforward version of this one... and I think I decided that I had posted a few cards that looked quite similar... so I resisted to post at the time... and then I forgot! But this was actually one of my favourites of my makes.... clean & simple with just a bit of subtle colour!
Embossing and colouring details here...
Monday, 10 July 2017
Embossed & Aqua-painted Floral Statements
Again on Crumb Cake... but heat embossing the image this time... and using softer pinks for the flowers... pretty!
So first the image was heat embossed in white... then Craft Whisper White was aqua-painted over all the flowers and leaves... followed by colouring the flowers with the Powder Pink marker pen... then aqua-painting Berry Burst at the tips and shadows and Tranquil Tide for the leaves...
Finished off with a very careful " wiping" away off the ink from the white embossed surfaces...
Matted onto a thin border panel of Whisper White... then onto a Fresh Florals paper panel brayered in Crumb Cake ink... and mounted onto a Tranquil Tide card blank...
Tuesday, 4 July 2017
Colouring Fresh Florals papers and the A2 Double Z Joy Fold Card Tutorial
First up the Team Colour Challenge... though you will have to squint to see the Calypso Coral.... but they are all there!

I stamped the Floral Statements "HELLO" image in Early Espresso on Crumb Cake... then I aqua-painted Craft Whisper White ink onto the flowers and leaves... left to dry... then coloured the leaves with my Pear Pizzazz marker pen... the flower edges & shadows using a Blushing Bride marker pen... and finished off the flower centres with aqua-painted Calypso Coral... and the "celebrate" (from Happy Birthday Gorgeous) is stamped in Fresh Fig...
I sponged the Fresh Florals papers for the front and inside with Crumb Cake ink... works a treat! Though it does look better in the flesh than in the photo! And I wish I had stuck the smaller inside paper and Crumb Cake greeting panels the other way round!!
I worked from A4 card... so click here for the A6 card (centimetres) tutorial from A4 cardstock...
But last but not least... here is the converted Tutorial for the fully opening A2 Double Z Joy Fold Card (in Landscape orientation) from US 8 1/2" x 11" letter cardstock...
Craft Spa Recipe
US Letter Card Crumb Cake 11" x 4 1/4"
Card Fresh Fig 10" x 2 3/4"
Card Crumb Cake Front - 4 1/4" x 2 1/2"; Inside 2 1/2" Square
Papers - Front 2 1/2" x 4" H; Back 5 1/4" x 4" H; Inside 2 1/2" Square
Craft Spa Directions
2. Z Bone Fold. Valley for halfway/centre... Peak for quarter-way
3. Score Fresh Fig LANDSCAPE panel at 2 3/4" & 5 1/2"
4. Z Bone Fold. Peak halfway-ish (front) fold... Valley for Quarter-ish (back) fold
5. Adhere papers
6. Adhere back section of smaller Z Fold onto back face of main card . Close the small Z Fold with the front face at the top and the Z folds behind... Eyeball the small Z Fold front face centrally on the back panel...
7. Open out the smaller Z Fold off to the right & close the front folds of the main card
8. Adhere front part of smaller Z Fold onto main card front (think about where NOT to put your glue... I use my fingers to guide me where I have put the pen in the photo...
9. Decorate as desired
Sunday, 2 July 2017
Floral Statements in Soft Blues
No wonky mats and flowers easily coloured using Soft Sky marker pen with aqua brushed Island Indigo to add centres and shadows...
Just simply beautiful... who needs more...
Thursday, 29 June 2017
Last Whole Lot of Lovely card...
Very quick post today... with the seventh and last card of the set made from the Whole Lot of Lovely Quarterly Training kit...
Just scroll back if you need to check what I used... though the flower spray on this one is fussy cut from the same paper pattern as used in the centre panel...
Really nice set of papers to work with... think a full pack may just fall onto my next order!
And here is the CAS card duo round up picture.... other card featured and the details shared here...
Tuesday, 27 June 2017
Floral Statements meets Whole Lot of Lovely #3
But Floral Statements came to the rescue as it co-ordinates really well... and it was out ready and waiting!
The image is stamped again... and then the letter H and flower & leaves and the letters LO and flower & leaves are coloured, fussy cut and 3D'd over the main image to achieve the whole seamless image! Now if you don't like fussy cutting... don't attempt this! But if you do... now you know!
Saturday, 24 June 2017
Floral Statements Duo
A simple but lovely little duo for you today...
So the new Floral Statements set has just the 2 big stamps... HELLO and THANKS... intertwined with flowers... and they do simply do what the name says... make a statement with flowers...
First up.... THANKS... and the cabbage rose....
Stamped in Archival Black to get it as black as can be... then coloured in with Berry Burst and Pear Pizzazz markers... simples...
Then moving onto HELLO... and the old fashioned rose... or christmas rose... (or for me generally... Mock Orange or Philadelphus as my garden is full of its lovely smell at the moment) or actually... it is amazing how many plants it could be!!
Again stamped with Black Archival ink... and coloured in with Pear Pizzazz and Powder Pink marker pens... then the Aqua-painter pulled out to colour in the flower centres and shadows with Berry Burst...
Finding the shadow areas is easy... as the artist has cross-hatched it all for us!! In fact this stamp set is really simple, quick and easy to say the words when we need to... highly recommended if you like your flowers....
And look... "wonky matting"... maybe a first on here.... but there was actually a good reason!!! I had stamped the image at an angle... so instead of getting a new white panel & stamping again... I thought what the heck... stick the word on straight but the mat at an angle... and it looks alright... and different for a change.... but I am going to giggle at all the "wonky matters/stampers!" in the future...
Friday, 23 June 2017
The other A6 Double Z Joy Fold Card with Tutorial
This is an update to the "not-fully-opening A6 version of the card" for which the tutorial was shared here back in April... which has proven very popular... but it was so worthy of this tweak!!
And for my US readers... click here for the A2 card fold tutorial from US letter cardstock...
Oh and click here for the A6 portrait orientation one with tutorial from A4 that I posted earlier this week.... or click here for the A2 portrait one from US Letter cardstock...
Craft Spa Recipe
A4 Card Thick Whisper White 10.5cm x A4L (ie 29.8cm)
A4 Card Basic Black 26.1 x 7cm H
A4 Whisper White 10.8 x 6.5cm H; 6.9 x 6.5cm H
Papers - Front 6.9 x 10cm H; Back 14.3 x 10cm H; Inside 6.9 x 6.5cm H
1. Score Thick Whisper White LANDSCAPE panel at 14.8 & 7.4cm
2. Z Bone Fold. Valley for halfway/centre... Peak for quarter-way
3. Score Basic Black LANDSCAPE panel at 14.8 & 7.4cm
4. Z Bone Fold. Peak halfway-ish (front) fold... Valley for Quarter-ish (back) fold
5. Adhere papers
Now to sticking the two Z Fold parts. Think about what needs to go where!!! Otherwise you will just stick your whole card together and it won't open after all!! Suggest a dry run with no glue the first time... then it should all become obvious... So...
6. Adhere back section of smaller Z Fold onto back face of main card - make sure the left/inside valley fold of the smaller Z section panel is behind your front/central peak fold of the main card/larger Z section ie slip the smaller Z in behind the larger Z panel central fold as you stick it down/line it all off on the front...
7. Adhere front part of smaller Z Fold onto main card front (think about where NOT to put your glue!?)
8. Decorate as desired
Other SU! Products Used
Stamps - Floral Statements; Confetti Celebration
Papers - Fresh Florals
Inks - Powder Pink, Tranquil Tide, Archival Black, Berry Burst & Aqua-painter
Marker Pens - Powder Pink, Tranquil Tide, Smoky Slate
Embellishments - In Color Bitty Bows, Black Mini Sequin Trim
Subscribe to:
Posts (Atom)