Thursday, 31 March 2016

Watercoloured Die Cut Roses

Back to something brighter for birthday wishes... another extra large square card as you do need something big to fit in these roses!
Simple card to make - 2 die cut roses in white - Aqua brush watercoloured roses in Rose Red and leaves in Mossy Meadow.
Finished off with a label...which I have forgotten to take a close up photo... so difficult to see... but I have coloured outside the line of the frame with a Pear Pizzazz marker pen
Still loving my roses!!! And thank heavens for my die-cut brush... these pop out very easily as a result!

And don't forget - today is the last day of the Sale A Bration promotion! Only hours to go...


Wednesday, 30 March 2016

Wisteria Rose Wonder ...

Now you may think me even more mad than usual... but this is one of my favourite makes using Rose Wonder... even when it is another one that is very "not me" in terms of the colourway... and it only took minutes from start to finish!

But before I share more... don't forget it is Wednesday... and the new weekly Deals are up! I will be ordering tomorrow, Thursday 8pm if you are local and want to save yourself that postage! And note that this will be my last Sale A Bration promotion order... a freebie for every £45 spent... you know the rest!
Ink up stamp in Wisteria Wonder... over-ink with Elegant Eggplant ( I used the ink pad where I could but finished off the job close to the rose with my trusty marker pen) and stamp onto left hand side of panel...
Ink up leaves in Elegant Eggplant and stamp to the top right of panel... then ink up and stamp an Elegant Eggplant greeting to the bottom right...
Mount onto Elegant Eggplant mat... then onto Wisteria Wonder 5" square card blank... 

Tuesday, 29 March 2016

Rose Wonder Wreath

Hope you have enjoyed a fabulous Easter break with friends and family...  and hope you have had lots of chocolate... (or abstained because you are being good!!)

So back to Rose Wonder... a simple little wreath for you today... 5 little die-cuts... all stuck together in a circle!!

Finished off with ... two trios of little flowers care of Blackberry Bliss, Rich Razzleberry and Pink Pirouette cardstock and the flower punch from the Itty Bitty Accents punch trio - plus a few pearls. And a double bow in Rich Razzleberry cotton ribbon...

Monday, 28 March 2016

Last Sale A Bration projects to share...

Second post for today... as now less than 75 hours left for the Sale A Bration promotion... so 3 projects for you... all using at least one of the freebies available for every £45 you spend with Stampin' Up!. All of these were made at Monthly Training sessions during January to March - so thanks Julie!

First up is a pullout card in a box.... using Party Pants (my favourite SAB freebie!) I love this!!! Which is code for this is a project you will see again....
Secondly a bow featuring the Metallics Glitter tape... I need to stock up on this... so if you wish to place any orders under that magic £45 level for your own freebie so that  I can do so... I will be forever in your debt.... Tee Hee...
And finally What I Love - a 3 Step stamped flower... 

Only 4 days to go to end of Sale A Bration

Gosh how it creeps up on us!! But here we are... only 4 days left to make the most of the Sale A Bration promotion... ends 31st March...

You know the one .... an exclusive freebie for every £45 spent (as the summary pictured above  - or full details here and here *)... and an extra £20 in free Stampin Rewards for an order over £200... and/or an extra £30 in your Stampin Up! starter kit (£160 product for your £99 investment) 

No time to waste now... order online straightaway here or via email to me here... or go and sign up here

Or here for some creative inspiration... here are todays' 3 projects... all using Sale A Bration freebie products as they are now no longer avaiable for long!!!

* Thanks so much to the clever American demonstrator ( I am sorry I do not know who you are - but I would love to add your name here!) that put this pictorial together... so great to have such a summary...


Sunday, 27 March 2016

Happy Easter to you!

2014_03_Easter Chick Tag Punch Treat Holder 5
Thought I would take an oldie but a goodie out of retirement for the day... just to wish you a Very Happy Easter... and my wish for lots of chocolate to be gifted to you today...

My ladies re-voted this little Easter Chick as their favourite still... so I couldn't resist re-sharing.... seeing as he is adorning our Easter table today....

Tutorial here...

Have a very Happy Easter...

Saturday, 26 March 2016

Rose Red Wonder 2nd Little Trio...

A second little Rose Wonder trio in Rose Red to try out a few more variants... this time on white card blanks mounted onto a Rose Red base... and as difficult in the group photo to see the difference!!!

First up ...white die cut rose - in a white aperture panel - with a Rose Red mat behind...
And a close up...
Then white die cut rose - in a white aperture panel - with the "waste" from a Rose Red rose popped into the rose apertures - piece by piece...
And a close up...
And finally white die cut rose - in a white aperture panel - with a Rose Red panel behind all stamped with Timeless Textures dots...

 And your close up...
And to finish off - a big group shot!!! The Two Trios!!!


Friday, 25 March 2016

Rose Wonder - A Simple Little Trio

Here I have used the other single rose die in the Rose Wonder set... some simple little cards made to try out some different ideas...

White die cut rose - in a white aperture panel - on a Rose Red small square card - Rose Red stamped wording...
Blackberry Bliss die cut rose - in a white aperture panel - on a Rose Red small square card - Blackberry Bliss stamped wording...
Rose Red die cut rose - in a white aperture panel - on a paper mat  - on a Rose Red small square card - Blackberry Bliss stamped wording... Bohemian set of papers...
Liking all of these... back with more soon...


Thursday, 24 March 2016

Rose Red Wonder Thank You ...

Easy little clean & simple Thank You card care of the Rose Wonder dies, a Rose Red mat and a couple of Pear Pizaazz scraps!
White top mat was die cut... stamped... and then the die cut rose and leaves popped back into the hole...with a couple of Pear Pizzazz scraps trimmed & popped behind the leaves areas before it was all stuck down onto the Rose Red mat...

Now I have to laugh at yesterdays' post... for some reason there was only 1 photo of the card posted... rectified at about 8pm last night... so there are a couple more shots now!

Wednesday, 23 March 2016

Wonderful Wedding Rose Wonder for Wednesday!

Wow... what a rose... Now I have to admit that this set initially passed me by... But I saw lots and lots of lovely makes and so it snook into my last order!! So glad it did... what can I say... FABULOUS!!!

Beautiful greetings (OK I won't use all of them... but most are gorgeous)  Stunning die cut roses and leaves - and a gorgeous frame too...
So for today - a " breath-taking & mouth-dropping" 7" square card!!! Well those 4 words have been uttered by everyone that has seen the card so far! Have to admit it does look REALLY good in the flesh... 

We will be making this card at classes next week... still some spaces for Wednesday if anyone would like to join us...

Tuesday, 22 March 2016

It's My Party Outdoor Bunting

Quick share of another of the All Day Event projects... Some nice subtle Happy Birthday bunting!! Suitable for the men folk as well as the ladies...

Extra special as each pennant is in a sealed/plastic unit - so it can be used outside as well as inside...
Though it hasn't been tested to see how much rain/wind it could actually withstand!!
To make this an outdoor version I used the Polka Dot Cone Cellophane Bags and then one of the It's My Party Washi Tapes (5 options to choose from!) to seal along the top on the front and back...
I made a template for everyone to use to cut the papers as required... you can then get 6 flags per piece of 12 x 12 if you so desire... 

The final decoration was left purposefully simple - alphabet stamping then punching out as 2" circles - and then punching of 2 3/8" scallop circles and stars...
Going to be a lot of these made around here!!! It has proved very popular in the flesh! Though my photos are rubbish... might try moving outside for a test (and re-photo) later on in the week!! And I will be sure to re-position that pesky h flag at the beginning!! It slipped!!

Monday, 21 March 2016

Handbag Mini Book Tutorial for Memory Making Monday

Well I had a bit of a reaction when I posted this project on Saturday...so I thought I had better get toute suite onto the tutorial for you!

Bear in mind that this explosion box bag can be left plain and used simply as a treat bag as well as adding the stars, mats and photos and making it into a mini book as I have done here... multi talented project or what!

Craft Spa Recipe


Products used
Stamps-  Party Pants (SAB)
Designer Series Paper (DSP) - It’s My Party
Framelits- Deco Labels
Framelits - Stars
Enamel Dots- It’s My Party
Bow Paper Clips (x2)
Ribbon White Cotton x 12”

Card & Papers Recipe
DSP Melon Mambo Stripe 12x12”
(D) Card Thick Wh. White 4 1/2” x 4”
(D) DSP Stars 3 ¾” x 3 ½”
Card Crushed Curry 3 ¾” Square (x3)
Card Melon Mambo 3 ¾” Square (x2)
Card Mint Macaron 3 ¾” Square (x4)
DSP Stars 3 ½” Square (x5)
(ST) DSP Stars 3” x 12” L
Card Melon Mambo scraps
where (D) is for die-cutting and (ST) for Stamping


Instructions
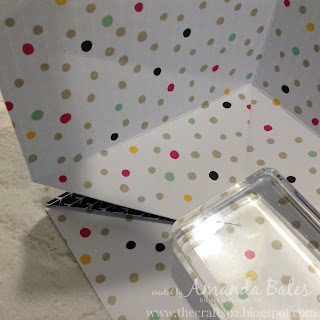
1. Score 12x12 paper at 4” and 8” (use either your score board or your trimmer!)(Note – this orientation will be the top and bottom of the bag) 
2. Turn 90 degrees, Score at 4” and 8”(Note – this orientation will be the left and right hand sides of the bag)
3. Mark top and bottom at 6” 

4. OPTIONAL. Mark 4 corners of inner square (makes it SO much easier to see what you are doing!!!)

5. Score 4 corners (each outer corner to corresponding marked inner corner) TIP – using the Diagonal Score plate makes this easy! Score Top left corner and Bottom Right corner, Turn paper 90 degrees. Then score Top left corner and Bottom Right corner
6. Trim each corner across diagonally (ie cut corner triangle off as per the black line!) & retain the trimmed off sections TIP – square things off by placing the previously cut side up against the Top Bar – Top Tip Louise! Thanks!)
    
6. Using a ruler, score - and then crease - from 6” marks on sides to corresponding marked inner corners

7. Valley Bone Fold all straight score-lines

8. Mountain Bone Fold all Diagonal Score lines. Note that you will fold your inner section scorelines in the opposite direction to how you folded them before…
 
9. Mark 2 x Stars Square panels at 1 ¾”

10. Cut from mark to opposing corners

11. Mark 2 x Mint Macaron Square panels at 1 7/8”
12. Cut from mark to opposing corners
 
13. Trim 4 paper corners to size using trimmer (Sorry - photos flipped themselves around! But I am sure you will get the idea!)
14. Die cut Whisper White & Stars Paper Deco Labels

15. Adhere parts together & score centre of Deco Label
16. Adhere ribbon to white side of bottom section of Deco Label (ie the bit that will get stuck onto the bag so you won’t be able to see it!)

17. Die cut card and paper stars (Note : I used 3 ¾” Square card pieces to cut the card stars out of as that was easier in a class situation… but you could get away with a smaller piece if you are doing this for yourself!!)

18. OPTIONAL. Stamp paper stars as required. NOTE – these star sections can be used/ are intended for photos

15. Adhere all parts