Friday, 31 August 2018

Triple Time Tropical Chic

Another of these for you... multi coloured mats the other way round... and some extra stamping in black to add more definition... Card Tutorial here too... 
Though I do think the black blobs look like fish swimming through a tropical seascape!

And here is the inside,,,
Remember it is the last day of August today... so it is the last day to order those Watercolor Pencils and the Blended Seasons bundle... and also get those Bonus Days Coupons to spend in September! Click here for all those details...

Thursday, 30 August 2018

Spooky Starry Bokeh Dots & Trees

Quick share of a Super CAS card featuring the Bokeh Dots stars in Night of Navy with black Lovely as A Tree trees...

But before I start on more details for this card... Please don't forget to order your Watercolor Pencils Set 2 and the Blended Seasons bundle... now only available for about 36 hours ie until 10.30pm UK time tomorrow, 31 August... and yes you still get your £4.50 free Bonus Days coupon ... for every £45 ordered... to spend in September... Click here for more details... 

Moon added care of a 3/4" circle punched post it note... placed prior to masking the horizon... and then stamping that Bokeh Dots sky... and then all the masks removed...Oh and (coming very soon!) Frost White Shimmer Paint added with a Sponge Dauber to the moon... lovely shiny moon!
Could have added snow to my trees using Shimmery White Embossing Paste... or stamped and embossed white trees on the centre section... but thought it all looked spooky enough to pass as a card for Halloween instead... greeting care of Itty Bitty Greetings

Love this starry sky in Night of Navy... so reckon there will be a christmas version before September is out!

Wednesday, 29 August 2018

More Ombre Bokeh Dots & Dandelion Wishes

Quickly sharing the other half of my ombre Bokeh Dots & Dandelion Wishes duo...
More graduation in the colours this time to make things more distinctive... and colourful! So starting with Mint Macaron at the bottom (grass!)... Coastal Cabana in the centre and finishing off with Blueberry Bushel at the top...

Greeting from Friendly Expressions... note that I covered that "for all that you do" wording with a post it note...inked up in Memento... took the post it note off... and so then stamped just my Thanks greeting! Quicker than using a marker pen to ink up just the Thanks...
And a story for those of you that are very observant... the card blank on this one isn't a standard A6 card blank... as I came to mount the stamped panel onto a Blueberry Bushel layer... and realised I didn't quite have enough!! So I had to cut the Coastal Cabana card blank down to suit! 
Life will become a lot easier when I have built up stocks of all the new colour card... almost there!!

Tuesday, 28 August 2018

Ombre Bokeh Dots & Dandelion Wishes

Now this Dandelion Wishes and Bokeh Dots card makes me very happy...

Light... bright... simple... quick...
Ombre to add interest to the subtle starry background... Pool Party at the bottom... then Coastal Cabana... and finishing off at the top with Bermuda Bay... perfect combination...

With a flash of something shiny to finish... care of the Rhinestone gems on the dandelion centres...

And click here for a more special and shiny version of the card that I shared before...


Monday, 27 August 2018

Shimmery Beautiful Blizzard for Merry Monday...

A simple little duo of cards for you today to introduce 2 new up and coming products in the Autumn Winter Catalogue...

First up ... I am delighted to say that Shimmer Paint is back!! This time it will be available in 4 colours... returning Frost White & Champagne Mist and 2 new colours Vegas Gold and Bright Copper...
For those of that missed this product the first time round... you are going to love Shimmer Paint... it is THE way to add a subtle shine and shimmer to almost anything... without the mess of glitter! Daub it! Spritz it! Paint it! Stamp It! A lot more about this small but wonderful range coming soon... though read on for how I used it for these cards...

Secondly... we have a new snowflake die and stamp set coming your way.... Beautiful Blizzard stamps and Blizzard Thinlits dies...

And I am delighted to report that the die worked wonderfully - using Champagne Foil - with the Precision Base Plate... and the Die Brush... no poking necessary... yay! And look at all those snowflakes - in 6 different sizes - in one pass... Fabulous!
So back to the cards...
First up the Night of Navy card blank... so you can see the Shimmer Paint on the card blank... 

I used the Champagne Mist Shimmer Paint... which gives a beautiful shiny and subtle warm silvery glow wherever it is used... 

I gave the bottle a good shake to mix up all the glittery goodness... and used a Sponge Dauber to pick up the ink from the lid... dabbed it onto my rubber stamp... and stamped fairly quickly so it didn't dry out... And note that the ink dries quickly on the card too...
I found that I could re-apply 3-4 times onto the stamp from the Sponge Dauber before I needed to re-load... and as (on this occasion) I wasn't too bothered about totally complete snowflakes... I also found that I could stamp a couple of times without re-applying...

I also stamped the snowflakes onto the main mat... which doesn't show up very well! But it is beautiful in the flesh...
Note that the Balmy Blue background "blizzard blotch" stamp was stamped off onto scrap paper before stamping onto the card...

Greeting stamped in Night of Navy. Night of Navy card mat on the white card - but Champagne Foil mat on the Navy card...

And spot that the die-cut snowflakes are finished off with a white Basics Self Adhesive Sequin


Sunday, 26 August 2018

Amazing Congratulations CAS Card Trio...

Sorry for the very quick post yesterday... but it was a case of needs must last night!

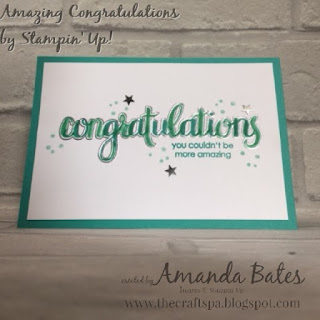
Told you I had made a few Amazing Congratulations cards... so here are 3 slightly different designs for you....

First up is the simplest stamped version... outline greeting stamped in Memento Black... and filled in using Bermuda Bay and Coastal Cabana... and a few little "stars" stamped around in Pool Party to soften... Finished off with the Twinkle Adhesive Backed Sequins...
Second up is the Silver embossed one I shared yesterday... and look closely as there are 2 versions of this one! The one pre Twinkle Adhesive Backed Sequins...
And the one after... One of those "little thing huge difference" moments...
And thirdly (and lastly)... the gold embossed "wonky" one... Yes... I stamped the extra wording wonky!! How annoying!!! So I added 4 rounds of Gold Metallic Thread to take the "focus" away... along with a few gold Metallic Pearls... which worked to a point...
So then I went for sticking it down at an angle... which works a treat! There is always a way round "the oopsies" when you think creatively... well that's my excuse...
The card is a standard A6 card in Bermuda Bay with a 9.5 x 13.8cm Whisper White mat (aka US A2 card with 3 7/8" x 5 1/8" mat)

And ... a few more results have since come in... so now I am off to make some more... think I may try out a different colour combination this time! I can feel something REALLY bright coming along...

Saturday, 25 August 2018

Simple for Saturday... Amazing Congratulations...

So it has been a week of quickly making and posting lots of lovely but simple cards out to young persons as they have received their A Level and GCSE results...  as this year I have many young people to be proud of!

But I will have to be more organised next year!
So a very quick share today as it is late in the evening and I have just realised that I hadn't written up a post!
But I will be back shortly...with more details... but in the meantime the Amazing Congratulations set was my saviour! Along with a bit of silver embossing powder... and Coastal Cabana and Bermuda Bay inks...
Finished off with the fabulous Twinkle Adhesive Backed Sequins (stars)... Don't miss these!!! Can't tell you how much these little starry sequins finished this card off...

Friday, 24 August 2018

Happy Greenfingered Birthday to my Dad!

Wonder if you can guess how old he is today!!?

So I had to make another of these Greenhouse Cards using the Hanging Garden stamp set... as my Dad loves to spend time in their conservatory and potter in the garden so this covered both angles... though I forgot to share this at the time it was made... I am not used to being so organised for family birthdays...
This time I used a Soft Sky card panel for the back to add some colour... though for some reason this colour backing made it very difficult to photo...

And please excuse me for - and ignore the fact that - the wonderful Hearth & Home window dies I used for the main feature are now retired (and no, before anyone asks - mine are definitely not for sale!) - as well as the Soft Sky card colour I used for the back!
Just click here for the Tutorial for the card...

And here are the two versions together... so you can compare and contrast... and do you have any particular preference???


Thursday, 23 August 2018

Broadway Bound Peekaboo Gatefold Thursday Trio

Just realised that I didn't share another batch of customer Thank You cards that I made the other week... These were sent out to 3 of my lovely online customers... along with a gift for each of them too...
So here you go... a further trio of Broadway Bound Peekaboo Gatefold cards with Bow Closure... click here for the Card Tutorial...
Thank you greeting a simple Thank You Thinlits Die die cut!
And the circle a simple Stitched Shapes die cut!

Wednesday, 22 August 2018

Watercolour Wednesday - No Line Watercolouring & Blended Seasons

Love this No Line Watercolouring technique... which is simply stamping your Blended Seasons flower trio image using the palest colour you can find... in this case stamped off Sahara Sand (ie ink up stamp using Sahara Sand, stamp onto scrap paper, do not re-ink and then stamp onto your Watercolor Paper mat)

Though this one didn't quite work out as well as usual!! As you can see some of my stamped lines ... Again I think my brand new very inky Sahara Sand ink pad being to blame! Need to remember to scrape (or push) off some of the ink to the sides before I use it again!!!
And then simple watercoloring using an Aqua Painter brush and ink off ink pad lids... In this case, the NEW Granny Apple Green and Highland Heather along with Bermuda Bay... and a light wash of Pool Party around the whole image to add some depth ( TIP - I just add a drop of water onto the ink splodge on the ink pad lid to get more of a watery wash)

Though if I was to repeat this week I would get my new selection of Watercolor Pencils out... as I didn't have them at the time... ONLY available this month... please don't miss them!!
Finished off with my favourite NEW embellishments, gold Metallic Pearls

Click here for more details and shop links for the Blended Seasons bundle...

Tuesday, 21 August 2018

Tuesday Tip - Stylish Christmas #3

So it seemed to make sense to keep the 3 cards made using Stylish Christmas together...  particularly as I have had some requests for a Stylish Christmas Class in the Post whilst I was away... so please click here to contact me if you are interested too... and I will be back to you very soon with more details and/or an invoice...

The basic Stylish Christmas Class in the Post to make 15 cards including Stylish Christmas stamps, 16 pc. cardstock, 15 envelopes & Metallics Pearls (3 designs x 5 cards each) will be £44 (£41 collected) for Wood Mount or £39 (£35 collected) for Clear Mount. I will be ordering 31st August... so delivery will be with you about 10 September at the latest...
And don't forget that if your Stampin Up! order is over £45 this month you will get a £4.50 Bonus Days coupon code to spend for free in September! So that is just £4 more for the Wood Mount option... or + £10 for the Clear Mount...

Other items used include:-


As well as staples of Versamark ink £8.25, Heat Gun £28, Embossing Buddy £5.50, Tombow multipurpose glue £3.75 or Tear & Tape £6.25 and Stampin Dimensionals £3.75

So this is the last card of the trio...  Just a simple one layer A6 standard card...
With the addition of the lovely Bokeh Dots stamp set (as Jane already has that one too! So it seemed rude not to use it!!)

So Sahara Sand stamped Bokeh Dots background... with the Stylish Christmas swirl and little snowflakes also in Sahara Sand...
Hand cut Real Red stamped flower... and Tuesday Top Tip! - the previously stamped & hand cut flower being used to work out the positioning for the Mossy Meadow leaves which are stamped directly onto the card

Finished off with a gold embossed greeting to match the gold Metallics Pearls at the centre of the flower...
And an admittance for you... you can tell my Sahara Sand is a brand new one... don't think I have ever had Sahara Sand stamp this dark before... I may have to move a bit of ink around on the pad before I use it next... as it has always been my go-to-palest-ink-pad when I want subtle!