Monday, 31 October 2016

Father Christmas Stocking...

Right you can take your sunglasses off after yesterday's post! Back to my more subtle colour hues...

But before I start today...don't forget that today is the last day that you can buy your 3 paper packs and get a fourth for free... just click here to place an order through my online shop... and feel free to add anything else you need... Offer ends 22.50h 31st October
Buy 3 Get 1 Free

I absolutely love the frame & greetings stamps in the Father Christmas set... but I don't love the thought of all that colouring in with the other images in the set.... so I had to have a play and come up with some workarounds...
So first up ... whilst my Hang Your Stockings was still out... the large Night of Navy stocking off the Smoky Slate greeting image...

Simple but very effective....
Fancy the Hang Your Stockings stamps... with 25% off.... click here for advance news of November's promotion.... full details will be posted tomorrow....

Sunday, 30 October 2016

The Ever So Glitzy Card

Now this is one you will love  - or loathe!! And the Christmas Pines greeting REALLY couldn't be more apt!!

I don't think that it will show in the photos ... but this card definitely sparkles and shines from across the room! And it is either the first stocking card picked up... or the last!!!

You may remember that I had intended to make a full-on Gold Glitter card when I shared this one for the Teams' October Sparkly Blog Hop.
Well I found my Heat & Stick powder and Gold Stampin' Glitter...so I started to make one... and then I got a bit diverted.... as I had to try out the Red Glitter Embossing Powder for a greeting... and then the Emerald Envy Glitter Embossing Powder for the holly leaves... and I happened to have a Gold Glimmer die cut stocking sitting there... and so it all got stuck together!

The Real Red background to the stocking is just the Real Red mat.. I just die cut a plain stocking aperture in the front white panel and stuck the gold glimmer one through....
But the Gold on Red die cut stocking proved way too much for me.... so I had to try to calm it all down... with a little bit of sticking scraps from the same die cut stocking in white...

So if you like full-on glitter for Christmas.... then this is the one for you!!!

Actually I think I may know the very person to send this one to for Christmas..... and as she is a regular visitor who always reads to the end.... can you guess who you are????? Actually... and I am laughing my head off now.... I can feel quite a few of you shaking in glitter fear now..... oh no... I may have to make some more!!!! Only a comment may save you from one of these!!!

Saturday, 29 October 2016

Soft & Smoky Stockings...

Or maybe... how to decorate more of your stockings!

I was given a colour theme of Soft Sky, Smoky Slate and Island Indigo for another batch of Hang Your Stockings cards...so thought I would share these too...

First up the Fairisle stocking... inked up in Soft Sky then Smoky Slate and Island Indigo marker pens carefully put to work over the top, Topped up with a Smoky Slate 1/8" Stirthed Ribbon bow...
Second up the Soft Sky snowflake stocking... topped off with Candy Cane Red/White Bakers Twine and a Christmas Trinket embellishment
And last but not least... the Smoky Slate Flourish Aperture Stocking... topped off with a stamped hanger and a Silver Glimmer die cut bow (and a smudged greeting...oops!)
Very serene little trio...


Friday, 28 October 2016

Star of Light Double Die Cut Square Card

Quick Share today... but I think some of you will love this one...
I was attempting to make another of these Double-Die Cut card folds but using the Star of Light... but the edges were a bit too precise for a class make... so before I rejected it altogether.... I stuck the front side flaps together and stuck it all on an Island Indigo square card blank... looks effective!
The star in the middle is a 3D one using the die in the set intended for the use... but I found that going over all the scorelines again worked a treat for me... much easier to fold!


Thursday, 27 October 2016

Sponged Star of Light

Another super simple, quick and easy Star of Light card for you today....
 But everyone picked this one up from my Product Display for a closer look
Island Indigo stamped large star and greeting... then Soft Sky sponged through an aperture die cut by the large fancy star die... though I actually used my Sponge Brayer to do the sponging.... well it happened to be out!!

Finished off with a die cut Silver Glimmer paper star...

Wednesday, 26 October 2016

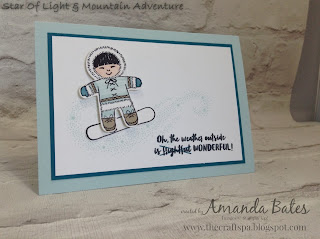
A bit more Cookie Cutter Fun....

I am sure you will recognise the concept from the Cookie Cutter one I made earlier... but whilst the Star of Light stamps were out... I had to give another of these a go...

My little eskimo is definitely having some Mountain Adventure fun in the snow ...
And go here if you want to see the original Snowboarding Santa

Tuesday, 25 October 2016

Hang Your Stockings - The Gold Trio

Another little Hang Your Stockings trio for you... a very sparkly gold glimmer trio this time...

You should recognise the one in the centre and first one below...as this was a Blog Hop project earlier in the month...
Gold Glimmer stocking the way the die intends..

But then I had another couple of ideas...

Firstly the Waste Stocking...
Die cut the flourish stocking and a plain solid stocking in plain white. Stick the flourish one on top of the plain one -  and then stick in the waste from the Gold Glimmer flourish stocking... not that many pieces so not too time consuming!

And lastly the Wrong Way Round Stocking...
Die cut the stocking through from the white side of the Glimmer paper...and then it turns the other way round!

And finish the cards off with pine boughs using the Christmas Pines stamps and dies

Monday, 24 October 2016

How to decorate & Hang Your Stockings

Really simple little trio of small square Hang Your Stocking cards (10.5cm aka 4 1/8" ) today... great for your bulk Christmas cards as so quick and easy...

But before I start... do you know that voting for the 2017 British Craft Awards is now open... Note that UK residents also get the chance to enter the prize draw for an Amazon voucher too...
Select the Papercraft category... and not only can you vote for Stampin Up! (or whoever!) as Brand of the Year ... But there is also a category for "your one must read blog for crafty inspiration". Now I am not on the nomination list... but as I am honoured that many of you feedback that I am your first-to-visit/ must read blog... there is the option to select Other and enter whichever blog name you wish.... Just sayin'...

Right back to today's creative share... These makes were inspired by this gorgeous Quarterly Training swap card from my lovely and very talented team-mate Julie Wade...
First up a Sahara Sand stocking stamped, die cut and 3D'd to the front of a card blank... Finished off with a stamped and die cut cuff, a red Mini Jingle Bell and Gold Bakers Twine bow 
Second up a Real Red stamped and die-cut stocking stuck through a die cut aperture in the card blank. Finished off with a Dazzling Diamonds Glimmer Paper die-cut bow and a Rhinestone Jewel...
And lastly, the Razzle Dazzle one... though I don't think it will show up so well in this photo.... a Real Red glitter embossed & die cut stocking again stuck through a die-cut aperture. Finished off with a Red/White Bakers Twine bow. And apologies for the smudge above the greeting... I didn't photo pre-classes so it got marked!
And a tip for using your Glitter Embossing powders when you want real depth to the colour when using a solid image like this one! 

Ink up the stamp in Versamark, then go and ink up in Real Red and then stamp... Add the embossing powder and then heat to melt. Not sure what it does to my Real Red pad if I do a lot of these...but I can always wipe that sticky Versamark off and re-ink with Real Red when I am done!

Sunday, 23 October 2016

Star of Light Tunnel Fold Card Part 2

 
Simpler version of yesterday's Tunnel Fold card... with the colours the other way round... check out yesterdays' post for the card tutorial

Simple stamped star on the inside... Smoky Slate 8 prong one & large Island Indigo one to get the layered effect... plus Wink of Stella all over the Smoky Slate to make it all shine...just as the card says!
And a thought for all you Whovians... can't you just see the Tardis in the centre of one of these cards....!


Saturday, 22 October 2016

Star of Light Tunnel Fold Card & Tutorial

Another simple Star of Light card that packs a punch...

Clean & Simple on the front... 
But opening up to a bit of paper engineering... with a 3D star to finish it all off...
Craft Spa A4 Cardstock Recipe
Island Indigo 21x14.8cm (1)
Thick Whisper White 20 x 14.3cm (2)
Smoky Slate 9.8 x 14.3cm
Whisper White 9.3 x 13.8cm
(St) Thick Whisper White 10 x A4L (6)
(D) Silver Foil 7.5 x 10cm
(D) Island Indigo 4 x 4.5cm
where (St) means for stamping on and (D) means for die-cutting

Stamps - Star of Light
Inks - Soft Sky, Island Indigo, Smoky Slate
Tools - Layering Ovals dies, Starlight Dies
Embellishment - Gemstones, Wink of Stella

And the How To...
(1) Score Island Indigo panel LANDSCAPE at 10.5cm ( ie standard A6 card blank!)

(2) Score Thick Whisper White panel LANDSCAPE at 5,10,15 cm (TIP-Don't Bone Fold yet!)
(3) Die cut largest Layering Oval centrally
(4) Stamp all over
(5) Bone Fold Valley, Mountain, Valley

(6) Stamp 3 large Island Indigo stars & die cut
(7) Score down the vertical centre axis of each star
TIP - these 2 steps are a lot easier/more accurate if you do them in reverse.... ie Score Whisper White strip LANDSCAPE at 5,13 & 21cm, then stamp the 3 stars centrally on the score lines, then die cut
(8) Valley bone fold each star
(9) Adhere right and left half-sides of 2 stars, then repeat for 3rd star

(10) Adhere right hand side of stamped white panel to inside right hand side of Island Indigo card blank
(11) Adhere 3D star to inside of card blank ( ie centre of star to centre line!)
(12) Fold flat & apply glue to top of left hand side of stamped white panel
(13) Close card over onto the glued panel

(14)Ink up and stamp front White panel - Soft Sky star spray, Island Indigo 8-prong star and greeting
(15) Die cut large Silver Foil & small Island Indigo fancy stars
(16) Adhere all parts


Friday, 21 October 2016

Presents & Pinecones Large Square Double Display Card & A4 Tutorial

A Fancy Fold Friday post with Tutorial for you. This is the Tutorial for the Large Square Double Display Card from A4 cardstock which I thought I had already published - but discovered I had not. So thought I should quickly rectify the situation!!

And remember that these Presents & Pinecones papers are on Special Offer this month
And here are the links to the Large Square Double Display Card Tutorials using 12x12 cardstock  versions - inches and centimetres.
Large Square Double Display Card Tutorial– A4 Metric Version 
You will need:-
Thick Whisper White A4 Cardstock 15x 29cm
Whisper White 12x12 Cardstock 15cm Square
Early Espresso Cardstock 10 cm Square
Presents & Pinecones Paper Mint Macaron 9.5cm Square (x2)
Presents & Pinecones Paper Stripe/Fronds 4.5cm x 9.5cm (x2)
Presents & Pinecones Paper Stripe/Fronds 4.5cm x 2cm (x2)
Stamps & Dies – Christmas Pines

 1.       PORTRAIT. Line up at 2.5cm on Top Bar
2.       Cut from 2 to 12cm. LIFT. Cut from 17 to 27cm
3.       Turn 180 degrees & Repeat 1-2

4.       LANDSCAPE. Score across whole width at 4.5, 9.5, 19.5 & 24.5cm
5.       LANDSCAPE. Score top and bottom sections at 2, 12, 17 & 27cm
(TOP TIP - you will find 17cm difficult to find/do on a Trimmer!! So alternatively…
Line up at 12cm to LEFT HAND SIDE. Score top and bottom sections
Line up at 2 cm to RIGHT HAND SIDE, Score top and bottom sections
Turn 180degrees and repeat for 12cm LHS and 2cm RHS)

6.       With panel PORTRAIT out in front of you… Hand fold from edge facing you…
1st LH & RH outer score-lines - Mountain folds
1st centre section score line - Mountain fold
4th/last LH & RH outer score lines- Valley fold
2nd/last centre section - Valley fold ( you can put your fingers through the previous folds to do so!)
3rd outers - Mountain Fold (will have happened automatically!)
2nd outers – Valley Fold (will have happened automatically!)
NOTE – the photos are of a Small Square Double Display Card but show you what you need to do!!


7.       Fold up towards centre, ensure cut-lines/sections lined up & free to move & then Bone Fold
TIP – an extra “crease” will now magically appear in the centre of the 4 top & bottom outer sections – do not worry, you will be covering these! But don’t further crease or bone-fold it!!! 

8.       Repeat 6-7 from other side

9.       Decorate the Card Front
(a) Adhere Mint Macaron Paper to Early Espresso Square panel
(b) Adhere to 15cm Whisper White Square Panel
(c) Chop in half at 7.5cm (best to use a guillotine cutter as you have 3 layers to cut through…)
(d) Stamp Early Espresso greeting on RIGHT HAND section
(e) Adhere these Card Front Sections to front LH & RH sections of Main Card – one at a time lining everything up nicely as you go! 


TOP TIPS – put glue on front sections of Main Card NOT the back of the Card Front Sections!!! Or you will have glue where you don’t want it!!!

I would recommend also Tombow – I have only used Sticky Strip for the photo so you can see where to put the glue! 


10.   Stamp, die cut and decorate as necessary
TIPS
(       (a)    the pine boughs are a Mint Macaron one layered over an Emerald Envy one. Layered as a shadow
        (b)    the seed-head is die cut in Cherry Cobbler and then the stalks coloured using an Early Espresso marker pen – leaving the berries in red…
        (c)     The central square paper panel is stamped with Mint Macaron stars/snowflakes from the Christmas Pines stamp set– subtle but adds great detail…


Stampin Up! Centrestage Ticket

Oops... I have a new Fancy Fold Friday Tutorial written and a new card to share today... but need to re-take photos of the card!!! My hands must have been shaking.... so please come back later....

In the meantime... look what arrived in the post today... my invite from Stampin' Up! to the Centrestage Reception at our next Stampin' Up! On Stage UK local event in Telford.

I had to share as I think this Large Ticket concept is fabulous... and it might just get repeated for something special I am plotting soon...
Though it is a good job they were not employing me to tie all those Linen Thread bows!!!! Cough...I am somewhat bow challenged....

Not long to wait now until Telford... just 2 weeks and I will be meeting up with over 400 UK demonstrators and cough... getting the new Spring Summer Catalogue in my hands!!
Really looking forward to it.. can't wait ladies and gents!