The ladies in this week's class all have big family gatherings for Easter... and so like to spend some time with me decorating lots of Easter Treats for the table... So I have to keep things decorated simply... as they don't want to have to stay overnight!!!
So this year I will send lots more chocolate... 2 Milka bars going in all mine... But something simpler and more stylish for presentation... as (apart from 2) they are all getting too old for cute Easter chicks and bunnies... Though I did have to laugh as... for once... I loved the pop of bright colour for the boxes... Lemon Lime Twist particularly doing it for me!! And everyone else as it happened...
I used the Petal Passion papers... as then everyone can colour as much or as little as they wished....
Craft Spa Recipe
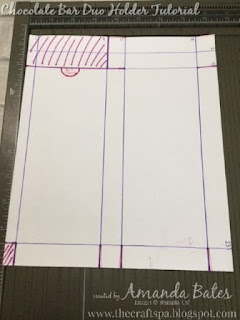
A4 Card 25 x 21cm (ie A4 width)(9 3/4" x 8 1/8")
Papers - Top 10.5 x 14cm (4 1/8" x 5 1/2"); Bottom 5 x 10.5cm (US 4 1/8" x 2")
Craft Spa Instuctions
1. PORTRAIT(short edge at top). Score 1, 9, 11 & 19cm (3/8", 3 1/2", 4 1/4" & 7 3/8")
2. LANDSCAPE(long edge at top) with the narrow section at the bottom. Score 2, 4 & 23cm (3/4", 1 1/2" & 9")
3. Bone Fold all lines
4. Cut as per Template (Note the thin red lines for sections you want to dart as you cut. Neater if you keep those wider bottom sections as straight as possible...)
5. 3/4" Circle Punch as per Template
6. Apply glue and adhere Box together as per Template in following order for ease/neatness.. we used Tear & Tape for all sections apart from the lid... where we used Tombow Multipurpose
(1) Lid sides first checking they fold in nicely! (TIP- partially doubling them up this way makes for a stronger lid)
(2) Narrow side section (TIP- line up tape glue along the fold edge rather than in the centre or open edge)
(3) Small bottom side tabs
(4) Back bottom wide tab (TIP - use a ruler to go into box to bottom so you can apply some pressure up against the ruler to stick things together firmly...)
(5) Front bottom wide tab (TIP - again using your ruler)
7. Cut 1.5cm (1/2") from either side of the papers (when PORTRAIT ie short edge along top)
8. Adhere longer pieces
9. Adhere side shorter pieces
10. Adhere ribbon to wide shorter piece (TIP - colour first as required! Blends or Markers will do the job... but let marker coloured ones dry a bit!)
11. Adhere centre/wider paper piece
11. Decorate as required...
We used a die cut Stitched Shapes circle (2nd smallest) and then stamped using just the leaves from the Sale A Bration Amazing You flower stamp in Lemon Lime Twist... plus a silver embossed Easter greeting from the retired Springtime Blossom set... though some were made using Happy from Perennial Birthday and Easter from Teeny Tiny Sentiments ( but too much faff to actually use in a bulk making class!)
And here are about half of them all neatly assembled and ready to go... the rest were a little bit of homework after all!!
Please note that the inches (imperial) are a literal conversion of the project rather than one tweaked to US Letter card... so either can be used... but do cut & score in the same system!.... Though personally ... even though I am an inches girl... I just found this one easier in metric (centimetres)!


No comments:
Post a Comment