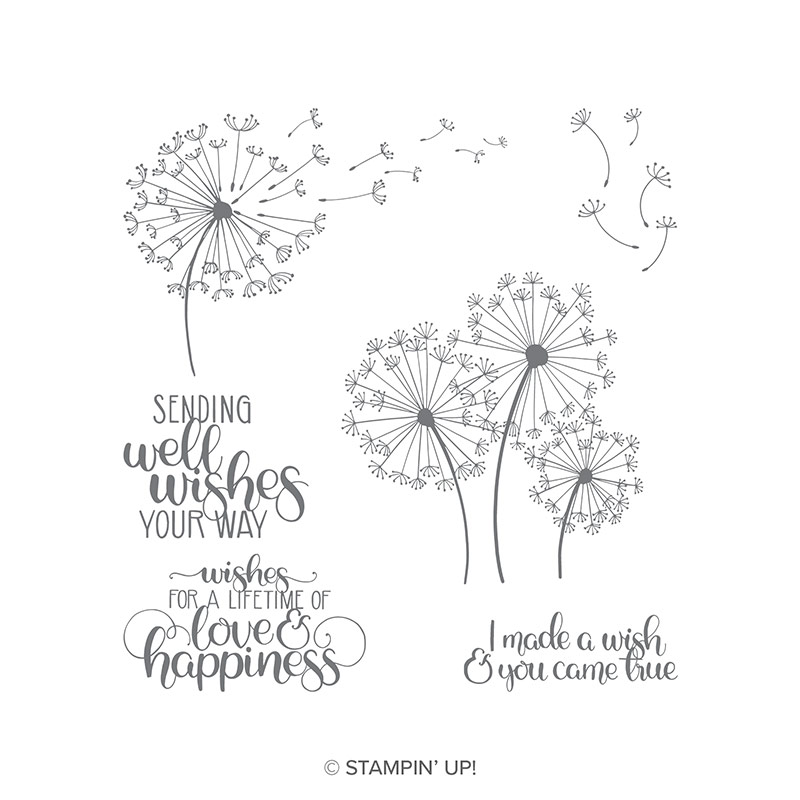
So ... as promised... back to these Dandelion Wishes 2019-2021 In Color cards... with a load more detail for you...
As I changed the (1) Stitched die cut frames (2) greetings (3) floral centres and (4) ribbons as well as the colour as I went along...
As I do like to vary the greetings in a set of cards... and try out a variety of embellishments etc when I have a lot of new ones!
Everything I have used is listed and linked again at the end of this post... but I will take you through each card and the differences!
But first... the common elements...
- each of the cards are made using each of the 5 NEW 2019-2021 In Color colours ... which I absolutely LOVE!
- the card is a standard A6 card blank (14.8cm x 10.5cm) with a 14 x 9.5cm Thick White panel (or use 5 1/2" x 4 1/4" from US Letter card... with 5 1/4" x 4" white panel)
- Ink up and stamp Memento Black Dandelion Wishes dandelion trio to bottom left and top right of white panel... Note that the bottom left are as a trio... but just a duo to top right...
I used Memento Black ink as the Purple Posy card is produced using Stampin Blends.. though I could have used any black including Staz On on any of the others! But I like to play it safe as I think about projects being made in classes... the less "rules" the better!
- Add a fine splatter... I went a bit overboard if I am honest...a s all of these were made up mid classes to demonstrate the technique!
Open the thick/brush tip end of the Dark Black Stampin Blend... and "thwack" the barrel of the pen with your Wink of Stella pen (as you have that out... although it is a bit easier with another Stampin Blend)... making sure to not hit the brush tip!!! (as you will break it if you do!)
It does need quite a sharp tap... I found that most of my girls needed a few practice runs before they go it just right (and they were so excited when they did!! Lots of oohs in the room!)
- Pick up ink from an ink pad using a Sponge Dauber... use a circular motion... start off light and build colour as you go... don't be tempted to press the dauber onto the centre... it will be too dark if using new ink pads! As you will see later!
- Add glitter to coloured centre of flowers using a Clear Wink of Stella pen
- Ink up and stamp Memento Black greeting
- Die cut centre as required
- Add a frame... ribbon... and/or mat as required

First up... the gorgeous Pretty Peacock... definitely my favourite new In Color... and probably to be my favourite Stampin Up colour ever... and the colour that had made every one of my girls almost swoon! No matter what their colour preferences interestingly
This card is the complete CASE of the
original swap card - created by Linda Kasparian - that I received at the last UK On Stage event... using the
Stitched Rectangle dies to cut out the centre panel & frame...
Apart from ... the greeting from
Bloom & Grow...
And if you look closely..! The add of the lovely new
Noble Peacock Rhinestones to the centre of each flower... though I should have used some of different colours with hindsight!
Also... whilst you are looking closely... and so you know what NOT to do (unless you still want to!)...
See the very bottom flower to the LHS... well I slipped! And applied downwards pressure with my Sponge Dauber... and so got a very dark and very defined circle to the centre... especially as it was the first use of the brand new ink pad!... whereas I wanted it all to be more shaded and subtle...
Second one... in Rococo Rose... with a
Dandelion Wishes greeting...
Again using the
Stitched Rectangle dies to cut out the centre panel & frame... but using two different sizes this time...so that I got a coloured frame around the centre panel.
Finished off with
Whisper White Bakers Twine (as although I prefer the black that Linda used... my girls did not... as well as the fact that the Black is not available to order any more!) ...
And then coloured
Basic Rhinestones...using the Dark Basic Black Stampin Blends to add the black...
Starting with Terracotta Tile...
And coloured
Basic Pearls this time... again using the Dark Basic Black Stampin Blends to add the black...
And then Seaside Spray... framed in a manner for which I will come back to tomorrow... as yet again... this post has become somewhat longer than I thought!! Now I know why I only share one card at a time normally!!
Greeting from
Hugs From Shelli Paper Pumpkin set ... which I have to say ... from a value point of view... is almost worth buying just for the lovely greetings and other stamps! The cards (and the lovely box!) etc are just a bonus!
And last but not least... and my favourite (so far!)... the Purple Posy card...
But we have no Purple Posy ink pad... nor do we have the
In Color markers in Europe yet! So
Purple Posy Stampin Blends to the rescue! Just a circular squiggle (technical term!) from the centre out... starting with the Light and then going over the centre with the Dark...
Again I will come back to the (Purple Posy) central framing tomorrow...
But this time I matted the stamped white panel onto a narrow Basic Black mat... albeit very badly ... as it was an afterthought... and suffice to say ... stuff wasn't straight! But I am sure you can get the idea! But a 14.4 x 9.9cm Basic Black panel would have done it! (or 5 3/8" x 4 1/8" with US Letter card)
And.... boy... am I glad I didn't add all of this to the original
Blog Hop post...
SU! Products used
Live in the UK? Click on the product link below to order...
Dandelion Wishes
Stitched Rectangles dies
Stitched Nested Labels dies
Noble Peacock Rhinestones
In Color 2019-2021 Faceted Dots
Basic Jewels - Rhinestones & Pearls
Clear Glitter Wink of Stella brush
Stampin Blends - Dark Black (splatter and colouring rhinestones & pearls)
Stampin Blends - Purple Posy combo
Sponge Daubers
Ink Pads - Memento Black; Pretty Peacock, Terracotta Tile, Seaside Spray, Rococo Rose
Card - A4 Thick Whisper White, In Color 2019-2021 A4 pack
Ribbons - Terracotta Tile Scalloped Ribbon (available in all 5 In Colors);
White Bakers Twine, Black Bakers Twine (no longer available)
Amanda's Quick Links
Just click on the relevant pictures below for On Line Store, Catalogues and/or more information...
 |
If you are ordering today... please add the Host Code shown below to earn yourself a gift... For orders over £150 you should claim your own Stampin Host Rewards... you will still get a separate gift from me...
|
Kits & Product Shares
Current Catalogues & Products