Showing posts with label Home to Roost. Show all posts

Wednesday, 6 February 2019

Wednesday WOW - Lavender fields

So I mentioned yesterday that I had another idea with my Home to Roost field of corn card... so without further ado... I bring you my fields of lavender... which has been "causing the WOW word" from everyone visiting me over the past few days!! 

Such a serene and simple little scene... immediately makes you want to lie back and relax... so good for the soul! And mindfulness... Just need some Lavender scented embossing powder ( or something) to make it complete!
And just set onto a simple little A7 card for today... ie 7.4cm wide x 10.5cm high card blank... OR cut an A6 piece of card ( ie 10.5cm H x 14.8cm W)... Score LANDSCAPE at 7.4cm ... or US Letter equivalent would be 2 3/4" x 4 1/4" high ( Cut 4 1/4"H x 5 1/2" W, Score LANDSCAPE at 2 3/4")

So yes it is nice and small too... You may get more of an idea of the size if I also share yesterday's cornfield scene on the standard SU! notecard (left)... and one of the narrow SU! notecards (right
I inked up the stamp using Markers... the colours used being Highland Heather. Gorgeous Grape and Mint Macaron... with the birds in Basic Grey...  see here for the simple how tos on the birds and the watercoloured background scene...... 

Amanda's Quick Links
Just click on the relevant pictures below for catalogues and/or more information... 

If you are ordering today... do remember to add the Host Code shown below to earn yourself a gift and help support The Craft Spa at the same time... 

Please note that this host code does expire and change over time... but the current code is always shown at the top right hand side of my blog...

Just click on the relevant pictures below for catalogues and/or more information...


Tuesday, 5 February 2019

Tuesday Team Home to Roost Swap Card

Now many of you know that I like to join in with a swap or two to share my ideas with others and to help build up my samples & display ... particularly with sets I don't own... and using new ideas that I haven't thought of... or used for a while...
So these are the swap notecards that I made for Mon's Passionettes Spring Summer and Sale A Bration swap... as I am part of Monica Gale's team too (she is my lovely SU grandma!)

I focused on the Sale A Bration set Home to Roost... and wanted to make a card without the cockerel... as I appreciate that birds aren't everyone's thing... although I have to laugh at myself... as I did end up adding little birds to the card in the end!!
So I hope everyone likes my watercoloured fields of corn scene... and I just can't wait to see what is in the return swap bag... 
And seeing as it is Tuesday... here are some tips for you if you want to make one of these for yourself...

I die cut a Shimmery White stitched Rectangle panel... and then squeezed Balmy Blue ink onto the top of the ink pad... then added a drop of water... and picked up the watery ink with my Aquapainter and swooshed it across the top 3/4 of the panel...

I squeezed Sahara Sand ink onto the top of the ink pad... and added a bit of Crushed Curry to the ink splodge... added a drop of water... and then Aquapinter swooshed it across the bottom 1/4 of my panel...

I then left my panels to dry (although I would use the Heat Gun to dry it off in a class situation) and went off on a 30 minute or so walk around the village!!
I then lined up and stuck my dry watercoloured panel to the centre of my Whisper White notecard (which come with envelopes too) using temporary glue... use Tombow glue and leave it to dry... and then moved onto the corn...

Two ways you can do the corn.... use Gray Granite and Crushed Curry marker pens on the stamp direct... or as I did as it is a bit quicker... ink up in Gray Granite, remove the ink from the ears using a Blender Pen... and then add Crushed Curry to the ears using the marker pen...

And stamp as high as possible off to the left hand side... and then repeat and line up the second stampin to the right... and below the line of the first...
 And the little bird trio...just 3 ticks with a Soft Suede marker pen... simples...
Finished off with a Gray Granite greeting to the top right hand side... and a 5.9 x 9.3 cm Gray Granite mat...

And apologies to my fellow swappers... as I completely forgot to send the envelopes... and also because as I finished these and packed them in the envelope... I  had another brilliant idea along the same lines!! And I can't wait to share that with you all...

Products Used
Stamp Set- SAB Home to Roost
Dies – Rectangle Stitched
Cardstock – A4 Shimmery White, A4 Gray Granite, Whisper White Notecard & Envelope
Inks (scene)– AquaPainter with  Balmy Blue, Sahara Sand & Crushed Curry Inks (grasses) - Gray Granite, Blender Pen, Crushed Curry marker pen
Inks (greeting)- Gray Granite
Inks (birds) – Soft Suede


Amanda's Quick Links
Just click on the relevant pictures below for catalogues and/or more information... 

If you are ordering today... do remember to add the Host Code shown below to earn yourself a gift and help support The Craft Spa at the same time... 

Please note that this host code does expire and change over time... but the current code is always shown at the top right hand side of my blog...

Just click on the relevant pictures below for catalogues and/or more information...


Friday, 1 February 2019

Home to Roost cornfields

Just playing around...

Call this the test card... which means more on this theme another day(s)... as I can't actually share the card I was actually making... 

And can you believe it is now February already.... have to admit that January had certainly run me ragged!!

Stampin' Up! Products used
Stamp Set- SAB Home to Roost (yours for fee with a £45 order during Sale A Bration)
Cardstock – A4 Shimmery White (7cm/ 2 3/4"), Gray Granite (14cm Card Blank/5 1/2"), Early Espresso (7.4cm/ 3")

Inks (scene)– AquaPainter with  Balmy Blue, Sahara Sand & Crushed Curry
Inks (grasses) - Gray Granite, Blender Pen, Crushed Curry marker pen
Inks (greeting & birds)- Early Espresso
Amanda's Quick Links
Just click on the relevant pictures below for catalogues and/or more information... 

If you are ordering today... do remember to add the Host Code shown below to earn yourself a gift and help support The Craft Spa at the same time... 
Please note that this host code does expire and change over time... but the current code is always shown at the top right hand side of my blog...

Just click on the relevant pictures below for catalogues and/or more information...


Wednesday, 16 January 2019

She sells... sea shells... on the sea shore...

So... out of interest... is this (title) a tongue twister used all over the world? Or is it a UK only thing!!?

Another quickie Narrow Note Card  from the By The Bay display... greeting from Home to Roost as it was out and it seemed more relevant to the little scene... 
Now... initially... this image had me stumped... and I definitely didn't see a sea shell... but more on that another day...

And this one does qualify for the Stampin' Up!  #simplestamping challenge... simple little Gray Granite stamping of the sea shell and greeting on Shimmery White card... Aqua Painter watercolouring of sand and sea using Sahara Sand and Pool Party
Simple... quick... but effective little card... 

Amanda's QuickLinks

If you are ordering today... do remember the Host Code to help support The Craft Spa... and earn yourself a gift at the same time...
And just click on the pictures below for more information...


Tuesday, 15 January 2019

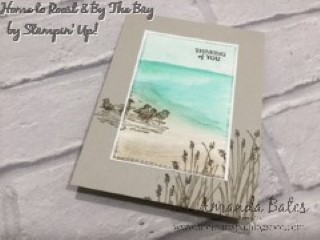
Tuesday Tutorial - By The Bay card

So back to this card that I shared last Friday... and the Tutorial and a few pointers for you if you would like to create one yourself... 

First up...the card size is not the standard A6 card size... as the Rectangles Stitched dies are a different rectangular shape/dimensions... but not to worry if you are working with A4 card... just chop your 14.8cm finished/folded card blank height down to 14cm... or just follow the Recipe/Tutorial for a Tent Fold Card like mine

And you may spot that I produced a couple of variants whilst I was at it!
Craft Spa Recipe
A4 Sahara Sand 10.5 x 28cm ( 4 1/8” x 11”)
A4 Thin Whisper White 7 x 10.4cm (2 ¾” x 4 1/16”)
Watercolor Paper 7 x 10.4cm (2 ¾” x 4 1/16”)

Embossing Folder – Seaside
Ink pads – Sahara Sand, Gray Granite, Early Espresso, Pool Party, Coastal Cabana, Bermuda Bay


Craft Spa Tutorial
1.     Score Sahara Sand card panel LANDSCAPE at 14cm (5 ½”)
2.     Bone Fold to make card blank

3.     Die cut Watercolor Paper (4th largest Rectangle Stitched die)
4.     Apply Temporary glue* to back of Watercolor Paper panel
5.     Stick to centre of card blank

6.     Wet top 2/3 of Watercolor Paper panel
7.     Apply Pool Party using AquaPainter
8.     Apply Coastal Cabana using AquaPainter to middle third
9.     Apply Bermuda Bay using AquaPainter to top and randomly!
10.   Leave to dry… or blast with Heat Gun

11.   Wet bottom 1/3rd of panel
12.   Apply Sahara Sand using AquaPainter to all of bottom third
13.   Apply Gray Granite using AquaPainter to bottom half (of bottom 1/3rd!)
14.   Leave to dry… or blast with Heat Gun

15.   Ink up & stamp Gray Granite birds to LHS.. about a third of the way up…
16.   Ink up grasses stamp with Sahara Sand (pad) all over and using Early Espresso marker direct onto grass heads
17.   Stamp to bottom RHS
18.   Ink up grasses and repeat 2 more times… varying the height as you go…
19.   Ink up & Stamp Early Espresso greeting

20.  Emboss the watercoloured panel using the Seaside Embossing Folder & Big Shot

*Bonus Tip: You can use Tombow Multipurpose glue… apply and leave to dry/go clear… as it is then forms a temporary glue

And here is the other version for you… without the Seaside embossing step… as guess who forgot first time round! Oops!!
And finally... the more observant of you will have noticed... in the embossed version below... that the sea area is kind of off to the right hand side of the scene from about the half way point to the left... and that it also looks like it has rolling waves... so for those that like the detail... a couple more Bonus Tips for you...
So I didn't quite wet all the way across to the left when I wet the top 2/3 for the blues... and then I wet a bit up that left hand side when I wet the bottom 1/3 for the neutrals... 

And the rolling waves... just appeared! A bit after drying... and then more after embossing... Now whether I could repeat this feature... only time (and another make) would tell!!

PS The tech eluded to in the last post will have to wait for another day... it didn't work - or not work- I just didn't get the chance to try it out - as the window went! - and it it may be a while before I get another one to try things out...

If you are ordering today... do remember the Host Code to earn yourself a gift ... and help support The Craft Spa at the same time...
And just click on the pictures below for more information...