Showing posts with label Card Recipe. Show all posts

Tuesday, 14 March 2023

Tuesday Tutorial - Small Square Double W Fold card


Back to the how to for the third version of my Double W Fold card... This version being a small square (ie 10.5cm aka 4 1/8") card.. 

Craft Spa Recipe - Small Square Double W Fold Card (actually 10.5cm Square)

Main Card-A4 Rich Razzleberry 21 x 10.5cm  & 22 x 10.5cm
Inside Base sections A4 Rich Razzleberry 21 x 3.5cm (x2)
Inside Top paper panels 20 x 7cm (x2)
Inside Base paper panels 4.8 x 3cm (x8)
Front Old Olive mat 10cm Square
Front paper panels - Floral 9.5cm Square... Dots 10 x 2.5cm
Ribbon x 36cm
Papers - Dainty Flowers (retired)

Craft Spa Instructions -  - Small Square Double W Fold Card
  1. Score 2 larger LANDSCAPE Rich Razzleberry panels at 10.5cm
  2. Score longer Rich Razzleberry panel LANDSCAPE at 21cm  
  3. Valley Fold both "in half"
  4.  Mountain fold thin section on longer piece (aka the glue tab)
  5. Open both out and place stood up in front of you - with the longer piece to the left with the glue tab to the right side... 
  6. Apply glue to the front face of the glue tab... and stick the shorter/RH panel to the tab...

  7. Score the 2 LANDSCAPE shorter Rich Razzleberry panels at 5.25, 10.5 and 15.75cm
  8. Concertina bone fold Valley, Mountain & Valley (as base sections)

  9. Cut the two larger LANDSCAPE paper panels in half to 10cm wide
  10. Adhere to top insides
  11. Adhere 8 paper pieces to inside base sections

    For the 2 left hand sections of the card...
  12. Hold concertina base sections with 2 open edges and folded centre facing to the right
  13. Apply glue to back/bottom face  
  14. Stick concertina section down onto right of right hand section(lining up at the sides and along the bottom edge of the card)
  15. With concertina panel still folded up... apply glue to top face
  16. Close left section of card onto the glued face

  17. Repeat with other concertina panel for 2 right sections of card...sticking the concertina base section (with 2 open edges and folded centre facing to the left) to the left side of the 2 left sections this time... and folding the right section of the card onto the top...

  18. Ink up, stamp, cut and punch as necessary
    I used the A La Mode dies and Alphabest stamp & punch bundle ... along with the 3 x 4.2cm Stitched Rectangle die to cut the white panels - so the mats are 3.5 x 4.7cm in Old Olive(x3), Rich Razzleberry(x3) and Fresh Freesia(x2) 

    Finishing off with  a couple of Fresh Freesia In Color Loose Flower Flourishes  and small punched flowers in Rich Razzleberry and Fresh Freesia (using a long retired punch!). Along with irridescent gems and pearls...

  19.  Decorate card


Tuesday, 28 February 2023

Tuesday Tutorial - A6(ish) Double W Fold - Fitting Florets


Back to the second version of my Double W Fold card... 

But before I start... today is the last day of the Sale A Bration promotion!! So don't forget to order and sign up whilst you can get all those extra freebies...click HERE for more details...

This version maximising the use of one piece of A4 cardstock... resulting in a card that is 14.5cm wide (hence the A6ish name in the title as it is very slightly smaller than the standard A6 14.8cm size... )

And I do find it fair to warn you... I have been very busy with variants of Double W Fold cards... so lots more to come... 

Craft Spa Recipe - A6 (ish) Double W Fold Card (actually 14.5cm)

A4 Balmy Blue 29.7 x 10.5cm  & 29 x 10.5cm
Inside Bottom paper panels 28 x 3.5cm (x2)
Inside Top paper panels 28 x 7cm (x2)
Front Night of Navy mat 13.5 x 9.5cm
Front paper panel 13 x 9cm... then cut 9cm square; 4 x 9cm
Front frame mat 5.9cm Square
Front frame (D) Whispwer White 6cm Square
Ribbon x 17"


Craft Spa Instructions -  - A6 (ish) Double W Fold Card
  1. Score both LANDSCAPE Balmy Blue panels at 14.5cm
  2. Score longer Balmy Blue panel LANDSCAPE at 29cm  
  3. Valley Fold both "in half"
  4.  Mountain fold thin section on longer piece (aka the glue tab)
  5. Open both out and place stood up in front of you - with the longer piece to the left with the glue tab to the right side... 
  6. Apply glue to the front face glue tab... and stick the shorter/RH panel to the tab...

  7. Cut the 2 LANDSCAPE taller paper panels in half at 14cm
  8. Adhere papers
  9. Open out the card

  10. Score the two shorter paper panels at 7,14 & 21 cm
  11. Bone Fold Valley, Mountain & Valley
  12. Concertina Fold (forms a W shape with a central mountain and valleys either side)

    For the left hand sections of the card...
  13. Hold concertina panel with 2 open edges and folded centre facing to the right
  14. Apply glue to back face  
  15. Stick concertina panel down onto right of right hand section lining up with your paper at the side...
  16. With concertina panel still folded up... apply glue to top face
  17. Close left section of card onto the glued face

  18. Repeat with other concertina panel for 2 right sections of card...sticking the concertina panel (with 2 open edges and folded centre facing to the left) to the left side of the left section this time... and folding the right section of the card onto the top...

  19. Ink up, stamp, cut and punch as necessary
    I used the A La Mode dies and Alphabest stamp & punch bundle ... along with retired Stitched Shapes dies and a 1 3/4" square punch
  20.  Decorate card

    I have purposefully left this one blank on the front as I can then add the age when I am ready to send it!

    But you can get the idea from the one I previously shared here...


Tuesday, 21 February 2023

Tuesday Tutorial - Dainty Flowers Double W Fold Card

Another version of the Double W Fold card I shared here last Friday... along with the recipe and instructions so you can try one at home! This one having the BIRTHDAY greeting letters set on square panels (1 3/4" mats with 1 5/8" stitched squares)

This version is sized around the front panel which is cut from this sheet in the Dainty Flowers paper pack.... that can be earnt for free...with an order of £45+... during the Sale A Bration promotion that runs until 28 February

So 12 of these cards could be made from just one pack of the papers... Simples!

Greeting letters care of the fantastic new A La Mode dies... which is a perfect set of dies for your letters and number needs...

Craft Spa Recipe

A4 Thick Whisper White 28.2 x 10.5cm AND 27.2 x 10.5cm
Front Paper Panel 12x9cm
Rich Razzleberry card mat 12.5 x 9.5cm
Inside Paper panels 13.1 x 7cm (x4)
A4 Old Olive card 28 x 3.5cm (x2)

Craft Spa Instructions
  1. Score 2 LANDSCAPE white panels at 13.6cm
  2. Score longer white panel LANDSCAPE at 27.2cm (aka 1cm to the RHS) 
  3. Valley Fold both "in half"
  4.  Mountain fold thin section on longer piece (aka the glue tab)
  5. Open both out and place stood up in front of you - with the longer piece to the left with the glue tab to the right side... 
  6. Apply glue to the front face glue tab... and stick the shorter /RH panel to the tab...
  7. Adhere papers
  8. Open out the card

  9. Score the two Old Olive card panels at 7,14 & 21 cm
  10. Bone Fold Valley, Mountain & Valley
  11. Concertina Fold (forms a W shape with a central mountain and valleys either side)

    For the left hand sections of the card
  12. Hold concertina panel with 2 open edges and folded centre facing to the right
  13. Apply glue to back face  
  14. Stick concertina panel down onto right of right hand section lining up with your paper at the side...
  15. With concertina panel still folded up... apply glue to top face
  16. Close left section of card onto the glued face

  17. Repeat with other concertina panel for 2 right sections of card...sticking the concertina panel (with 2 open edges and folded centre facing to the left) to the left side of the left section this time... and folding the right section of the card onto the top...

  18. Ink up, stamp, cut and punch as necessary
    I used the A La Mode dies, the Petal Park flowers stamps & punch, Framed Florets greeting on the front and the gorgeous new Dragonfly Trinkets... along with retired Stitched Shapes dies and 2" punched circle or 1 3/4"square mats...
  19.  Decorate card

And here's a reminder of the one I shared last Friday... with the circular letter panels and lots of HAPPY (care of the Biggest Wish stamp set - stamped in 3 colours-Rich Razzleberry, Old Olive and Petal Pink-  and handcut into letters)

Tuesday, 15 January 2019

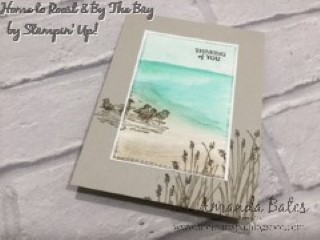
Tuesday Tutorial - By The Bay card

So back to this card that I shared last Friday... and the Tutorial and a few pointers for you if you would like to create one yourself... 

First up...the card size is not the standard A6 card size... as the Rectangles Stitched dies are a different rectangular shape/dimensions... but not to worry if you are working with A4 card... just chop your 14.8cm finished/folded card blank height down to 14cm... or just follow the Recipe/Tutorial for a Tent Fold Card like mine

And you may spot that I produced a couple of variants whilst I was at it!
Craft Spa Recipe
A4 Sahara Sand 10.5 x 28cm ( 4 1/8” x 11”)
A4 Thin Whisper White 7 x 10.4cm (2 ¾” x 4 1/16”)
Watercolor Paper 7 x 10.4cm (2 ¾” x 4 1/16”)

Embossing Folder – Seaside
Ink pads – Sahara Sand, Gray Granite, Early Espresso, Pool Party, Coastal Cabana, Bermuda Bay


Craft Spa Tutorial
1.     Score Sahara Sand card panel LANDSCAPE at 14cm (5 ½”)
2.     Bone Fold to make card blank

3.     Die cut Watercolor Paper (4th largest Rectangle Stitched die)
4.     Apply Temporary glue* to back of Watercolor Paper panel
5.     Stick to centre of card blank

6.     Wet top 2/3 of Watercolor Paper panel
7.     Apply Pool Party using AquaPainter
8.     Apply Coastal Cabana using AquaPainter to middle third
9.     Apply Bermuda Bay using AquaPainter to top and randomly!
10.   Leave to dry… or blast with Heat Gun

11.   Wet bottom 1/3rd of panel
12.   Apply Sahara Sand using AquaPainter to all of bottom third
13.   Apply Gray Granite using AquaPainter to bottom half (of bottom 1/3rd!)
14.   Leave to dry… or blast with Heat Gun

15.   Ink up & stamp Gray Granite birds to LHS.. about a third of the way up…
16.   Ink up grasses stamp with Sahara Sand (pad) all over and using Early Espresso marker direct onto grass heads
17.   Stamp to bottom RHS
18.   Ink up grasses and repeat 2 more times… varying the height as you go…
19.   Ink up & Stamp Early Espresso greeting

20.  Emboss the watercoloured panel using the Seaside Embossing Folder & Big Shot

*Bonus Tip: You can use Tombow Multipurpose glue… apply and leave to dry/go clear… as it is then forms a temporary glue

And here is the other version for you… without the Seaside embossing step… as guess who forgot first time round! Oops!!
And finally... the more observant of you will have noticed... in the embossed version below... that the sea area is kind of off to the right hand side of the scene from about the half way point to the left... and that it also looks like it has rolling waves... so for those that like the detail... a couple more Bonus Tips for you...
So I didn't quite wet all the way across to the left when I wet the top 2/3 for the blues... and then I wet a bit up that left hand side when I wet the bottom 1/3 for the neutrals... 

And the rolling waves... just appeared! A bit after drying... and then more after embossing... Now whether I could repeat this feature... only time (and another make) would tell!!

PS The tech eluded to in the last post will have to wait for another day... it didn't work - or not work- I just didn't get the chance to try it out - as the window went! - and it it may be a while before I get another one to try things out...

If you are ordering today... do remember the Host Code to earn yourself a gift ... and help support The Craft Spa at the same time...
And just click on the pictures below for more information...


Thursday, 9 August 2018

Thursday Triple Time Tropical Stamping... with Tutorial

Haven't done one of these Triple Time Stamped (aka Triple Layer or Triple Time or just Triple Stamped) cards for years!! But seemed like the right time... with the right stamp set, Tropical Chic! Aided and abetted again by Friendly Expressions

Though I have done a couple of things slightly differently this time around... as...

(1) I have used different colour mats/card base... which adds variety and is a bit more subtle than using just the one colour for all the layers... So the card base and inner mat are in Soft Sea Foam... and the middle mat is in Lemon Lime Twist...
(2) I have embossed the three stamped panels with the wonderful Subtle embossing folder to add texture... which immediately makes the finished card look and feel more luxury! Though it is impossible for you to see this... so just trust me on this point!!!

I embossed all 3 whilst they were still temporarily adhered... very quick and simple that way! But do note that they do then stick together quite well (even with the temporary glue!)... so you do need to take more care separating the layers before adhering to the cardstock panels...
Stamping in Soft Sea Foam, Lemon Lime Twist and Granny Apple Green... What a gorgeous selection of greens...

Craft Spa Recipe - A6 Triple Time Card Design
A6 Card Blank 14.8W x 10.5cmH (ie 14.8cm x 21cm Scored LANDSCAPE at 10.5cm)
Coloured Card 12.4 x 8cm, 9.9 x 5.5cm
Whisper White Card 14.4 x 10cm, 11.9 x 7.5cm, 9.4 x 5cm

And for you guys in the the US with US Letter Sized and A2 card... here you go!
Craft Spa Recipe - A2 Triple Time Card Design
A2 Card Blank 5 1/2" W x 4 1/4" H(ie 5 1/2" x 8 1/2" Scored LANDSCAPE at 4 1/4")
Coloured Card 4 1/2" x 3 1/4", 3 1/2" x 2 1/4"
Whisper White Card 5 1/4" x 4", 4 1/4" x 3", 3 1/4" x 2"

And click here for the step by step Pictorial of the stamping and assembly for one of these cards... as well as the dimensions for the larger A5 Triple Time Card in centimetres...