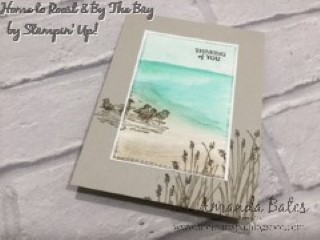
So back to this card that I shared last Friday... and the Tutorial and a few pointers for you if you would like to create one yourself...
First up...the card size is not the standard A6 card size... as the Rectangles Stitched dies are a different rectangular shape/dimensions... but not to worry if you are working with A4 card... just chop your 14.8cm finished/folded card blank height down to 14cm... or just follow the Recipe/Tutorial for a Tent Fold Card like mine
And you may spot that I produced a couple of variants whilst I was at it!
Craft Spa Recipe
A4 Sahara Sand 10.5 x 28cm ( 4 1/8” x 11”)
A4 Thin Whisper White 7 x 10.4cm (2 ¾” x 4 1/16”)
Watercolor Paper 7 x 10.4cm (2 ¾” x 4 1/16”)
Stamps – By The Bay, Home To Roost
Embossing Folder – Seaside
Tools – Aqua Painter, Big Shot, Rectangle Stitched dies
Ink pads – Sahara Sand, Gray Granite, Early Espresso, Pool
Party, Coastal Cabana, Bermuda Bay
Craft Spa Tutorial
1. Score Sahara
Sand card panel LANDSCAPE at 14cm (5 ½”)
2. Bone Fold to
make card blank
3. Die cut
Watercolor Paper (4th largest Rectangle Stitched die)
4. Apply Temporary
glue* to back of
Watercolor Paper panel
5. Stick to centre
of card blank
6. Wet top 2/3 of Watercolor Paper panel
7. Apply Pool Party using AquaPainter
8. Apply Coastal Cabana using AquaPainter to middle
third
9. Apply Bermuda Bay using AquaPainter to top and
randomly!
10. Leave to dry… or blast
with Heat Gun
11. Wet bottom 1/3rd
of panel
12. Apply Sahara Sand
using AquaPainter to all of bottom third
13. Apply Gray
Granite using AquaPainter to bottom half (of bottom 1/3rd!)
14. Leave to dry… or blast
with Heat Gun
15. Ink up & stamp Gray Granite birds to LHS.. about a third
of the way up…
16. Ink up grasses stamp with Sahara Sand (pad) all over and using
Early Espresso marker direct onto grass heads
17. Stamp to bottom RHS
18. Ink up grasses and repeat 2 more times… varying the height as
you go…
19. Ink up & Stamp Early Espresso greeting
20. Emboss the
watercoloured panel using the Seaside Embossing Folder & Big Shot
*Bonus Tip: You can use Tombow Multipurpose glue…
apply and leave to dry/go clear… as it is then forms a temporary glue
And here is the other version for you… without the Seaside
embossing step… as guess who forgot first time round! Oops!!
And finally... the more observant of you will have noticed... in the embossed version below... that the sea area is kind of off to the right hand side of the scene from about the half way point to the left... and that it also looks like it has rolling waves... so for those that like the detail... a couple more Bonus Tips for you...
So I didn't quite wet all the way across to the left when I wet the top 2/3 for the blues... and then I wet a bit up that left hand side when I wet the bottom 1/3 for the neutrals...
And the rolling waves... just appeared! A bit after drying... and then more after embossing... Now whether I could repeat this feature... only time (and another make) would tell!!
PS The tech eluded to in the last post will have to wait for another day... it didn't work - or not work- I just didn't get the chance to try it out - as the window went! - and it it may be a while before I get another one to try things out...
If you are ordering today... do remember the Host Code to earn yourself a gift ... and help support The Craft Spa at the same time...
And just click on the pictures below for more information...


No comments:
Post a Comment