Showing posts with label Wetlands. Show all posts

Tuesday, 15 January 2019

Tuesday Tutorial - By The Bay card

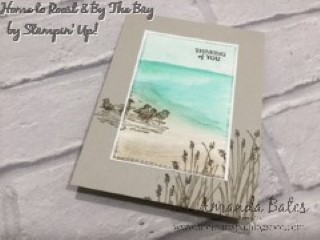
So back to this card that I shared last Friday... and the Tutorial and a few pointers for you if you would like to create one yourself... 

First up...the card size is not the standard A6 card size... as the Rectangles Stitched dies are a different rectangular shape/dimensions... but not to worry if you are working with A4 card... just chop your 14.8cm finished/folded card blank height down to 14cm... or just follow the Recipe/Tutorial for a Tent Fold Card like mine

And you may spot that I produced a couple of variants whilst I was at it!
Craft Spa Recipe
A4 Sahara Sand 10.5 x 28cm ( 4 1/8” x 11”)
A4 Thin Whisper White 7 x 10.4cm (2 ¾” x 4 1/16”)
Watercolor Paper 7 x 10.4cm (2 ¾” x 4 1/16”)

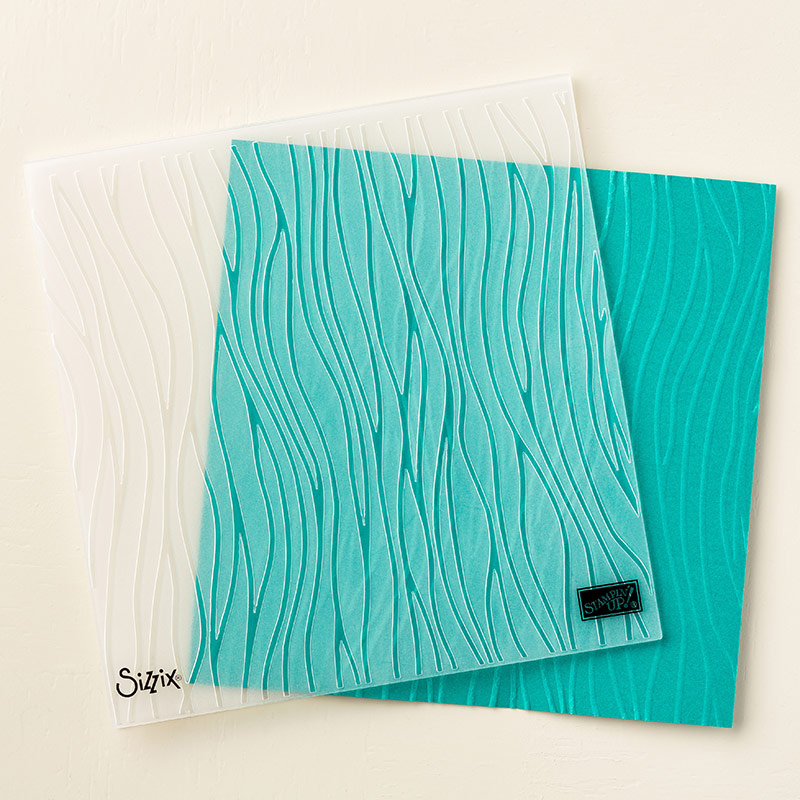
Embossing Folder – Seaside
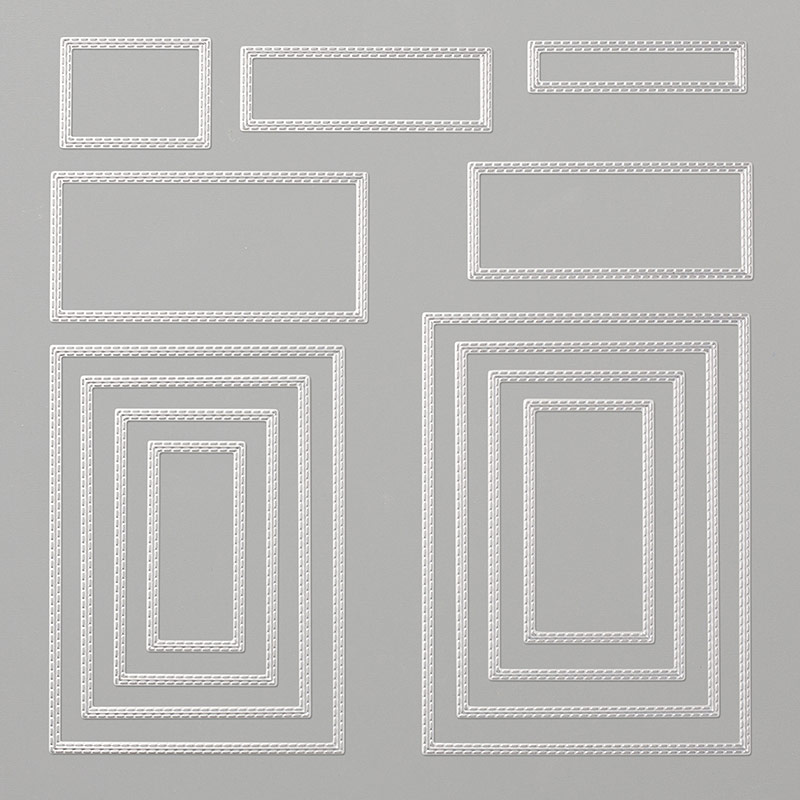
Ink pads – Sahara Sand, Gray Granite, Early Espresso, Pool Party, Coastal Cabana, Bermuda Bay


Craft Spa Tutorial
1.     Score Sahara Sand card panel LANDSCAPE at 14cm (5 ½”)
2.     Bone Fold to make card blank

3.     Die cut Watercolor Paper (4th largest Rectangle Stitched die)
4.     Apply Temporary glue* to back of Watercolor Paper panel
5.     Stick to centre of card blank

6.     Wet top 2/3 of Watercolor Paper panel
7.     Apply Pool Party using AquaPainter
8.     Apply Coastal Cabana using AquaPainter to middle third
9.     Apply Bermuda Bay using AquaPainter to top and randomly!
10.   Leave to dry… or blast with Heat Gun

11.   Wet bottom 1/3rd of panel
12.   Apply Sahara Sand using AquaPainter to all of bottom third
13.   Apply Gray Granite using AquaPainter to bottom half (of bottom 1/3rd!)
14.   Leave to dry… or blast with Heat Gun

15.   Ink up & stamp Gray Granite birds to LHS.. about a third of the way up…
16.   Ink up grasses stamp with Sahara Sand (pad) all over and using Early Espresso marker direct onto grass heads
17.   Stamp to bottom RHS
18.   Ink up grasses and repeat 2 more times… varying the height as you go…
19.   Ink up & Stamp Early Espresso greeting

20.  Emboss the watercoloured panel using the Seaside Embossing Folder & Big Shot

*Bonus Tip: You can use Tombow Multipurpose glue… apply and leave to dry/go clear… as it is then forms a temporary glue

And here is the other version for you… without the Seaside embossing step… as guess who forgot first time round! Oops!!
And finally... the more observant of you will have noticed... in the embossed version below... that the sea area is kind of off to the right hand side of the scene from about the half way point to the left... and that it also looks like it has rolling waves... so for those that like the detail... a couple more Bonus Tips for you...
So I didn't quite wet all the way across to the left when I wet the top 2/3 for the blues... and then I wet a bit up that left hand side when I wet the bottom 1/3 for the neutrals... 

And the rolling waves... just appeared! A bit after drying... and then more after embossing... Now whether I could repeat this feature... only time (and another make) would tell!!

PS The tech eluded to in the last post will have to wait for another day... it didn't work - or not work- I just didn't get the chance to try it out - as the window went! - and it it may be a while before I get another one to try things out...

If you are ordering today... do remember the Host Code to earn yourself a gift ... and help support The Craft Spa at the same time...
And just click on the pictures below for more information...


Friday, 11 January 2019

Global Stamping Friends Blog Hop showcasing new products...

Hello and welcome to The Craft Spa blog with Amanda Bates in the UK...  and a very Happy New Year to you!
Gosh it has been a long while (July last year) since I joined my Global Stamping Friends to hop  around the world... and I am very happy to be back! 2019 is going to be a good year!

This month's Blog Hop brief is a simple one... all of us getting together to showcase products from the NEW Spring Summer (aka Occasions) catalogue and/or the Sale A Bration promotion...
And I couldn't help but CASE ... well myself!

When I saw the Sale A Bration free promotional By The Bay and Home to Roost products I immediately thought of the Wetlands card in my 2nd most visited blog post ever...
A card that has been pinned beyond all imagination... and much CASED around the world ever since... but Wetlands is now long retired... so I thought it high time the basic design was updated for 2019... but I do REALLY secretly wish we still had that  Serene Scenery paper pattern we had back then!! Though luckily we do still have the fabulous Seaside embossing folder...
Seaside Textured Impressions Embossing Folder
But we don't have those papers anymore... so after a bit of wet on wet watercolouring with inks on a piece of  Watercolor Paper die cut with the NEW and wonderful Rectangle Stitched Framelits dies (my favourite new product!) ...
Rectangle Stitched Framelits Dies
... I had a similar seaside scene that I then embossed with the Seaside embossing folder... colours as shown below...
Too much fun!
Come back on Tuesday for tips and tricks and a full tutorial for this new version (with a tutorial that may surprise you if the new tech works out!!) ... and a couple of other cards for a bit of variety!

But in the meantime... here is my original card that I CASED... just click on it's photo to go to the original post with instructions... though ignore the initial patterned paper cutting bit! And the card is a slightly different size to the norm... but more of that on Tuesday...
And now it is time to pass you onto the lovely Lisa in Ontario, Canada... Just click on the big arrow!

And here is the Roll Call of my lovely Global Stamping Friends around the world that have something to share with you today... please feel free to hop using the NEXT icons... or click around this list if that's the way you prefer...

  1. Blog Hop Participants
    1. Libby Dyson
    2. Tricia Butts
    3. Karie Beglau
    4. Sharon Dalton
    5. Vicky Wright  
    6. Angélique Stempelkeuken
    7. Narelle Fasulo 
    8. Amanda Farlinger
    9. Kimberley Anne Morris
    10. Amanda Bates
    11. Lisa Henderson
    12.  Marieke Bar
    13. Jan Musselman
    14. Anja Reuss
    15.  Rachel Macleod
    16.  Lisa Ann Bernard
    17.  June Olsen
    18. Sarah Mcdermott


Saturday, 18 March 2017

Watercolour Pencils #8 - Lovely as a Tree

Quick share today... just using the Watercolor Pencils to colour on the Watercolor Paper and then using the Aquapainter to drag out to a wash... for a lovely little sunset scene...

Starting with Calypso Coral on the horizon... moving up to Daffodil Delight at the top. Ground with a light dusting of Basic Gray with a teeny tiny bit of Daffodil Delight...
And I have to say... thoroughly enjoyed using Lovely as a Tree again... still as good as it ever was...

SU! Products Used
Stamps - Lovely as a Tree, Wetlands
Watercolor Pencils & Aqua-painter on Watercolor Paper
Ink - Staz On Black


Sunday, 3 July 2016

Wetlands Serene Scenery

Now this was one of the cards that immediately popped into my head when I first saw the brilliant Serene Scenery papers back in April at the UK On Stage event....
It has been a while since I have used Wetlands... and it is just perfect for the job...
So how to make one for yourself...

1. Cut the paper in half (3") and trim off to 11.9cm for an A6 card (guess 3" x 4 1/4" for US Standard card?)
2. Put temporary glue on the back of the paper panel and stick centrally on card front
3. Ink up and stamp the birds. Tip- I used the Tip Top Taupe ink pad and highlighted the bird bodies and legs with an Early Espresso marker pen. Makes it pop more...
4. Ink up and stamp a few foliage images. Tip - again Tip Top Taupe pad plus Early Espresso marker
5. Ink up and stamp Versamark greeting . Add white embossing powder and heat to melt
6. Emboss paper using Seaside embossing folder. Tip - my sky isn't embossed...didn't seem right!
7. Adhere panel to white mat (8 x 12.3cm - or 3 1/4" x 4 1/2" for US card?)
8. Adhere to card front

And here is the simpler version without the Seaside embossing stage... and with just Tip Top Taupe inking up...
I just LOVE this piece of paper.... Lovely little simple but stunning cards... in a flash!
And a perfect card for me to submit to this week's Freshly Made Sketches FMS 243 challenge. First timer challenge entry alert! (actually 2nd ever if I am totally truthful) 

But I have to say that I really love this sketch... most of the cards submitted are fabulous as it is just such a great sketch Amy...
 
Edited to Add: 
Oh my!! I was selected as a a Perfect Princess by Kim of the Freshly Made Sketches Team... what an honour as there were lots and lots of fabulous entries... and I am a complete novice at a challenge entry! And so I have a badge to share with you now!!