Showing posts with label Top Stampin Up UK Blogger. Show all posts

Saturday, 14 September 2019

Saturday Suite - Let It Snow

Another of my favourite suites... as I love the colour combi and I always love a snowman (or 10!)

So introducing, the Let It Snow suite... a suite for our inner child...

First up ... a display board shot bringing most of the elements together in the one place... click on the picture to see all the elements in the Online Store..
Starting with the lovely Let It Snow speciality papers... and please scroll to the end of the post if you would like to see all the sheets!
And not one - but two product co-ordinating bundles... both with that 10% off...
And the Tiny Keepsakes bundle... so so happy to see this miniature Curvy Keepsakes box die... perfectly sized for our favourite christmas chocolates of Lindor and Ferrero Rocher... just one mind!
And of course you can buy the bundle elements separately if you prefer... click on the pictures below to go straight there...


Then we have the Winter Knit 3D embossing folder...
The Let It Snow Embellishment Kit... look closely... this is better than I first thought! Snowballs... clothing... and of course everything to decorate your snowman's face! See the Tiny Curvy Keepsake projects photo below!! Gutted I didn't order this in my pre-order...!!
The Real Red Glimmer paper... so glad to see this back... as I had just run out of my stash!
And a few projects to share too...

And so finally back to the papers... showing every sheet for your perusal!


Tuesday, 8 January 2019

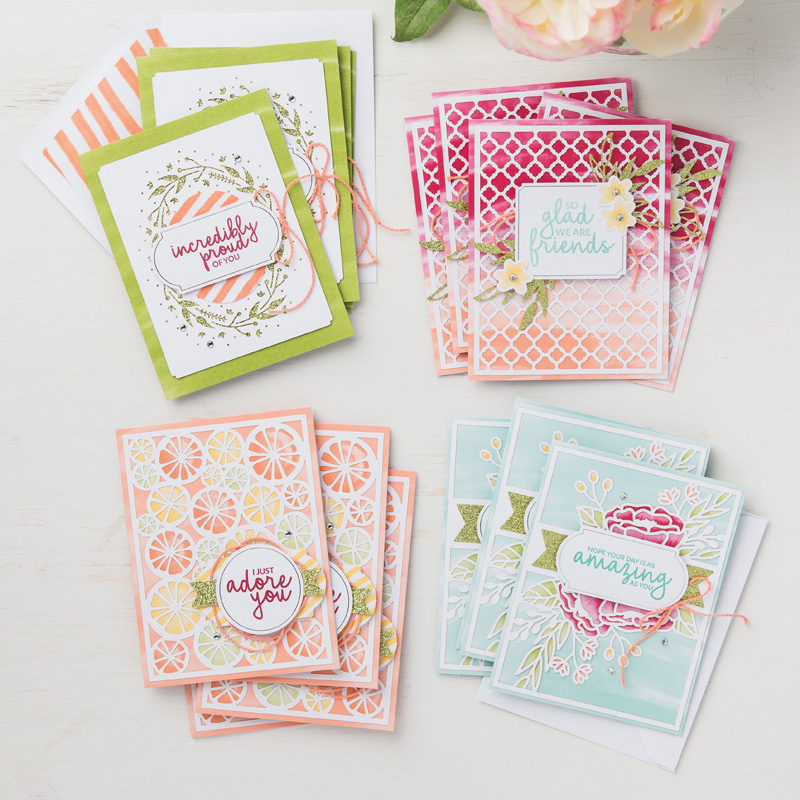
Incredible Like You cards...

Incredible Like You Project Kit
So these are what I am currently making up for classes next week... 

From the Incredible Like You kit... but so nice... in fact too nice to not let my ladies make!!!

Especially as they like something simpler... and something that they can add virtually any sentiment to start off a New Year... so this achieves both of those requests...
Incredible Like You Project Kit
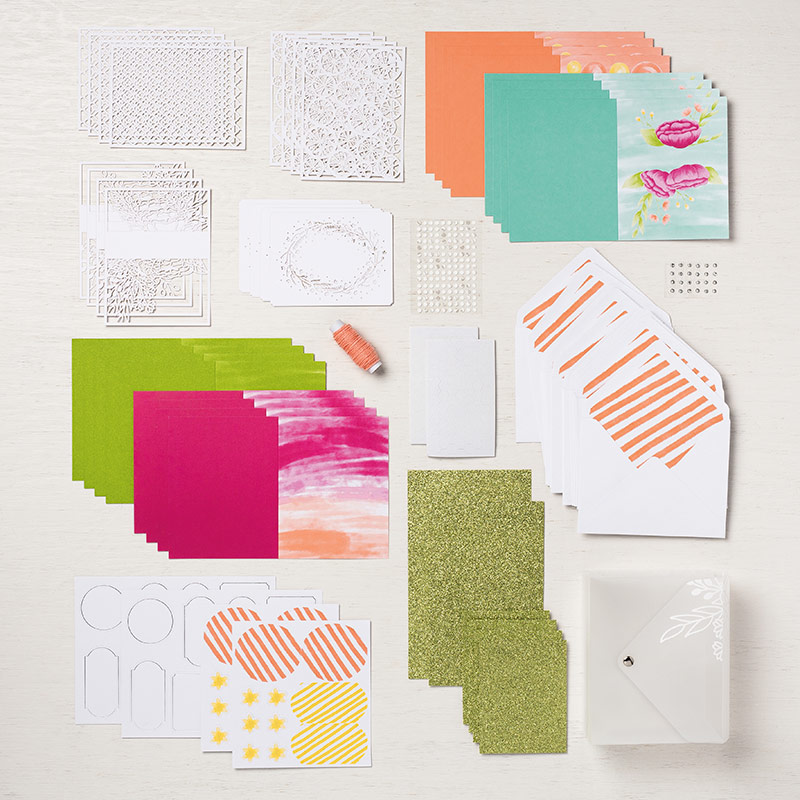
Delicate laser-cut overlays let the colour peek through on these all-occasion cards. Store or gift your cards in the reusable storage envelope.  Makes 16 cards, 4 each of 4 designs. Folded card size: 4-1/4" x 5-1/2" (10.8 x 14 cm). 
Kit includes:
* 16 printed card bases
* Laser-cut card front overlays
* 16 printed envelopes
* Glimmer, printed, and silver foil die-cut accents
* Grapefruit Grove Baker’s Twine
* Stampin’ Dimensionals
* Adhesive dots
* Adhesive-backed rhinestones
* 6-5/16" x 5" x 2-5/16" (16 x 12.7 x 5.9 cm) printed polypropylene storage envelope

The envelope being lovely and strong with an etched pattern too... very nice!

Coordinating colours: Coastal Cabana, Daffodil Delight, Granny Apple Green, Grapefruit Grove, Lovely Lipstick, silver, white

I reckon these may be popular....

Co-ordinating stamp set... Incredible like You... may just have to make a little something else whilst this stamp set is out!
Incredible Like You Photopolymer Stamp Set


Friday, 31 August 2018

Triple Time Tropical Chic

Another of these for you... multi coloured mats the other way round... and some extra stamping in black to add more definition... Card Tutorial here too... 
Though I do think the black blobs look like fish swimming through a tropical seascape!

And here is the inside,,,
Remember it is the last day of August today... so it is the last day to order those Watercolor Pencils and the Blended Seasons bundle... and also get those Bonus Days Coupons to spend in September! Click here for all those details...

Saturday, 18 August 2018

Thursday, 9 August 2018

Thursday Triple Time Tropical Stamping... with Tutorial

Haven't done one of these Triple Time Stamped (aka Triple Layer or Triple Time or just Triple Stamped) cards for years!! But seemed like the right time... with the right stamp set, Tropical Chic! Aided and abetted again by Friendly Expressions

Though I have done a couple of things slightly differently this time around... as...

(1) I have used different colour mats/card base... which adds variety and is a bit more subtle than using just the one colour for all the layers... So the card base and inner mat are in Soft Sea Foam... and the middle mat is in Lemon Lime Twist...
(2) I have embossed the three stamped panels with the wonderful Subtle embossing folder to add texture... which immediately makes the finished card look and feel more luxury! Though it is impossible for you to see this... so just trust me on this point!!!

I embossed all 3 whilst they were still temporarily adhered... very quick and simple that way! But do note that they do then stick together quite well (even with the temporary glue!)... so you do need to take more care separating the layers before adhering to the cardstock panels...
Stamping in Soft Sea Foam, Lemon Lime Twist and Granny Apple Green... What a gorgeous selection of greens...

Craft Spa Recipe - A6 Triple Time Card Design
A6 Card Blank 14.8W x 10.5cmH (ie 14.8cm x 21cm Scored LANDSCAPE at 10.5cm)
Coloured Card 12.4 x 8cm, 9.9 x 5.5cm
Whisper White Card 14.4 x 10cm, 11.9 x 7.5cm, 9.4 x 5cm

And for you guys in the the US with US Letter Sized and A2 card... here you go!
Craft Spa Recipe - A2 Triple Time Card Design
A2 Card Blank 5 1/2" W x 4 1/4" H(ie 5 1/2" x 8 1/2" Scored LANDSCAPE at 4 1/4")
Coloured Card 4 1/2" x 3 1/4", 3 1/2" x 2 1/4"
Whisper White Card 5 1/4" x 4", 4 1/4" x 3", 3 1/4" x 2"

And click here for the step by step Pictorial of the stamping and assembly for one of these cards... as well as the dimensions for the larger A5 Triple Time Card in centimetres...


Wednesday, 11 July 2018

Twinkle Twinkle Little Star...

So whilst we made this Swing Easel card...we had to keep the Twinkle Builder punched out parts to make this simple card...

Another 5 1/2" Square (or 14cm Square) card blank to keep things constant for class prepping...

With the 13.5cm (5 1/4") starry Twinkle Twinkle papers adhered to the front of the card... and then the largest Layering Squares aperture cut out (7.3cm/2 7/8") in the centre
And a Tip for you if you struggle to eyeball cutting a square in the centre like this... draw diagonal lines from each corner... intersecting at the centre... your eyes will start to behave then!!!

White embossed Little Twinkle greeting...

Stuck to a 7.8cm/3 1/8" Square Whisper White panel... and then the square carefully stuck to the top of the hole...
And another Tip for you... as the line around the aperture on the top of the card... neatly defined the area that no glue should go over...

Finished off with the punched Whisper White moon and stars.. with a trio of  Twinkle Adhesive Backed star Sequins to add a touch of sparkle to finish it all off...


Friday, 6 July 2018

New Swing Easel Card Tutorial for Fancy Fold Friday

Time for new card designs with new papers for new classes... but a return to one of my card design classics, the Swing Easel card... for which a large amount of people still visit me daily (probably via Pinterest of course!) for the 12x12 version tutorial... and the A4 version tutorial...

And now was the time to re-make as the format is perfect for the papers I am using for July and August classes... so today is the time for Twinkle Twinkle... (have I told you these are my favourite papers!!! And that they are on the 4for3 Sale promotion running this month... ) and a re-size to my original Swing Easel card...
As I always intended to do another Tutorial for the Swing Easel Card... for a 5 1/2" Square version from US Letter card (or 14cm from A4 card)... so roll on a few years.. and here it is... though I am sure the internet is already awash with a US Letter 5 1/2" in both word and video form.... but still... apologies that it has taken me so long...
But whilst I was there... on a Swing Card that is... I couldn't resist trying out another idea I had had for the card... think you will like that one even more... but more on that next week... 

And I thought I would try something different... a PDF tutorial for you too... Just click on the photo to upload and/or save and/or print etc ... 
And please let me know what you think of the pdf version... either in comments...  or in my contact me form down the right hand side of my blog... 

Craft Spa Recipe
Card Thick Whisper White 5 ½” x 11” (14 x 28cm)
Paper (Top) 5 ¼” (13.5cm) Square
Paper (Base) 5 ¼” (13.5cm) Square
Card Gray Granite 3 ½” (9cm) Square
Card Whisper White 3 ¼” (8.5cm) Square
Papers – Twinkle Twinkle
Dies – RETIRED Squares Collection

Craft Spa Instructions
1.    Die cut the central square aperture in the paper(or cut out with trimmer at ¾”or 2cm all round)

2.    LANDSCAPE. At 5 ½” (14cm) on Top Bar. Score across whole card
3.    LANDSCAPE. At 6 ½” on Top Bar. Cut from 1” to 4 ½” (2.5 to 11.4cm)
4.    LANDSCAPE. At 10” on Top Bar. Cut from 1” to 4 ½” (2.5 to 11.4cm)

5.    Bone Fold along central 5 ½” (14cm) line
6.    With card as Tent Fold – adhere paper on front (around the cuts)
TIP – ensure you have glue spread all over (but thinly) half way down the sides

7.    Place card blank back on trimmer LANDSCAPE with papers to the right hand side…
8.    LANDSCAPE. At 8” on Top Bar. Score from 0-1” (0-2.5cm) and 4 ½”–5 ½” (11.4-14cm)
9.    LANDSCAPE. At 8 ½” on Top Bar. Score from 0-1” (0-2.5cm) and 4 ½”–5 ½” (11.4-14cm)
10. LANDSCAPE. At 9” on Top Bar. Score from 0-1” (0-2.5cm) and 4 ½”–5 ½” (11.4-14cm)

11. Place card blank on trimmer PORTRAIT with papers at Top…
12. PORTRAIT. At 1” on Top Bar. Cut 1-2 ½” (2.5-6.4cm), LIFT, Cut 3-4 ½” (7.6-11.4cm)
13. PORTRAIT. At 4 ½” on Top Bar. Cut 1-2 ½” (2.5-6.4cm), LIFT, Cut 3-4 ½” (7.6-11.4cm)

14.  Fold the 2 side sections as Mountain, Valley, Mountain.
(Tip – it is easier to fold the 2 mountains and then push the valley fold in between)


15. Decorate as necessary

Other Swing Easel Card Tutorials already published for you
Click here for A4 cardstock version
Click here for 12x12 cardstock version