


The Impossible Card is a card originally designed by Claire and appearing first here on her iheartmaggie site... her inspiration for the card fold was a magic playing card trick (known as Hypercard ) ... and I have to add that this card fold is a truly inspired and very clever twist of the card Claire!!!
Claire then made and shared a video here on the Trimcraft You Tube site/blog... which is short enough for (even) me to watch!! Though blink and you will miss the key moment!! And now there are probably 30 or so videos to choose from... but not a lot in writing...

But before I start... you can also see a Garden Shed version posted previously here...
1.
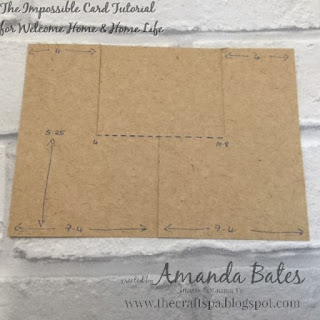
Cut an A6 card sized panel ie 14.8 x 10.5cm (US Letter 5 ½” x 4 ¼”)
2.
PORTRAIT. Line up at 5.25cm (US 2⅛”)
3.
Score
from 4 to 10.8cm (US 1 ½” to 4”)


4.
LANDSCAPE. Line up at 7.4cm (US 2 ¾”)
5.
Cut
from score-line (ie 5,25cm or US 2⅛”) up to 0

6.
Turn the piece of card 180degrees (so that your
cut line is now at the bottom)
7.
LANDSCAPE. Line up at 4cm.(US 1 ½”)
8.
Cut
from score-line (ie 5,25cm or US 2⅛”) up to 0


9.
LANDSCAPE. Line up at 10.8cm (US 4”)
10.
Cut
from score-line (ie 5,25cm or US 2⅛”) up to 0


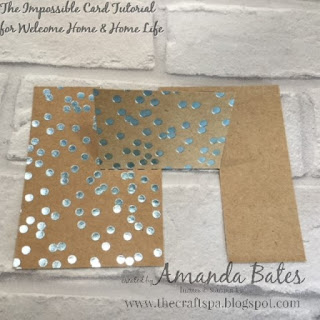
So you end up with this...

11.
With central cut line to bottom/front…hold the top/back
left hand cut/sections in your left hand


12.
Flip the right hand “back to front L shape” back
on itself on the central fold… so that the top/back narrower section ends up at
the front/bottom... and upside down!


13.
Bone Fold centre scoreline at the right hand
side (ie above the cut-out/notch section)


14.
Pull left hand side of central scoreline/section
up and fold to front/bottom (ie back on itself) & Bone Fold


15.
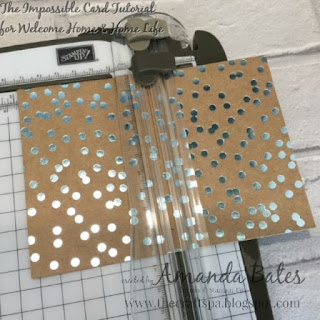
Cut your “grass” papers to size… 7 x 10cm (x2) (US 2½” x 4” - x 2)
16.
PORTRAIT lined up at 3.5cm. Cut 5.25cm to 0 (US line up at 1 ¼”.Cut 2 ⅛” to 0)
17.
LANDSCAPE (with cut to left hand side) lined up
at 5.25cm. Cut 3.5cm to 0. (US line up 2⅛”.Cut 1 ¼” to 0)
18.
Repeat for 2nd piece of paper
And an admittance… the 2 panels should really be cut slightly differently… but I decided that life was too short!! So both of mine are the same…and lined up to best compromise!
And an admittance… the 2 panels should really be cut slightly differently… but I decided that life was too short!! So both of mine are the same…and lined up to best compromise!
19.
Decorate as required. I wanted a clean and
simple style… kind of the "less is more" aspect of the hygge style... so just added a wooden die cut house and heart… and a couple of
greetings… Job done...
Stampin Up
Products Used
Papers - Naturally
Eclectic, Wood TexturesStamps - Home Life, Beautiful Bouquet
Dies – Welcome Home, Sweet & Sassy
Card & Ink - A4 Mint Macaron card, Memento Ink, Mint Macaron Ink


5 comments:
Amanda... Thank you so much for this Tutorial, I love your "House/Home" card and can't wait to give it a go. Thank you for the time and effort you put in to show us how to make these cards, it is truly appreciated.
Thank you for the appreciation... that means a lot...
I have been looking at these cards and thinking looks complicated, however you have made it seem doable, i may have a go this weekend thanks amanda
Definitely easy to do once you have spotted the ‘trick of the turn’...
Fab tutorial and spin on the impossible card, thanks for the mention :) xx
Post a Comment