Showing posts with label Bravo. Show all posts

Saturday, 7 May 2016

Jems Monthly Blog Hop

Introducing a new monthly feature for you... a monthly Blog Hop. These will be every first Saturday of the month... and will carry a specific theme for each hop... Carry on around the hop by pressing on the NEXT or BACK buttons at the bottom of the post depending on whether you want to go forwards or backwards! Your choice...


Either way there are many fantastic projects shown by my fellow team hoppers... the Jems are a talented bunch so you won't be disappointed...
So... for our first hop... we are featuring Retiring Products... not long to be able to purchase these... just till 31st May. Do remember that all current bundled items are now at 15% discount and that they will either not be available at all or not bundled anymore come the new Annual Catalogue on 1st June... Also cardstock is going up a few pennies a sheet... so stock up now... I will be ordering on Thursday night if you need anything....
So I am featuring.... the retiring Bravo stamp set (gonna really miss this one!), Shine On speciality papers (I have just grown to REALLY love these!), Itty Bitty Trio star punch (sorry all gone!) and last but not least Remembering Your Birthday (reduced in both wood and clear mount btw)

Bravo Photopolymer Stamp Set by Stampin' Up!Shine On Specialty Designer Series Paper by Stampin' Up!Remembering Your Birthday Wood-Mount Stamp Set by Stampin' Up!
I have made the card for my son's birthday tomorrow - no guesses as to his age! Hope he likes it as I have strayed a long way from the annual Real Red card.....
This is a Large Square Double Display Card from 12x12 card - metric tutorial here, imperial (inches) here... I cannot believe how easy one of these cards is with these papers - not a lot of prepping or decoration required as the paper(card) is so stiff in itself.... yippee!

And spot the details...
Cucumber Crush panel looks more like leather care of stamped off Cucumber Crush ink & You've Got This background stamp... the silver embossing making it all pop...
Silver Glimmer Large Numbers popped onto Cucumber Crush ones to add more definition...
Really pleased with this card... especially as so out of my usual comfort box with colours... It is just so quick for a card that gives such a WOW... even I will be buying some stock of these papers... as I am always running out of teen cards... and I reckon this will also look fabulous in Bermuda Bay and Watermelon Wonder!! And the embossed silver sides will look fabulous too...
Right time to carry on with the hop... Carry on around the hop by pressing on the NEXT or BACK buttons here... Your choice which way...
SU! Products used
Stamps - BravoRemembering Your Birthday (reduced in both wood and clear mount btw)
Papers -  Shine On speciality papers, Silver Foil Vellum, A4 Cucumber Crush card, Silver Foil, Silver Glimmer
Punches - Itty Bitty Trio star punch (all gone!)
Inks - Staz On Black, Versamark & Silver embossing powder

Directions - Metric tutorial here, Imperial (inches) here...
Obviously somewhat less layers of card & paper to cut than the original. The only other difference in the detail being the front central square mats - silver foil 10.5cm, cucumber crush 10cm so as to fit the Congratulations image...

Monday, 2 November 2015

Special New Home Congratulations Card

A break from Christmas makes again today...

Though you may think this seems familiar...
A very special friend of mine moved house recently... so it was time for a special card...

And this format sprang to mind - for which the tutorial is posted here... 
Though I had a few extra challenges...
(1) time was not on my side.. I had an hour before we needed to be in the car and on the way to their new house...luckily I had a few strategic makes left over from my Christmas card making!
(2) I don't have any New Home wording stamps...so my brain had to get inventive...
(3) I did plan a long banner going across the whole card...but reason (1) stopped that!
So how did I get round the lack of New Home wording...
(1) the slim wide Congratulations is from Bravo...
(2) the NEW banner is using the Back to Basics alphabet - just punched out with the Banner Punch - simples!
(3) the HOME is from the Homemade for You... I just put a post it note over the MADE and kitchen utensils - inked up - removed the Post It note - and stamped & embossed...
I also used the FOR YOU WITH LOVE from the Homemade for You to dress up the mirror... though I have now spotted that I didn't stamp it centrally spot on in my haste! Aargh....
And a more summery scene behind the windows this time.... Soft Sky sponged sky - and Mossy Meadow & Aquapainter pen for the grass and trees...

Anyway... the card was very well received... I do love the fact that I can make something that brings such happiness to others! I just never own up as to how long it may have taken me!!
And finished off on the front with the larger Wonderful Wondrous wreath this time...

Now I just have to remember in a month or so's time that she is not having the matching Christmas card!!
Built for Free Using: My Stampin Blog

Wednesday, 23 September 2015

Hearth & Home - iPad -Technology Series Part 2

Following on with my mini series of some technology based Fancy Fold Cards for the men and teens in our life - using the fantastic Hearth & Home window dies...
This is the card that started me off! IPad time....
On its docking station with speakers!

Edited to add: I had a bit of a first with these technology cards...  as I posted this card... I happened upon a timely challenge on a Technology theme... and so I entered them in a Challenge over at Less is More... I have always had entering Challenges on my bucket list... and now I have started! May it long continue...

This is a variant of my Centre Step Easel Card. Just sized slightly differently...but more of that on another day... Tutorial for this version now added here...
The iPad is just a snipitty snipped Smoky Slate die cut window frame - with a Basic Black back - mounted on a Thick Whisper White small rectangular die cut Project Life card. Handheld punched 1/4" & 1/8"white circles for the button ( Smoky Slate ink around the smaller) and 1/16" black circles for the camera.

And the apple motif... loving this! Punched apple using the Tree Builder  Punch... then re-punched out using a 1/8" Circle Hand Punch... but be warned ...this bit is trickier than it looks! Think I had 5 attempts to punch in the right place...

The keyboard is just a trimmed die cut planter - also from the Hearth & Home die set... again the white embossed wording being from the Bravo stamp set

And the speakers... whilst I lamented the lack of my trusty Square Lattice embossing folder for the job of adding the texture... I had a brain wave... and the Softly Falling embossing folder came to my rescue! Who would have thought!
And as  final inspiration for an iPad... here is the first one I made using the Hearth & Home window die... 

Smaller but still perfectly formed ( though a bad photo!). The outer white frame being a snipped white window - corner rounded to finish it off...

I just need to find "the window!" (of time that is... ) to be able to make and pop it on a card I have in mind.... though that may be a little while now... so hopefully I will have  Part 3 of my Technology series later!

Built for Free Using: My Stampin Blog

Tuesday, 22 September 2015

Hearth & Home - The Technology Series Part 1

You will be glad to know that DH kept to his word - and I have my photos back! Phew...
And yes you did read the title right... the window die is ever so useful for technology makes... particularly useful for those teen boys that can be so hard to make something suitable for... but now I am sorted...
So the back story first... I was also asked to do an inspiration station for our Team Training event last Saturday...and so I did... featuring... yes you guessed it... the Hearth & Home window & planter dies along with a smattering of Happy Scenes, Festive Fireplace/Fireside and of course Peaceful/Perfect Pines.
Hence why I now have a few more to share with you all here ...
For once I did get quite a way through my "Creative Mind Dump List"... but there are still some more once I have had a chance to play ( work very hard!) with some other stamp sets etc....
So today I am featuring a PS4 ( Playstation) which is my son's current favourite gaming platform,...
Just a case of snippity snip with the windows in Smoky Slate and Basic Black - plus a Basic Black PL card - die cut by my trusty Project Life Cards & Labels dies. A bit of an Eureka moment I can tell you.... And finished off with a sentiment from Bravo ... another well used stamp set at The Craft Spa!
And yes this is another version of my Pop Out Swing Card... the perfect format for a male card... movement and fiddle factor!

Edited to add: I had a bit of a first with these technology cards...  as I posted my 2nd card... I happened upon a timely challenge on a Technology theme... and so I entered them in a Challenge over at Less is More... I have always had entering Challenges on my bucket list... and now I have started! May it long continue...

And here are some other ideas of what to put on the screen....
X Box One .. XBox 360... Wii...  PS3...
Minecraft... FIFA... Call of Duty... Grand Theft Auto... Club Penguin... 

PC... Windows 10 landing screen shown here... but think Facebook.. a favourite blog... another game... the list will go on!!
 
TV... you will have to use your imagination with this picture! But think fave Sport... fave programme... fave film... again a very long list for this area....
 
A photo (of a loved one!) frame... a picture (favourite painting?) frame... Even more imagination required here...

So see... that is all the teens and men folk wrapped up for the year!! Actually probably anyone from the age of about 6 to 60.... maybe even 80 with all our Silver Surfers nowadays....

Wednesday, 1 July 2015

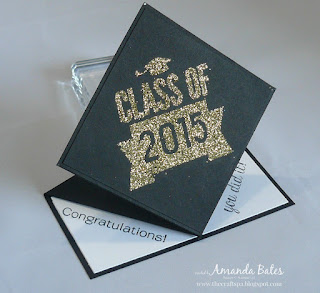
Class of 2015 Graduation Spring Fold Card & a Tutorial

This is my 2nd post today - please do not miss the information on Clearance Rack & Weekly Deals updated earlier today!
Embossed version
One of my ladies has a son graduating from university this year - so I was asked to make a graduation card - and here it is! Everyone was WOWed!
Heat & Stick & Glitter version
Now I can't really take much credit for this card as I have seen many of versions on the web over the years...but a Spring Fold Card just works so well as a mortar board/graduation cap... so it just had to be done.
I used this great tutorial on Splitcoast Stampers for the Spring Fold Card to start off with...but I found this quite a "manual?" process and I wasn't using double sided paper to be able to easily explain the right side to fold in etc in class...

So I worked out how to do the same using my trusty Stampin' Trimmer... Note that I used my Trimmer for all the scores & marks - but I am like that!

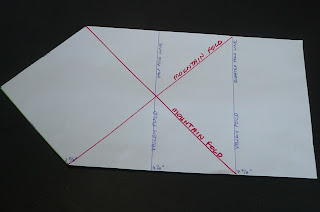
So I have a quick tutorial for you.....

You will need:-
Basic Black Card 10 1/2" x 5 1/4"
Basic Black Card 3 1/2" Square
Whisper White Card 5" x 2 3/8"
Tools - Stampin' Trimmer
Stamps - Bravo; Class of 2015(retired)

1. LANDSCAPE. Score at 5 1/4" & 7 7/8"
2. LANDSCAPE. Mark top and bottom edges at 2 5/8"
3. PORTRAIT. With 2 score lines to bottom... Mark top edge at 2 5/8"
4. Line up mark on top long edge with bottom of quarter fold (ie 7 7/8") score line & Score
5. Repeat for mark on bottom long edge to top of quarter fold score line
6. PORTRAIT. Cut from top mark (on narrower side) to mark on RHS of long side
7. Repeat from top mark to LHS mark
8. Bone fold 2 straight score lines as valleys
9. Bone fold 2 diagonal lines as mountains
10. Push in 2 diagonal side sections and then it should all become obvious!
11. Stamp & decorate as necessary
12.. Apply glue to bottom triangular section & adhere to bottom rectangular section
I created my tassel using my trusty peg bow maker (not Stampin' Up! just a great find on eBay).
Just wrapped thread around the pegs about 15-20 times and then wrapped some thread around one end of my wrapped thread and knotted to hold. Then snipped through the other end....

But I have to 'fess up.... my tassel came apart as my thread was too silky/shiny ( well that is my excuse!) ... hence why it has ended up looking... well scraggly... but I am sure you get the idea...