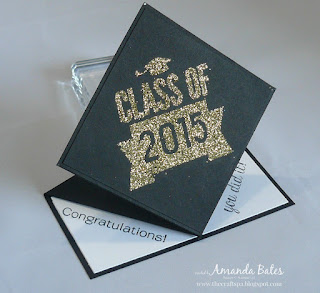
Embossed version
One of my ladies has a son graduating from university this year - so I was asked to make a graduation card - and here it is! Everyone was WOWed!
Heat & Stick & Glitter version
Now I can't really take much credit for this card as I have seen many of versions on the web over the years...but a Spring Fold Card just works so well as a mortar board/graduation cap... so it just had to be done.I used this great tutorial on Splitcoast Stampers for the Spring Fold Card to start off with...but I found this quite a "manual?" process and I wasn't using double sided paper to be able to easily explain the right side to fold in etc in class...
So I worked out how to do the same using my trusty Stampin' Trimmer... Note that I used my Trimmer for all the scores & marks - but I am like that!
So I have a quick tutorial for you.....
You will need:-
Basic Black Card 10 1/2" x 5 1/4"
Basic Black Card 3 1/2" Square
Whisper White Card 5" x 2 3/8"
Tools - Stampin' Trimmer
Stamps - Bravo; Class of 2015(retired)
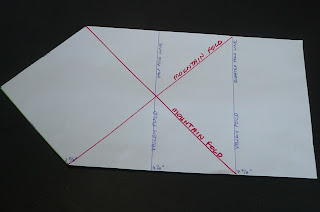
1. LANDSCAPE. Score at 5 1/4" & 7 7/8"
2. LANDSCAPE. Mark top and bottom edges at 2 5/8"
3. PORTRAIT. With 2 score lines to bottom... Mark top edge at 2 5/8"
4. Line up mark on top long edge with bottom of quarter fold (ie 7 7/8") score line & Score
5. Repeat for mark on bottom long edge to top of quarter fold score line
6. PORTRAIT. Cut from top mark (on narrower side) to mark on RHS of long side
7. Repeat from top mark to LHS mark
8. Bone fold 2 straight score lines as valleys
9. Bone fold 2 diagonal lines as mountains
10. Push in 2 diagonal side sections and then it should all become obvious!
11. Stamp & decorate as necessary
12.. Apply glue to bottom triangular section & adhere to bottom rectangular section
I created my tassel using my trusty peg bow maker (not Stampin' Up! just a great find on eBay).
Just wrapped thread around the pegs about 15-20 times and then wrapped some thread around one end of my wrapped thread and knotted to hold. Then snipped through the other end....
But I have to 'fess up.... my tassel came apart as my thread was too silky/shiny ( well that is my excuse!) ... hence why it has ended up looking... well scraggly... but I am sure you get the idea...


1 comment:
Like this- wish I knew someone graduating! X
Post a Comment