Showing posts with label Festival of Trees. Show all posts

Tuesday, 8 October 2019

A trio of Tree Punch projects....

All is Calm, Double Display Card, Festival of Trees, Wonderful Wreath, by Amanda Bates, The Craft Spa (1)
As I shared the Perfectly Plaid stamps and Tree punch on Sunday... I was reminded of a number of projects I made using the Festival of Trees and that Pine Tree Punch...

But before I start... 2 quick announcements...
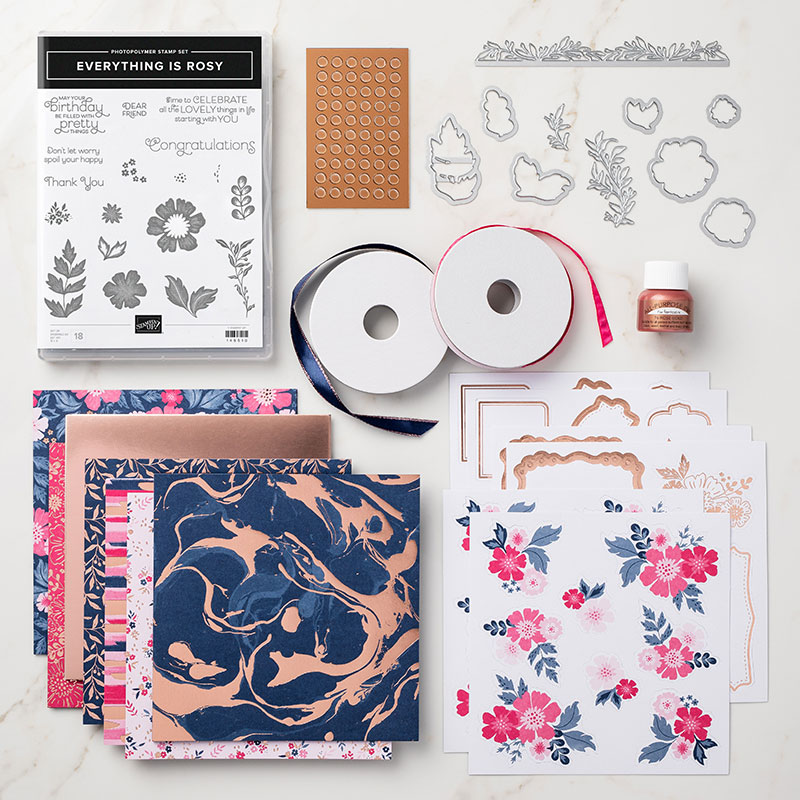
(1) The really beautiful Everything is Rosy product bundle is available in the Clearance Rack (with 15% off) while supplies last...
10.01.19_BANNER_ROSY_OOP_NAUKSP
You know the one... pinks, navy blues and a touch of rose gold! Click here to go to see...
Everything Is Rosy Product Medley
(2) The "technical glitch" for ordering the Farmhouse Christmas tutorials yesterday morning is sorted!! So they are now ready to order!! Sorry for any inconvenience...  And thank you for the afternoon orders... all of which have been emailed out already...

Right back to today!

So I thought it may be interesting for some of you if I did a quick re-run and share...
Just click on the photo to go to the original post...

I have found this fascinating... as these have been some of my own personal favourite projects  - and my most visited card tutorial - over the last 4 years or so... and indeed many of these still come out every christmas!
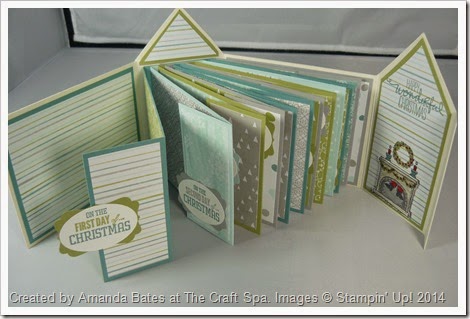
12 Days of Christmas, All is Calm House Mini Book, Amanda Bates, The Craft Spa,  (2)
Hope that this post may inspire some of you... Enjoy...

And I do have to laugh... as I have lots of this year's christmas projects sitting ready to share with you... but it just seemed to make more sense to take a bit of time and share some golden oldies this week! 
12 Days of Christmas, All is Calm House Mini Book, Amanda Bates, The Craft Spa,  (7)

Sunday, 27 December 2015

Special 12 Days of Christmas gift Part 2

Now this will be very familiar to the ladies who came here and created my 12 Days of Christmas House last year...
But you may have noticed that it has been extended!
Yes I created a co-ordinating His & Hers 12 Days of Christmas gift... 

12 Days of Ports for the guys... 
12 Days of Gins for the the ladies!
And don't they fit together well!!
Hence the need for the retired papers...
Never heard so many WOWs at my creative endeavours from the family before... but maybe the full little jars had something to do with that!!


Friday, 21 November 2014

Imperial Tutorial for Large Square Double Display Card


All is Calm, Double Display Card, Festival of Trees, Wonderful Wreath, by Amanda Bates, The Craft Spa (1)
Here is the Imperial Tutorial for the Large Square Double Display Card. I personally find this easier as I am an inches gal……. but for you younger ones or when you are using a trimmer with only a metric cut/vertical blade bar…. the Metric Tutorial was posted here…..

As I said before this is my way of saying  A BIG THANK YOU to all of you that regularly follow my blog, who comment and who re-share/pin my projects. Nearly 600 of you following at the last count!!! WOW – that is amazing – you would laugh at how excited I was all those years ago when I first hit 20 followers!!! So THANK YOU EACH AND EVERYONE OF YOU… you honour me with your time… particularly when you comment as that always makes my day!

Again I have to thank & credit Paola Levi in South Africa as I was inspired by a Double Display cut & score card she made back in 2011 and whose template I have used a few times …. as first shown here back in 2012 …. Edited to Add: As I have travelled around Pinterest - I have subsequently found a previous 2009 version with instructions of the main back part of the card - so I feel that the originating credit should be attributed to Susan Bluerobot. Thank you Susan for a fantastic cut & score card.... so glad I have found you...

I just added an extra square front to the card (as I do so like my square cards!!)  - which has already earnt this card the nickname of The Card With More Frontage!!!

And as also promised …..here is another example of a Large Square Double Display card ….
Typeset Large Square Double Display Card  (3)
This time the Card Front Mats are Larger (Cardstock Mat 5 ¾“ Square; DSP 5 ½“ Square )

I purposefully didn’t add any extra decoration to the front this time as it was for a man! Happy Birthday again Steve… And I am delighted to report that Steve REALLY loved this card!!! He was well WOWED…. So I am definitely making a few more of these… need to do some today actually!
Typeset Large Square Double Display Card  (6)
Oh and check out the great Larger than Life numbers – my favourite photopolymer alphabet & numbers set….
Typeset Large Square Double Display Card  (7)
Come back tomorrow for another example!

So here is the Imperial Tutorial…..
RECIPE Main Card CS Pear Pizzazz

Mats CS Lost Lagoon

Decoration DSP

CS Whisper White

Main Card 12” x 6” X X X
Card Front 6” Square 4 ¼” Square 4” Square X
Card Back X 3 ¾” Square X 3 ½” Square
Inner Centre X 3 ¾” Square 3 ½” Square X
Inner Sides X 1 ¾” x 3 ¾” (x2) 1 ½”x 3 ½” (x2) X
Inner Top & Bottom X 1 ¾” x ¾” (x6) 1 ½” x ½” (x6) X


INSTRUCTIONS
In pictorials, Red = Cut Line; Blue = Score Line Main Card

(1) Line up large Pear Pizzazz panel PORTRAIT at 1” on Top Bar
(2) Cut from 1” to 5”
(3) LIFT THE CUTTING BLADE...
(4) Cut from 7” to 11”
(5) Flip 180 degrees
(6) Repeat (1-4) for the other side
double display card-Imperial Template - Copy

(7) Line up LANDSCAPE at 1” on Top Bar
(8) Score from outside edge to cut line at top & bottom (ie score from O to 1”, LIFT BLADE..., then score from 5” to 6”)
(9) Repeat (7-8) lined up at 5”, 7” & 11” on the Top Bar

(10) Line up LANDSCAPE at 2” on Top Bar
(11) Score across the whole card  (ie 0 to 6”)
(12) Repeat (10-11) lined up at 4”, 8” & 10” on the Top Bar

double display card-Imperial Template

(13) Crease score lines by hand LIGHTLY.... starting at one side of the card...
          Inside Sections – Mountain then Valley folds
          Outer Sections – Mountain, Valley, Mountain, Valley folds
(14) Bone Fold. TIP – an extra “crease” will now magically appear in the centre of the top & bottom outer sections – do not worry, you will be covering these! But don’t further crease or bone-fold it!!!
(15) Repeat (13-14) from the other side

Card Front Decoration
(1) * Cut 6” Square Pear Pizzazz panel in half to 3” (x2)
*This step is not necessary with a guillotine cutter, but most Trimmers will not cut through 3 layers! If your cutter will go through the 3 layers then adhere all 3 parts & cut the whole panel in half (ie at 3”)

(2) Adhere DSP to larger square Lost Lagoon Card Mat
(3) Cut DSP/Mat panel in half (ie at 2 1/8” )

(4) Adhere parts (1) & (3) together to form 2 Card Front Sections
(5) Adhere Card Front Sections to front LH & RH sections of Main Card – one at a time lining everything up nicely as you go! TIP – put glue on front sections of Main Card NOT the back of the Card Front Sections!!! Or you will have glue where you don’t want it!!!

Large Square Double Display Card Tutorial, The Craft Spa 007Large Square Double Display Card Tutorial, The Craft Spa 010
I would recommend Tombow – I have only used Sticky Strip so you can see where to put the glue in the photo!

Inner Card Decoration The rest is just gluing & sticking! And stamping &decorating as you desire.....

So there you have it…. I would love to see your makes if you use this…so please remember to link back here…. or send me an email with a photo!!

Thursday, 20 November 2014

All is Calm LARGE Box in a Bag

All is Calm Box in a Bag, Festival of Trees, Amanda Bates, The Craft Spa  (2)

Following on from an earlier post – here is the large version of the Box in A Bag we made at an October class.

And it is pretty large as papercrafting projects go… 6” high, 8” wide at the top and 4” deep… And here is the tutorial by Heather Klump that I used… thank you Heather – it is a fabulous project! I will definitely be making more…

I just changed a couple of things….

Firstly  - the handles from ribbon to cardstock to end up with a stiffer handle.

Secondly -  the flap is made using the larger of the Envelope Liners dies as it is so perfect for the job. Not only in shape/size – but also as  - with just one quick score – you have a flap to stiffen & cover the inside too…. perfect! (Note I didn’t use the whole die  shape - just to about 1” down on the long length – I didn’t need any more overlap on the inside – so cutting the whole shape would have just been a waste of cardstock!)

And thirdly – a shout out for and thanks to fellow Jems team-mate & friend, Sharon Glynn – the fabulous Tag is a remake of her fabulous Christmas swap at the last Team Training. I just changed the colour of the stars panel and the tree to suit this project…. Thanks again Sharon! 

And finally – here are the 2 Box in a Bag projects we made – so you can see how much bigger this bag is compared to the “standard”… It may be rather expensive to fill with chocolate – as it is nearly twice the depth too!!!

All is Calm Box in a Bag, Festival of Trees, Amanda Bates, The Craft Spa  (3)

Wednesday, 19 November 2014

Metric Tutorial - Large Square Double Display Card

All is Calm, Double Display Card, Festival of Trees, Wonderful Wreath, by Amanda Bates, The Craft Spa (1)
And here is the last of the projects we made at my All Day Christmas event…. Yes you will recognise it from before if you regularly follow my blog … but this card has been so popular – and pinned/re-pinned/visited here so many times -  that it had to be shared with /demonstrated again & made by my All Day Event ladies ……
All is Calm, Double Display Card, Festival of Trees, Wonderful Wreath, by Amanda Bates, The Craft Spa (2)
But seeing as I was looking for a way to say  A BIG THANK YOU to all of you that regularly follow my blog, who comment and who re-share/pin my projects. Nearly 600 of you following at the last count!!! WOW – that is amazing – you would laugh at how excited I was all those years ago when I first hit 20 followers!!! So THANK YOU EACH AND EVERYONE OF YOU… you honour me with your time… particularly when you comment as that always makes my day!

And also… because so many of you asked too…  so here it is!! A tutorial for the Large Square Double Display Card. Just to say Thanks!

But first…. a quick apology for keeping you waiting… I had to tell you to be patient as I worked through a very full calendar of events during the last month.

Secondly Again I have to thank & credit Paola Levi in South Africa as I was inspired by a Double Display cut & score card she made back in 2011 and whose template I have used a few times …. as first shown here back in 2012 …. Edited to Add: As I have travelled around Pinterest - I have subsequently found a previous 2009 version with instructions of the main back part of the card - so I feel that the originating credit should be attributed to Susan Bluerobot. Thank you Susan for a fantastic cut & score card.... so glad I have found you...

But this time I added an extra square front to the card (as I do so like my square cards!!)  - which has already earnt this card the nickname of The Card With More Frontage!!! - and I converted Paola’s imperial template to metric to suit our new Stampin Up! trimmer….. but don’t worry I will be back with a full Imperial Tutorial tomorrow ( as I am still an inches gal)….. and some more Large Square Double Display card options….

RECIPE Main Card  CS Pear Pizzazz Mats CS Lost Lagoon Decoration DSP CS Whisper White
Main Card
30 x 15cm
X
X
X
Card Front
15cm Square
10.5 cm Square
10cm Square
X
Card Back
X
9.5cm Square
X
9cm Square
Inner Centre
X
9.5cm Square
9cm Square
X
Inner Sides
X
4.5x9.5 cm (x2)
4 x 9cm (x2)
X
Inner Top & Bottom
X
4.5 x 2cm (x6)
4 x 1.5cm (x6)
X

INSTRUCTIONSIn pictorials, Red = Cut Line; Green = Score Line
Main Card

(1) Line up large Pear Pizzazz panel PORTRAIT at 2.5cm on Top Bar

(2) Cut from 2.5 to 12.5cm.

(3) LIFT THE CUTTING BLADE...

(4) Cut from 17.5 to 27.5cm

(5) Flip 180 degrees (6) Repeat (1-4) for the other side
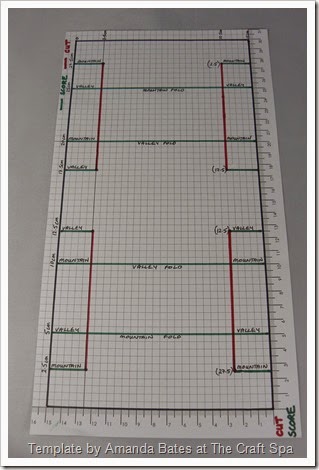
 Large Square Double Display Card Tutorial, The Craft Spa 001

(7) Line up LANDSCAPE at 2.5cm on Top Bar

(8) Score from outside edge to cut line at top & bottom (ie score from O to 2.5cm, LIFT BLADE..., then score from 12.5 to 15cm)

(9) Repeat (7-8) lined up at 12.5cm, 17.5cm & 27.5cm on the Top Bar

(10) Line up LANDSCAPE at 5cm on Top Bar

(11) Score across the whole card (ie 0 to 15cm)

(12) Repeat (10-11) lined up at 10,20 & 25cm on the Top Bar

 Large Square Double Display Card Tutorial, The Craft Spa 002

(13) Crease score lines by hand LIGHTLY.... starting at one side of the card...
Inside Sections – Mountain then Valley folds
Outer Sections – Mountain, Valley, Mountain, Valley folds (14) Bone Fold. TIP – an extra “crease” will now magically appear in the centre of the top & bottom outer sections – do not worry, you will be covering these! But don’t further crease or bone-fold it!!! (15) Repeat (13-14) from the other side


Card Front Decoration

(1) * Cut 15cm Square panel in half to 7.5cm x 15cm (x2)
*This step is not necessary with a guillotine cutter, but most Trimmers will not cut through 3 layers! If your cutter will go through the 3 layers then adhere all 3 parts & cut the whole panel in half (7.5cm)
(2) Adhere DSP to larger square Lost Lagoon Card Mat
(3) Cut DSP/Mat panel in half (5.25cm)

(4) Adhere parts together to form 2 Card Front Sections

(5) Adhere Card Front Sections to front LH & RH sections of Main Card – one at a time lining everything up nicely as you go! 

TIP – put glue on front sections of Main Card NOT the back of the Card Front Sections!!! Or you will have glue where you don’t want it!!!
 Large Square Double Display Card Tutorial, The Craft Spa 007Large Square Double Display Card Tutorial, The Craft Spa 010
I would recommend Tombow – I have only used Sticky Strip so you can see where to put the glue in the photo!

Inner Card Decoration

(1) The rest is just gluing & sticking!

And stamping & decorating as you desire.....

Edited to Add: And for those of you wanting an Imperial Tutorial…here it is… along with another version of the card…

So there you have it…. I would love to see your makes if you use this…so please remember to link back here….