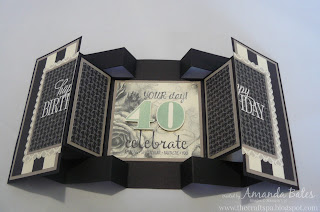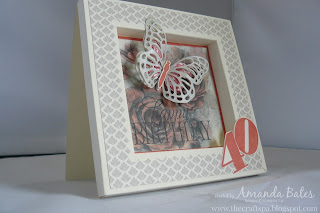
Today I have something for you that I have been meaning to do for a while… a Fancy Fold Friday post – including the Tutorial for my favourite card format at the moment! I hope that this is the first of many! Fancy Fold Friday posts that is!!

When we made these
Shadow Box Frames a month or so ago… I promised my ladies a card using the same concept… so here is one version of what I came up with. A very solid chunky card – perfect for special occasions…

It seemed appropriate to share it now as it is my son’s 16th Birthday today… so Happy Birthday Joe! And as long standing readers of my blog will know – today is the day to share my annual Real Red card - no guesses as to his favourite colour!

But before I share the tutorial – these details should be read in conjunction with my
original tutorial which has pictures of each step for you.
Edited to add Jan 2016- some key photos added on this post too!
In fact I
strongly recommend that you make up one of the shadow boxes as per my
original tutorial first… call it a practice run! The adhering of the sides (steps 6&7) is harder in this version – so it is better that you know what to do before you do it!!!
And I have to admit that I use Tombow on the straight sides for this version – as having a bit of wiggle time is very useful with this one! Still use Sticky Strip on those diagonals though…..
You will need
Whisper White Card 12”x12”; 12” x 6”
Real Red Card 4” Square
Whisper White Card 3 3/4” Square
Designer Series Paper 5 3/4” x 3/4” (x4)
Tutorial
1. Score Whisper White 12x12 card at 1”, 1 ½”, 2 ½” and 3” on all 4 sides.
2. Score extra score-lines across just 2 score lines at 4” and 8” on 2 opposing sides
3. Cut up these extra score lines & diagonally across to the 3
rd score-line intersection
4. Cut off “16-square” section at each corner
This is the "16 Square bit" cut out!
With all 4 corners cut out...
5. Bone Fold
6. Adhere 2 straight sections
7. Adhere 2 notched side sections
8. Score LANDSCAPE 12” x 6” Whisper White card in half at 6”
9. Bone Fold
10. Adhere to back of box frame
11. Cut mitres in paper strips. ( this is a fab tip I picked up from my fantastic SU! mummy –
Julie Kettlewell…)
- Place 2 strips on top of each other at 90degrees
- Snip across from inside to outside intersection
And my extra TIP- do one corner at a time & place each of the cut pieces down around your frame before you pick up the next 2 strips and cut. Then you have the matching mitres in position…
12. Decorate as required.
I just kept it classic & simple on the front – just greetings from the
Fabulous Four set and numbers from my favourite
Larger Than Life set.
And then some of the Speech Bubbles from the retiring
Just Sayin set on the inside

And the 3/4” deep box to wrap – and/or post it in – nice and simple…
- Cut 2 pieces of card. One to 7 7/8” Square and the other to 7 3/4” Square
- Score in at 3/4” on each side.
- Dart score lines on 2 opposing sides.
- Punch a 3/4” semicircle on 2 sides of the lid
- Apply glue to tabs and assemble
TIP assemble the base first – then assemble the lid whilst it is on the base – that way you know the lid is going to fit on the base!!
- Decorate as required

Stampin᾿ Up! Supplies
Table built by craftingbecky.com
|
|
|
|
|
|
|
|
|
|
|
|
|
|
|
|


