Showing posts with label Square Framelits. Show all posts

Monday, 22 February 2016

Very Pink Cherry Blossom Tree in the Happy Home Series

So here is the group picture of this trio of Happy Home framed water-coloured cards...
The third card being a very pink Cherry Blossom tree.... amazing how bright Blushing Bride with Rose Red highlights can be!
In fact it proved so pink...that I had to quickly grab my trusty white gel pen and add white blossom over the top!
This card is also Aqua Painter brush water coloured using Pool Party and Pear Pizzazz on Water Color Paper... 


Saturday, 23 January 2016

Box Frame Card Twins

Box Frame Card twins today...
Lots of flowers - or just the one...
Again you choose! One flower version with more details shown here... Sorry but in a big rush today!
My Number of Years & Birthday Bouquet 54321 class is running  next Wednesday and also  - a new date - Saturday 6th February by popular request... just contact me for more details... there are still a few spaces left for each session... would love you to join us!!


Tuesday, 19 January 2016

Birthday Bouquet Box Frame Card and Box

Time for a Box Card today... Seems like ages since I did one of these!
Scallop Square left over from Swing Easel card... 
Flowers cut out from papers ... and given the Wink of Stella treatment...
Simples!


Built for Free Using: My Stampin Blog

Sunday, 18 October 2015

Timeless Elegance Pop Out Swing Card

Still one of my favourite card types... 
Looks WOW... works WOW! Great fiddle factor for the recipient...  so particularly good for men's cards then!!)
But quick and simple to create...
Tutorial here...


Built for Free Using: My Stampin Blog

Saturday, 17 October 2015

Timeless Elegance 40th Birthday Double Display Card

Just realised that there are a few more (non Christmas) cards I made back in August with the Timeless Elegance papers that I haven't yet shared....
 
So thought I should share these whilst I ( and DH) try to fix the latest series of technical issues to hinder me in my blogging endeavours...! And then hopefully I can get back to quicker shares and decent photos again!
 
So a Large Square Double Display card for you today - all dressed up for a 40th... 
Imperial (inches) Tutorial here...
Metric (centimetres) Tutorial here ...

And just because I can... here is last year's christmas Large Square Double Display card that opened the floodgates to this blog! 
All is Calm, Double Display Card, Festival of Trees, Wonderful Wreath, by Amanda Bates, The Craft Spa (1)
I thought it worth sharing again today as both stamps are still available - only the papers are not available.... in fact .. not that I was planning to do this 1 minute ago.. but I think a remake might be "on the cards" whilst I am working with the Winter Wonderland papers this week...
Built for Free Using: My Stampin Blog

Thursday, 15 October 2015

Large Square Box Frame Card for Teens....

A change from Christmas for today.... 
A year on... and a post in order to answer a question I was asked about my 2 versions....

Remember this...
The annual red card post for my son's 16th birthday back in May... along with the tutorial for my Large Square Box Frame card... (as well as the tutorial for the 3/4" deep box which allows for Large Letter postage here in the UK...)

Well we are now in a new school year.... which means that the age has changed...but the card for his friends didn't need to
But spot the other change.... 
As long time followers of my blog will now... I changed my favourite version of the card a while back to include a scallop square die cut from a 5 3/4" square of paper...
So here is the photo of the cards with the 2 fronts so you can compare them side-by-side... and make your own decision!
So which one do you prefer? 

I personally prefer the scallop square... not only because I do still like a scallop square...! But mainly because it is so much quicker to produce the card...! Though the mitred version does use less paper!

Note these cards both use a retired Real Red polka dot paper...for which the Brights paper stack £19.50 is listed - however the new Brights Designer Paper Stack £20 is also listed as that is the one that is now available - this also includes a polka dot pattern....


Built for Free Using: My Stampin Blog

Tuesday, 18 August 2015

Timeless Elegance Butterflies Pop Out Swing Card

Another Pop Out Swing card in my Timeless Elegance collection!. 
Back to Butterfly Basics and Watercolor Wings
Back to Tip Top Taupe, Sahara Sand, Basic Black and Lost Lagoon colour combination
Tutorial for my (Tabbed) Pop Out Swing card here
And as a final point - the new Archival Basic Black ink pad is amazing...

The blackest black ink pad I have ever had. 

Works equally well with rubber or photopolymer. Though it does stain the photopolymer immediately - but I personally like that - as then I can see what I am stamping!

And can be used on some shiny surfaces too... 

A great all-rounder! 

It has quickly become my go to black. 

And I will definitely be buying the Basic Grey one on my next order...


Thursday, 13 August 2015

Timeless Elegance Shadow Box Frame Card

 
Well I couldn't do a Fancy Folds Class without a Shadow Box Frame Card could I...!? Actually it is the Box Frame card that the ladies particularly want to learn to do....

Tutorial for this version here... And incredibly that tutorial blog post has just hit my Top 10 posts of all time! In just 3 months...

Back to the cards... Two options for the ladies to choose from... mute or vivid!! Actually - I lie - there are 3 versions in the room they can choose from! 3rd one already shared here...

So first the vivid version! I didn't know when I selected the Timeless Elegance for this class... but the ladies have a particular passion and love for poppies!! So I just had to oblige....
Well Timeless Elegance certainly delivered those in abundance! So I really hope they like this colourful version! These flowers are all cut out from the one sheet of paper.... love that sheet! Equally stunning with no colour... but more on that another day!
I kept the colours mainly within the In Color collections - so Watermelon Wonder/Basic Black for the Poppies, Mint Macaron for the leaves and Lost Lagoon and Delightful Dijon for the small flowers. All coloured in using my trusty Aquapainter.

I have also used Tip Top Taupe for the mat & background stamping and Early Espresso for the greeting.
But the coolest bit...well this is a true 3D card - 3 layers of flowers and leaves - don't know if you can see this in the photo!
And then there is the Mute version... clean and simple in a box!
Same background stamping... but a Watercolor Wings large Butterfly behind a Tip Top Taupe die cut Butterfly Basics butterfly... 

But just realised... I need to quickly add some pearls to the butterfly! Has to be finished off...

And the inside of the card is just kept simple... Mint Macaron fern leaves from Butterfly Basics...inked, stamped, stamped again. Tip Top Taupe postmark. And Early Espresso greeting from my favourite hostess set of all time - Happy Birthday Everyone...
So there you have it. Loving these Timeless Elegance papers - right up my Craft Spa street!!!
Fancy making these cards for yourself...? And finding the tutorials a bit too much!! Well - if you are fairly local to Yorkshire - I hold Private Classes as well as my regular monthly classes  - here in Great Ouseburn (between Harrogate and York) - just get yourself and some friends together to visit me and create cards like this.... just contact me to arrange a date. 

Stampin Up! Supplies
Stamps - Butterfly Basics, Watercolor Wings, Happy Birthday Everyone
Papers - Timeless Elegance
Dies - Butterflies, Bold Butterflies, Squares
Tools - Simply Scored scoreboard

Wednesday, 29 April 2015

Balloon Bash Pop Out Swing Card

Created by Amanda Bates at The Craft Spa 020

Another in the Balloon Bash series – and another Tabbed Pop Out Swing Card for which I shared the tutorial here.

Created by Amanda Bates at The Craft Spa 024

Slightly brighter and more lively this time…. and the co-ordination of the cardstock and paper stacks make this type of card a simple task!

Created by Amanda Bates at The Craft Spa 018

Created by Amanda Bates at The Craft Spa 016

And for those of you checking in for the Weekly Deals…. there appears to be a little delay today …. I guess they will go live about 4-5pm UK time. So do come back and check them out then….

Tuesday, 7 April 2015

Tabbed Pop Out Swing Card or Square Simple Lever Card Tutorial

Easter Treats Amanda Bates at The Craft Spa 027

Still working on catching up with tutorials… I am now beginning to get there slowly….  So I am prioritising based on the numbers of emails/comments I have received about a particular project! Seemed logical to me….

Easter Treats Amanda Bates at The Craft Spa 044

So…. Remember this… this was the favourite card format made in last month’s classes.. the photos don’t really do the card justice – it is one of those that you maybe have to see in the flesh…and do the swing thing!!

As I am making a new card in the same format for next month’s classes… the photos/recipe in the tutorial are in a different colour way….

So you need….

Card Blank - Cardstock Coastal Cabana 11” x 5 ½” (28 x 14cm)

Inner Panel - CS Whisper White 7 ½” x 5 ¼” (19.5 x 13.5cm)

Tabs - CS Coastal Cabana 1.8cm (just less than 3/4”) x 5 ¼”(13.5cm) (x2)

Card Front Panel- CS Whisper White 3 ½” Square (8.8cm Square)

Instructions

1. Score wider coloured panel at 5 ½” (14cm). Bone Fold.
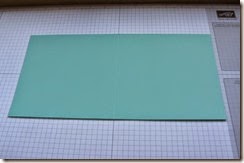
Tabbed Pop Out Swing Card Tutorial, Amanda Bates @ The Craft Spa 001

2. Score narrower coloured panel at 2 ½” & 5” (6.5 & 13cm)

3. Bone Fold as concertina/Z-fold ( ie one as mountain & 1 as valley fold)

Tabbed Pop Out Swing Card Tutorial, Amanda Bates @ The Craft Spa 002

4. Score 2 narrow Coastal Cabana panels at 2 ½” (6.5cm)

5. Die cut Square Aperture in card blank front  and keep the Square…
Oh! Remember that the Square Framelits are on WEEKLY DEALS until 11pm tonight Tues 7 April

Tabbed Pop Out Swing Card Tutorial, Amanda Bates @ The Craft Spa 004

OR this could be hand cut using your trimmer- go in ¾” /2cm from each side – aka line up at ¾” on the Top Bar and cut from ¾” to 4 ¾” … on all 4 sides

6. Adhere Z folded panel to RHS of open card blank (note: valley fold of Z Fold panel to LHS when stuck )

Tabbed Pop Out Swing Card Tutorial, Amanda Bates @ The Craft Spa 008

7. Fold over front of card blank. (with Z folded panel folded)

8. Apply glue through aperture to top of Z fold panel ( ie to RHS of aperture) Note I have used Sticky Strip just so you can see where the glue needs to be…..
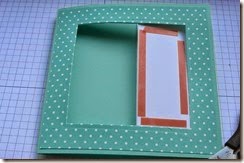
Tabbed Pop Out Swing Card Tutorial, Amanda Bates @ The Craft Spa 009

9. Adhere die-cut square (making sure the Square can swing through the aperture)

 Tabbed Pop Out Swing Card Tutorial, Amanda Bates @ The Craft Spa 010Tabbed Pop Out Swing Card Tutorial, Amanda Bates @ The Craft Spa 015Tabbed Pop Out Swing Card Tutorial, Amanda Bates @ The Craft Spa 011

But when you open this card…that Square section doesn’t pop out or swing… it just … well sits there!
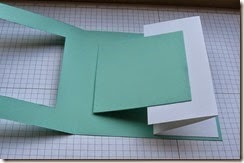
Tabbed Pop Out Swing Card Tutorial, Amanda Bates @ The Craft Spa 013 

So now for the Tabs to attach it all together….. and allow it all to pop out and swing…

10.Open up Card blank. Open out Z folded panel to the right.
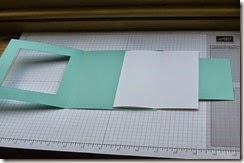
 Tabbed Pop Out Swing Card Tutorial, Amanda Bates @ The Craft Spa 016

11. Apply Glue to narrower side of the 2 Tabs
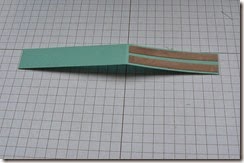
Tabbed Pop Out Swing Card Tutorial, Amanda Bates @ The Craft Spa 017

12. With folded edge of Tabs to outer/RH edge of Z panel - adhere narrower side of Tabs to top and bottom (ie above and below the square panel) ensuring that these tabs clear the square and Z folded panel LHS score line. (Trim if necessary)

 Tabbed Pop Out Swing Card Tutorial, Amanda Bates @ The Craft Spa 018

13.Fold top layer of Z Fold panel back over & open the Tabs out.

  Tabbed Pop Out Swing Card Tutorial, Amanda Bates @ The Craft Spa 019

Check that the Tabs will clear the central score line of the Card Blank.

Tabbed Pop Out Swing Card Tutorial, Amanda Bates @ The Craft Spa 020

Trim if necessary

Tabbed Pop Out Swing Card Tutorial, Amanda Bates @ The Craft Spa 021

14. With the Tabs opened out, apply glue to top side

Tabbed Pop Out Swing Card Tutorial, Amanda Bates @ The Craft Spa 022

14. Fold front of card blank shut to close down onto tabs

Tabbed Pop Out Swing Card Tutorial, Amanda Bates @ The Craft Spa 023

And there you have it…one safely attached swing out card mechanism….

Tabbed Pop Out Swing Card Tutorial, Amanda Bates @ The Craft Spa 024Tabbed Pop Out Swing Card Tutorial, Amanda Bates @ The Craft Spa 025

Now some of you won’t like the fact that you can see the Tab on the back of the white Z folded panel…

Tabbed Pop Out Swing Card Tutorial, Amanda Bates @ The Craft Spa 026

2 ways to work round that …

(1) make your card blank and Z folded panel all in the same colour as I did with the Pistachio Pudding version of the card

(2) cut 2 x  1.8 cm ( almost 3/4”) x 2 1/2” White Tabs…and just stick over the top!

Tabbed Pop Out Swing Card Tutorial, Amanda Bates @ The Craft Spa 030

Tabbed Pop Out Swing Card Tutorial, Amanda Bates @ The Craft Spa 031

Look vanished!

So there you have it… add a decorated panel to the front Square section… and you have a simple looking card with a WOW on opening… and it is simple to make too…

Tabbed Pop Out Swing Card Tutorial, Amanda Bates @ The Craft Spa 027

Right…. onto the Something Borrowed Tri Fold Mini Album Tutorial now…..