Showing posts with label Fabulous Four. Show all posts

Saturday, 17 October 2015

Timeless Elegance 40th Birthday Double Display Card

Just realised that there are a few more (non Christmas) cards I made back in August with the Timeless Elegance papers that I haven't yet shared....
 
So thought I should share these whilst I ( and DH) try to fix the latest series of technical issues to hinder me in my blogging endeavours...! And then hopefully I can get back to quicker shares and decent photos again!
 
So a Large Square Double Display card for you today - all dressed up for a 40th... 
Imperial (inches) Tutorial here...
Metric (centimetres) Tutorial here ...

And just because I can... here is last year's christmas Large Square Double Display card that opened the floodgates to this blog! 
All is Calm, Double Display Card, Festival of Trees, Wonderful Wreath, by Amanda Bates, The Craft Spa (1)
I thought it worth sharing again today as both stamps are still available - only the papers are not available.... in fact .. not that I was planning to do this 1 minute ago.. but I think a remake might be "on the cards" whilst I am working with the Winter Wonderland papers this week...
Built for Free Using: My Stampin Blog

Thursday, 15 October 2015

Large Square Box Frame Card for Teens....

A change from Christmas for today.... 
A year on... and a post in order to answer a question I was asked about my 2 versions....

Remember this...
The annual red card post for my son's 16th birthday back in May... along with the tutorial for my Large Square Box Frame card... (as well as the tutorial for the 3/4" deep box which allows for Large Letter postage here in the UK...)

Well we are now in a new school year.... which means that the age has changed...but the card for his friends didn't need to
But spot the other change.... 
As long time followers of my blog will now... I changed my favourite version of the card a while back to include a scallop square die cut from a 5 3/4" square of paper...
So here is the photo of the cards with the 2 fronts so you can compare them side-by-side... and make your own decision!
So which one do you prefer? 

I personally prefer the scallop square... not only because I do still like a scallop square...! But mainly because it is so much quicker to produce the card...! Though the mitred version does use less paper!

Note these cards both use a retired Real Red polka dot paper...for which the Brights paper stack £19.50 is listed - however the new Brights Designer Paper Stack £20 is also listed as that is the one that is now available - this also includes a polka dot pattern....


Built for Free Using: My Stampin Blog

Friday, 17 July 2015

Medium Square Box Frame Card with Tutorial for Fancy Fold Friday

So it is Fancy Fold Friday again...so here is another idea and another tutorial for a different Box Frame card... 

This card is a birthday card for a favourite "uncle" of mine - known him since the day I was born!! A very special man in & throughout my life... thought it was about time I told him that!

Having die-cut the Scallop Square aperture for yesterday's version of the card... I thought that it was maybe a bit too "frilly" for a man's card...but I liked using a Square Framelit to cut out the aperture in the paper rather than using strips as per the original card I made....

But the largest Square Framelit aperture is too small for the large 6" square versions of the Box Frame Card I have been making - another one here... 

So a re-size was in order - so this is a 5 1/2 Square card instead - so I am calling this the Medium Square Box Frame card... although it isn't that much smaller really....

But before I share the tutorial – these details should be read in conjunction with my Shadow Box original tutorial which has  pictures of each step for you.

In fact I strongly recommend that you make up one of the shadow boxes as per my original tutorial first… call it a practice run! The adhering of the sides (steps 6&7)  is harder in this version – so it is better that you know what to do before you do it!!!

And I have to admit that I use Tombow on the straight sides – as having a bit of wiggle time is very useful with this one! Still use Sticky Strip on those diagonals though…..

You will need
Basic Black 12x12 Card cut to 11 1/2" Square
Basic Black Card cut to 11” x 5 1/2”
Designer Series Paper 5 1/4" Square
Very Vanilla Card 3 7/16" Square
Very Vanilla Card/DSP 5 1/4" Square (for inside)

Tutorial
1. Score Square Basic Black Square  panel at 1”, 1 ½”, 2 ½” and 3” on all 4 sides.

2. Score extra score-lines from edge to 2nd score line at 4” and 7 1/2" on 2 opposing sides
3. Cut up these extra score lines & diagonally across to the 3rd score-line intersection
4. Cut off  “16-square” section at each corner

5. Bone Fold

6. Adhere 2 straight sections
7. Adhere 2 notched side sections

8. Score LANDSCAPE 11" x 5 1/2" panel in half at 5 1/2”
9. Bone Fold
10. Adhere to back of box frame
11. Adhere card/paper to front face of card back

12. Die cut aperture in paper using largest Square Framelit ( TIP - I eyeball it! - but if you are uncomfortable with that - draw the diagonals in with pencil/Frixion pen on the back of the paper - then eyeballing/getting the die central is much easier!!)

13. Adhere paper to front of frame

14. Decorate as necessary.
Note - I just daubed the Sahara Sand ink on the Worlds Greatest banner - saved me going upstairs for some Sahara Sand cardstock!


Friday, 8 May 2015

Shadow Box Frame Card Tutorial for Fancy Fold Friday

Shadow Box Frame Card - Joe 16 - by Amanda Bates at The Craft Spa (4)
Today I have something for you that I have been meaning to do for a while… a Fancy Fold Friday post – including the Tutorial for my favourite card format at the moment! I hope that this is the first of many! Fancy Fold Friday posts that is!!
Shadow Box Frame Card - Joe 16 - by Amanda Bates at The Craft Spa (7)
When we made these Shadow Box Frames a month or so ago… I promised my ladies a card using the same concept… so here is one version of what I came up with. A very solid chunky card – perfect for special occasions…
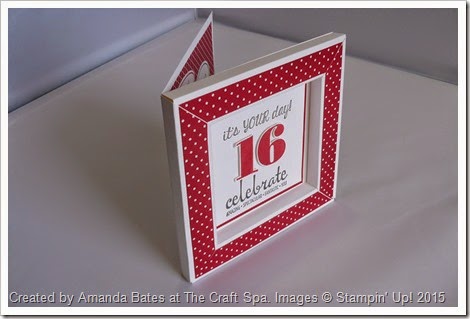
Shadow Box Frame Card - Joe 16 - by Amanda Bates at The Craft Spa (9)
It seemed appropriate to share it now as it is my son’s 16th Birthday today… so Happy Birthday Joe! And as long standing readers of my blog will know –  today is the day to share my annual Real Red card  - no guesses as to his favourite colour!
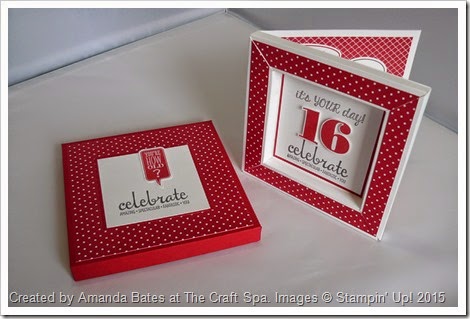
Shadow Box Frame Card - Joe 16 - by Amanda Bates at The Craft Spa (17)
But before I share the tutorial – these details should be read in conjunction with my original tutorial which has  pictures of each step for you. Edited to add Jan 2016- some key photos added on this post too!

In fact I strongly recommend that you make up one of the shadow boxes as per my original tutorial first… call it a practice run! The adhering of the sides (steps 6&7)  is harder in this version – so it is better that you know what to do before you do it!!!

And I have to admit that I use Tombow on the straight sides for this version – as having a bit of wiggle time is very useful with this one! Still use Sticky Strip on those diagonals though…..

You will need
Whisper White Card 12”x12”; 12” x 6”
Real Red Card 4” Square
Whisper White Card 3 3/4” Square
Designer Series Paper 5 3/4” x 3/4” (x4)

Tutorial
1. Score Whisper White 12x12 card at 1”, 1 ½”, 2 ½” and 3” on all 4 sides.
2. Score extra score-lines across just 2 score lines at 4” and 8” on 2 opposing sides
3. Cut up these extra score lines & diagonally across to the 3rd score-line intersection
4. Cut off “16-square” section at each corner
 This is the "16 Square bit" cut out!
 With all 4 corners cut out...

5. Bone Fold
6. Adhere 2 straight sections
7. Adhere 2 notched side sections
8. Score LANDSCAPE 12” x 6” Whisper White card in half at 6”
9. Bone Fold
10. Adhere to back of box frame
11. Cut mitres in paper strips. ( this is a fab tip I picked up from my fantastic SU! mummy – Julie Kettlewell…)
- Place 2 strips on top of each other at 90degrees
- Snip across from inside to outside intersection
And my extra TIP- do one corner at a time & place each of the cut pieces down around your frame before you pick up the next 2 strips and cut. Then you have the matching mitres in position…
12. Decorate as required.
I just kept it classic & simple on the front – just greetings from the Fabulous Four set and numbers from my favourite Larger Than Life set.
And then some of the Speech Bubbles from the retiring Just Sayin set on the inside
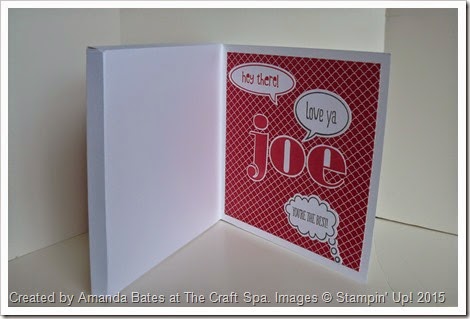
Shadow Box Frame Card - Joe 16 - by Amanda Bates at The Craft Spa (1)
And the 3/4” deep box to wrap – and/or post it in – nice and simple…
  1. Cut 2 pieces of card. One to  7 7/8” Square and the other to 7 3/4” Square
  2. Score in at 3/4” on each side.
  3. Dart score lines on 2 opposing sides.
  4. Punch a 3/4” semicircle on 2 sides of the lid
  5. Apply glue to tabs and assemble
    TIP assemble the base first – then assemble the lid whilst it is on the base – that way you know the lid is going to fit on the base!!
  6. Decorate as required
Shadow Box Frame Card - Joe 16 - by Amanda Bates at The Craft Spa (17)
Stampin᾿ Up! Supplies
Table built by craftingbecky.com