Showing posts with label Painted Blooms. Show all posts

Tuesday, 29 December 2015

A Round Up... Painted Blooms papers

I have just spotted that the End of Year Sale was updated again just before Christmas... and amongst other things... our favourite 2015 papers, Painted Blooms is now on there... at just £3.98 for the 12 sheet pack... which is a fantastic reduction for a £10.00 RRP pack...


So I thought it high time for a quick round up of some Painted Blooms projects... just press on the photo to go to the original post...

Also don't miss some of my other un-missables in the Sale... just read on to the end!!

First up... the the project that was the start of my Box Frame addiction!
Painted Blooms Box Frame Feb 2015 by Amanda Bates at The Craft Spa  (6)
Four Cards in a Painted Blooms wrapped Box from Quarterly Training...
Painted Petals. Made by Amanda Bates at The Craft Spa (18)
Our Easter Treats - the pull bars...
Pull Chocolate Bar Treat Holder, Amanda Bates at The Craft Spa 016
Easter Treats Amanda Bates at The Craft Spa 003
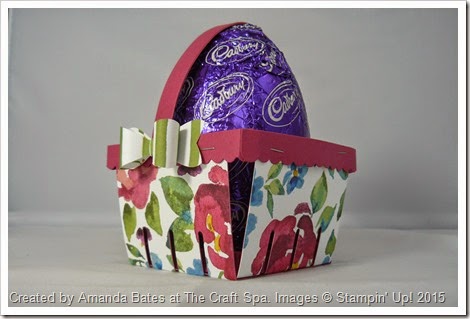
And our Baskets...
Amanda Bates at The Craft Spa 573
And finishing off with Sam's stunning Large Square Double Display Card make
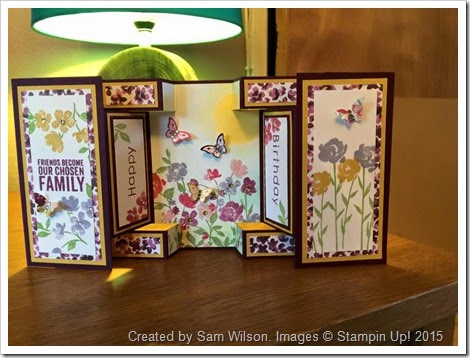
Painted Blooms Large Square Double Display card by Sam Wilson
Snapshot of the papers...
Painted Blooms Designer Series Paper  by Stampin' Up!
And whilst I am looking at these Year End Bargains... a few more worth highlighting... either as un-missable (in my humble opinion!) - or just because they are such a bargain!

Festive Designer Kraft Paper...now only £3.58 for 2x 5yard rolls (RRP £8.95) Really good quality wrapping paper for all year round use... I stocked up! So I do use it all year round!
Festive Designer Kraft Paper Rolls
Chalkboard Paper... 10 sheets of 6"x 12" thick black card... now only £2.90... (RRP £7.25). Perfect for blackboard cards! And great for mini albums too!! I have a cunning plan for these...so I stocked up with these too!
Chalkboard Paper  by Stampin' Up!
Soft Sky Seam Binding... what a bargain!? And it was always my favourite... Now £2.50 RRP £6.25. Only 25p a yard...

Soft Sky 1/2" Seam Binding Ribbon
Watercolor Winter Simply Created Kit Now only £9.18 for 20 cards (RRP £22.95). Been on a while so easy to miss! But - at this price- these are fabulous cards for Christmas 2016! And so easy... This kit has been my favourite of all of the cards kit so far!
Stampin Up Watercolor Winter Kit
Watercolor Winter Card kit
And last but not least.... The Angled Tag Topper Punch Now just £12.57 (RRP £20.95)...having just made tags in record time for this Christmas - these punches are my must haves - and keepers!!
Angled Tag Topper Punch
Full list of items in the Year End Sale here... numerous papers, stamps, ribbon & embellishments - particularly good for those of you stocking up for next Christmas!

Right... off to unpack my pre-order box fully... I can feel a spot of crafting with new goodies coming on... yay!!! That is something that still makes me very happy.....

Thursday, 2 April 2015

Milka Chocolate Bar Pull Treat Holder with Travelling Tag! and the Tutorial

Pull Chocolate Bar Treat Holder, Amanda Bates at The Craft Spa 016
Remember these posted just the other day…
Pull Chocolate Bar Treat Holder, Amanda Bates at The Craft Spa 029
Well not only have mine multiplied but I have had lots of emails asking me for the directions for this years’ Easter treats … so here they are for those of you that have already gone out and bought your chocolate bars!  No pressure!!!
All of these wishes were from Europe – so I have left the tutorial as metric – as that suits the bar I used….
Oh and I have to add…. I loved the nickname given by Karen… the Pull Bar with the Travelling Tag… I think that sums up the extra element of this project perfectly!
And for those of you that needed to know…. The size of my Chocolate Bar is 100g in weight and 5cm wide x 18,5cm long x almost 1cm deep
Recipe
Box: 19 x 21cm
Tag: 5.1 x 18cm
DSP (Paper): 7,5 x 15,6cm
White Panel for Stamping: 4,6 x 15,6cm
Ribbon: 46cm (18”)
Twine: 22cm (9”)
Punches – Ornate Tag Topper Punch, 1/4” Handheld Circle
DSP (Paper) – Painted Blooms
Stamps – For Peeps Sake, Happy Easter Bunny ( see what I have done to my stamp at the end!!!)
Instructions
1. With large box panel PORTRAIT, score at 8,9,17 & 18cm
clip_image002
2. Turn 90degrees so LANDSCAPE with 2 narrow score lines across the top
3. Score LANDSCAPE at 19 & 20cm
clip_image004
4. Bone Fold all score lines
5. With panel PORTRAIT and narrow sections to bottom and to LHS - cut up all 4 bottom score lines (see red lines)
clip_image006
6. Cut out 2 outer bottom sections (see red striped sections)
clip_image008
7. Apply glue to small tabs and outer narrow sections (bottom and side)
Sorry for awful photos here – don’t know what happened!clip_image010
clip_image012
clip_image014
8. Adhere 2 small tabs to inner bottom section
clip_image016
9. Pull over outer bottom section & remove protective tape
clip_image018
10. Adhere long outer side section
clip_image020
11. Adhere paper
12. Punch ¼” circle through top ( about ¼ cm down from top line of paper)
clip_image022
13. Punch Tag ( I used the Ornate Tag Topper Punch)
14. Stamp & adhere white panel to Tag
15. Place Tag hole over box hole
clip_image024
16. Insert ribbon from inside the box up through these 2 holes
clip_image026
17. Place chocolate bar inside the box with the ribbon underneath it
clip_image028
18. Holding onto the front end of the ribbon - push chocolate bar into the box allowing the ribbon to slide under it and ending up with the 2 ribbon ends the same length ( you may find you need to adjust ribbon to size to achieve this!)
clip_image030
19. Knot ribbon and make a twine bow around the knot
clip_image032
clip_image034
20. Now when you pull on the bow, the chocolate bar and the Tag move up the box to surprise the recipient!
clip_image036
clip_image038
clip_image040
21. And here is the view behind the Tag. Looks SO SO SO much better with the Travelling Tag added!!
clip_image042
Now I know a few of you will be saying…where is that Happy Easter Bunny in the Spring Summer Catalogue….
I was guilty too…I just didn’t spot it until I saw it used by another demo – and then I fell in love!!
So here is the image…
Happy Easter Bunny Wood Stamp by Stampin' Up!
And here is (actually are) my stamps….
 Amanda Bates at The Craft Spa 601
I just cut out the Bunny before I mounted the stamp… the Bunny being mounted on a spare wooden block I had lying around… eh voila! – Easy Bunny stamping…. I wouldn’t have him any other way!!
Right – off to nurse my aching back – my new “heat rub” definitely needed now …..


Tuesday, 31 March 2015

Easter Egg Berry Basket

Amanda Bates at The Craft Spa 573st
Another Easter project kept simple due to the mass production going on this year…. nearly 50 of these were made here last week… that is a lot of Easter Egg & Treats going on!!
This ended up as a great sturdy little basket… not because of using the stapler to assemble but because there is both paper and card on all the sides – and the “spare” 2 x straight sided card strips cut out with the die were also glued together – and used as the handle.
Little thing – huge difference! Actually ended up strong enough for Cream Eggs etc or even Mini Eggs…
Amanda Bates at The Craft Spa 571
We also added a quick insert to the inside to hold up the Easter Egg… didn’t want them flopping over….
Just a 9cm card square (3 1/2”) – scored at 1 cm (3/8”) all round. And punched with the 1 3/4” Circle Punch ( tip – you have to fold over one scored side to get the punch to centre on the internal square!)
Amanda Bates at The Craft Spa 576
And just finished off with a Bow Builder Punch bow…simples… they all looked fab!!
Amanda Bates at The Craft Spa 572
But we did have a laugh…. at some point we realised that if you turned the egg over so that the thinner end is at the bottom… then you looked like you had bought a medium sized egg rather than a small egg!!! Frugal chocolate giving!!!
I hasten to add that the egg in the photo is the “right way up”
SU! Products Used
Dies -  Berry Basket
Punches etc – Handheld Stapler, Bow Builder; 1 3/4” Circle Punch;
Card & Papers – Painted Blooms, Rose Red

Thursday, 5 March 2015

Painted Blooms Box Frame

Painted Blooms Box Frame Feb 2015 by Amanda Bates at The Craft Spa  (6)

So here is the final project we made last week at my Painted Petals & Blooms class – and this was also a project for my All Day class on Saturday… I was determined to make everyone cut into their gorgeous piece of Painted Blooms papers… you know the one… great to stroke but SO hard to cut!

So I searched various shops and on-line for a nice – but inexpensive - box frame. To no avail…way above my class budget! And then I watched a few moments of crafting TV… saw some envelope boxes…and had a Eureka moment!!

And the Eureka was great for the box section on each side… but the corners left me baffled!! So it was onto the Internet and a bit of research… 2 hours later and I was no better off – there are many box frame tutorials but the corners didn’t do it for me….so it was back to my paper sample… and trial cutting this way, then that, then the other  …. and suddenly it just… worked!!!

So those beautifully mitred corners took me quite a long time to work out …. but this project does not a long time for anyone to make. Once you know the tricks…well the rest is easy! But more on that another day….  I can feel a tutorial coming on if you are interested….

Painted Blooms Box Frame Feb 2015 by Amanda Bates at The Craft Spa  (3)

So back to the project…the box frame is made from one piece of 12x12 paper…the leafy one!

Then the floral picture within is cut from “The Gorgeous Piece” … and I have paper left to make some more great cards…

All finished off with simple Rich Razzleberry stamping of the Feel Goods words to bottom left and Pool Party Perfect Pennants stamping/ Framelit die cutting to the top right. With a sprinkling of Dazzling Diamonds Stampin Glitter glue to finish off. Actually less of a sprinkling… there is loads on there!

And now it is ready to hang on my kitchen or utility room wall… the colours were pre-tested after all!

And how much did I love this Box Frame…. well if I say that I have already made 10 variants… I think you may get the picture!!!

Tuesday, 24 February 2015

Painted Petals Set in a Box

Painted Petals. Made by Amanda Bates at The Craft Spa (18)

Here is a project that we made at our January Jems Training session.

4 lovely cards and a simple box to put them in. Featuring Painted Blooms papers and Painted Petals stamps. Love these Julie…. and so do many of my ladies that craft! So there will be a fair number of these made this week at The Craft Spa….

Painted Petals. Made by Amanda Bates at The Craft Spa (8)

Think my mind must have still been thinking of hearts when I made this one!

Painted Petals. Made by Amanda Bates at The Craft Spa (7)

Painted Petals. Made by Amanda Bates at The Craft Spa (9)

Painted Petals. Made by Amanda Bates at The Craft Spa (10)

And finally the little box…all wrapped up with a sparkly Something Borrowed embellishment to finish. Love these little embellishments. More on those soon….

Painted Petals. Made by Amanda Bates at The Craft Spa (15)