Showing posts with label Pop of Pink. Show all posts

Tuesday, 18 April 2017

Pop of Pink... Round Up post...

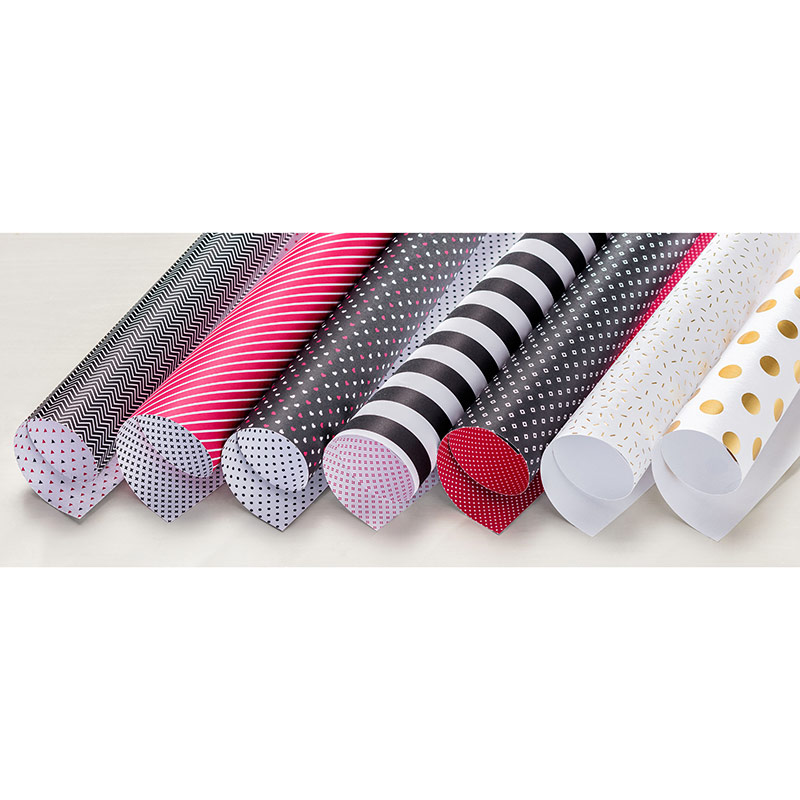
Pop of Pink Specialty Designer Series Paper
Had some great use of - and fun with - these Pop of Pink papers this year... for lots of different occasions... and suitable for both males and females.... BUT soon to retire ... though still in stock as of now... as all retiring products only while supplies last... 

Definitely a great pack of papers... although I have just spotted that I haven't used my favourite large gold polka dot piece... I think that may come in useful for something BIG I am working on this week.... I must have known...

First up another Dutch Map Explosion Card... directions linked if you click here..
Then the Graduation cards from last year... click here for more information...

The Head-girl Tag Topper Concertina Congratulations card...  click here for more information...

The Double Z Panel Birthday cards... click here for more information and the Tutorial... 


And finally the Double Z Fold Sweet Cupcake and Baby Bear cards... click the highlighted links for more infomation....


Monday, 18 July 2016

Marquee Messages Double Z Joy Fold card

 
One for the boys... but still using the Pop of Pink papers... Card tutorial here...

I embossed the Marquee Messages in white on a black panel this time... rest stamped in Archival or Memento Black on coloured card which was then cut out by hand...with the finishing of using the White Signo gel pen and same colour markers on the shaded parts to make it all pop...


Sunday, 17 July 2016

Baby Bear Pop of Pink Card


This is the card that Nicola made... a Large Square Double Pop Up Z Fold Card... but she needed a Baby Girl card to send in the post that week...so a quick change was in order... So cute!
Nice job Nicola....

Friday, 8 July 2016

Special Card for a Special Girl... and Fancy Fold Friday!

Have to share how useful the Large Letters dies are when you need a sentiment or a word that you would never find in a stamp set!

I had a lovely call this week from a family friend whose daughter had just been made Head Girl at our school... so I am delighted for her and so so proud of her! 
So a very special card was in order to shout out her achievement in big letters! 

This is another Tag Topper Concertina card for which the tutorial is here... but I used the Pop of Pink papers this time
Quick Baby Wipe swipe with Pool Party on each white panel plus a few random stars. Star and greetings from the Confetti Celebrations stamp set...
And a quick tip for you... my white background letters looked a bit lost when I took the photo...so I just grabbed my Basic Black marker pen and carefully drew an outline around with the thin end... the before photo added so you can see below...
Definitely a unique card for a special and very happy girl!

And remember if you buy the Large Letters stamps & dies bundle this month... you will have two £4.50 Bonus Days coupon codes to spend in August...and very nearly a third (just £15.50 more for that third!)... Bonus Days details here... But if you are going for 3 coupons ... remember it is then just a further £15 for a £150 order which will also earn you another £15 in Stampin Rewards for free! Feels like we are giving money away!!!

Alternatively if you are going for just the Large Letter dies... remember to add something (anything!)  to go over the £90 for 2 Bonus Days coupons ...

Tuesday, 21 June 2016

Number of Years Double Z Joy Fold Card

Just sharing Heidi's version of this week's Double Z Joy Fold Cards using the new Pop of Pink papers... she had 5 minutes left to complete it... so no time for the multi Marquee Messages etc... and she did to such great clean & simple effect using the Number of Years stamps and the Large Numbers dies.... Love it! The little gold stars are from the new Metallic Enamel Shapes pack...
So much so Heidi... guess what I then made for next year's stash...
I just couldn't resist as I had a spare card pack!
Thanks again for the inspiration Heidi!


Sunday, 19 June 2016

You are Awesome Double Z Joy Fold Card

Remember this card I posted earlier with the tutorial...
Well in true Craft Spa class fashion here is the same card with the papers flipped.... great card/sentiment for a success in exams or life! Who doesn't want to be saying this to their kids....

And a "little detail that makes a huge difference" that I didn't point out before about the Marquee Messages image... I coloured in the shadowed areas with the corresponding colour of marker pen... makes it all really pop - and go 3D effect!
Not sure it shows up very well in the photo... but I am sure you will get the idea!

Saturday, 18 June 2016

Sweet Cupcake Large Square Pop Up Z Fold Card

Flip the Pop of Pink papers around from yesterday's card... and this is what you get.... perfect for another card requested by my ladies... 
Decorated with a cupcake this time... sitting on half a new delicate white doily as it just needed something extra (which was a fabulous idea inspired by this card made by Julie at our last Team Social Stamping event)

Almost looks good enough to eat... thanks to the Sweet Cupcake stamps and the Cupcake Cutouts dies. Truly a great cupcake!


Tuesday, 14 June 2016

Tutorial Double Z Joy Fold card - Pop of Pink Marquee Messages

Now I know a few of you have been waiting for this tutorial! 

The details were linked in the posts before as this card is a merger of 2 other (Square Pop Up Z Fold) card tutorials I have recently posted... but here is the All In One tutorial for a Double Z Joy Fold card...
But about this card first. Which is making me squeal as it is so happy and bright.... and not exactly my usual colour spectrum!!!  

I have used the Pop of Pink papers, Marquee Messages and Confetti Celebration stamps - along with the Medium Star Punch.
The banners are coloured by stamping onto card and then cutting by hand. The letters and slats are coloured in using Melon Mambo and Bermuda Bay marker pens. 

Along with the Signo white gel pen for the dots and stars (sadly no longer available from Stampin' Up! - I knew it wouldn't be long before I would have to use them! But they are readily available in supermarkets, stationers and on-line!!)

And another admittance - Marquee Messages definitely didn't do it for me on first viewing! But I know it is going to get a lot of use here for teen, male and congratulations (graduate, exams etc) cards. Loving it!! So glad I looked again...!!
Now I did say that I was going to tweak this card so it opened more fully... but that didn't work with my lovely squares format!! So I am sticking with this one as it is for now... EDITED TO ADD... the tutorial for the fully opening version can now be found by clicking here...

For a left handed person to sign the card - there are 2 options that I can think of... sign and then do the final assembly... or mat that right hand panel with a signed panel as and when necessary. I am sure there are other ways too... 

Or you could do as I often do... and that is send the card without any signature!!! Funny how they always know it is from me.....

So now onto the tutorial... Metric first, Imperial (inches) for my US followers afterwards (in blue type)

You will need:-
Card A4 Thick Whisper White 14.8cm x  29.7cm (ie A4L)
Card A4 Thick Whisper White 10.5cm x 21cm ( ie A4W)

And for Decoration...
Paper Front Left 6.9 x 14.3cm
Paper Inside Back 14.3cm Square
Paper Inner 4.75 x 9.9cm
Card Bermuda Bay 9.9cm Square
Card Thin Whisper White 9.4cm Square (Stamped panel)
Card Melon Mambo/Bermuda Bay 9.9cm Square each (though you could get away with 9cm Square)
Inks - Memento Black


1. Pick up the larger piece of Thick Whisper White card
2. LANDSCAPE. Score at 7.4 & 14.85cm
3. Decorate as necessary
4. Z fold your card

5. Pick up the smaller piece of Thick Whisper White card
6. LANDSCAPE. Score at 5.25cm & 10.5cm.
7. Decorate as necessary
8. Z fold your card

9. Adhere right hand side of the smaller card to the inside back right hand side 
7. Adhere left hand side of the smaller card to the front left of the card (TIP - think about where you do not want your glue!!! I found that there was a feint line produced from the bone folding so easy to spot the half way point so as to not go over with the glue!)

If you give this a go... please do feel to share your make with me... I always love to see what other people make from my card fold ideas - and from time to time I get to share them on here too.... 


And for my US followers... the imperial (inches) version... as usual Crafter Beware as this is not tried and tested... just converted as best as I can... if you notice an error please tell me so I can update accordingly!!

You will need:-
Card  Thick Whisper White 5 1/2" x 11" 
Card  Thick Whisper White 4 1/4" x 8 1/2"

And for Decoration...

Paper Front Left 2 1/2" x 5 1/4"
Paper Inside Back 5 1/4" Square
Paper Inner 1 7/8" wide x 4" high
Card Bermuda Bay 4"
Card Thin Whisper White 3 3/4" Square (Stamped panel)
Card Melon Mambo/Bermuda Bay 4" Square each (though you could get away with 3 1/2" Square)
Inks - Memento Black


1. Pick up the larger piece of Thick Whisper White card
2. LANDSCAPE. Score at 2 3/4" & 5 1/2"
3. Decorate as necessary
4. Z fold your card

5. Pick up the smaller piece of Thick Whisper White card
6. LANDSCAPE. Score at 2 1/8" & 4 1/4" 
7. Decorate as necessary
8. Z fold your card

9. Adhere right hand side of the smaller card to the inside back right hand side 
7. Adhere left hand side of the smaller card to the front left of the card (TIP - think about where you do not want your glue!!! I found that there was a feint line produced from the bone folding so easy to spot the half way point so as to not go over with the glue!)

If you give this a go... please do feel to share your make with me... I always love to see what other people make from my card fold ideas - and from time to time I get to share them on here too....