Sharing another of my simple Gap cards... for which I shared the tutorial yesterday...
This one sent to the lovely Paula Gorry who has been our Stampin' Up! UK Demonstrator Development Manager since Stampin' Up came to our shores in the UK...
Paula will be truly missed by one and all... as her commitment and energy will be so hard to match! But as sad as we are to see her go... she has left us for a lovely life with the start of grandchildren! Can't say I blame you Paula! Such special days ahead... Enjoy!
Using the Noble Peacock papers again... with the Sorry For Everything stamp set for the greeting... and Butterfly Wishes for the lovely flowers...
Showing posts with label Sorry For Everything. Show all posts
Saturday, 5 October 2019
Friday, 27 September 2019
Double Point Card - Garden Lane
Another remake for my Garden Lane class this week... a Double Point Card (the stuck down version)
More details on the Magnolia Lane version of the Card here... and there is a link to a tutorial here...
I just stuck down those folded papers/sides under the Nested Label greeting... which is popped up on 3D foam Stampin Dimensionals...
And added a couple of stamped and punched So Saffron Daisy Lane daisies and a couple of Pear Pizzazz punched leaves...
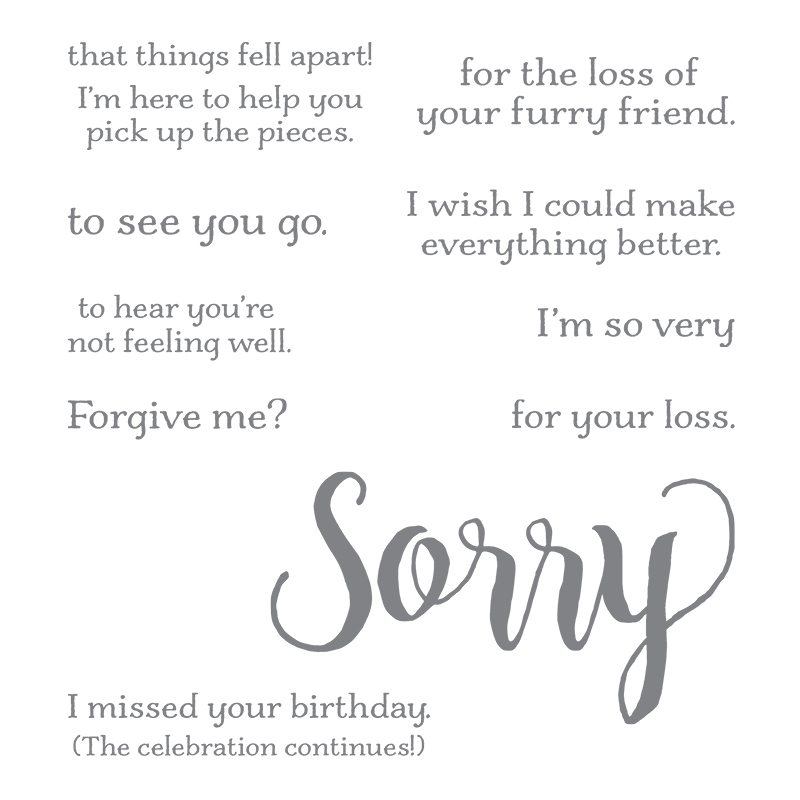
And greeting from Sorry for Everything... which is such a useful greeting set for those things that just need to be said when we least want to...
Thursday, 15 August 2019
Magnolia Lane & Blooms Double Point Card
Another A6 Double Point Fold card... featuring the Magnolia Lane papers... and the Magnolia Blooms and Sorry For Everything stamps...
But in landscape orientation this time...
With an extra paper panel (the striped one!)...
And the front panel part all stuck down... the centre greeting Nested Labels panel being stuck down with Stampin Dimensionals... so as to still give some extra dimension...
Click here for the Landscape version... with that extra front panel part if you like it that way! Tutorial for this (and that one) linked there too...And click here for my Deconstructed Double Point card version... for which there is another one coming up soon...so I will remember to add the recipe and instructions! As it is somewhat simpler... and achieves most of the effect!!
And a quick update on my mother... still in ITU... but one heck of a lot better! Still a long way to go though... What can I say! Been a LONG week!
Monday, 12 August 2019
More on Monday - Pressed Petals cards #5 with Round Up...
So I made 6 cards with the "card topper" piece of Pressed Petals paper... and here is the last one...
There were more toppers to use to create more... but then "life got in the way"... so I had to quickly put it everything away... which was a shame as I was really enjoying making these...
But I hope that these give you some ideas as to what to do with your papers....And here are the 4 cards using the Sorry for Everything stamp set...
So you can get a better idea of some of the sentiments included...
Though these were my favourite cards with the suite... click on the pictures to go straight there... with the Card Fold Tutorial being on the green Get Well Soon one!
Sunday, 11 August 2019
Daisy Lane Pressed Petals Sorry for Everything #4 ...
Back to the Pressed Petals suite and the simple "card topper " cards series I began to post the other week....
Click here for more cards from my series... and here for all the details on the Pressed Petals suite...
This one being finished off with Daffodil Delight and Crumb Cake Daisy Lane daisies... and the large greeting from the Sorry for Everything stamp set...
Click here for more cards from my series... and here for all the details on the Pressed Petals suite...
This one being finished off with Daffodil Delight and Crumb Cake Daisy Lane daisies... and the large greeting from the Sorry for Everything stamp set...
Wednesday, 7 August 2019
Deconstructed Simple Double Point Noble Peacock card
Perfect with our new Nested Label die cut shape... and I have loved every card I have seen using the design... and will come back to some cards as intended sometime soon...
But in the meantime... well I decided to deconstruct the design... and simplify... and here you have it!
Incorporating Stitched Nested Labels dies, Sorry for Everything stamps, Noble Peacock papers, Bloom & Grow and Daisy Lane bundles for good measure!
And spot the Nested Label shape cut from this Royal Peacock card... and that the white greerting panel id the same size but trimmed by hand using the line inside the stitched line... so as to get a thin mat...
Please visit my Online Store here to find all the named products and more... thank you...
And I will be back with more details on this card design sometime very soon... as we are a bit addicted to them!
Tuesday, 30 July 2019
Tuesday Pressed Petals Two-Fer... #3
Two more for your money with the Pressed Petals papers & suite ... along with the Sorry For Everything stamp set... which I have just been re-united with!
A great stamp set to say those things that are difficult to say... and that just need adding to a card when you need it... rather than being pre-made and put in a box ready to go!!
Though I have to admit that I definitely prefer to have them made and ready for when I need them... but I seem to be on my own in that regard! How about you?
Both these cards are larger than usual... as that was just the way they worked out as I trimmed them to size based upon the paper panels as they come...
And they are both different sizes... but in hindsight I would use the same size Merry Merlot card blank.... and trim my pre-prepared panel to suit! Life is so much easier that way!
So I started to re-calculate... but then I realised that I didn't even have any envelopes that I could pop these into... as C5s are too large and 5x7"s are too small...
Though I do have some 16cm Square (6 5/16") envelopes that would actually fit the shorter (wood background) card in... in a fashion!
A great stamp set to say those things that are difficult to say... and that just need adding to a card when you need it... rather than being pre-made and put in a box ready to go!!
Though I have to admit that I definitely prefer to have them made and ready for when I need them... but I seem to be on my own in that regard! How about you?
And a round up shot of the cards in the series so far for you too!
And they are both different sizes... but in hindsight I would use the same size Merry Merlot card blank.... and trim my pre-prepared panel to suit! Life is so much easier that way!
So I started to re-calculate... but then I realised that I didn't even have any envelopes that I could pop these into... as C5s are too large and 5x7"s are too small...
Though I do have some 16cm Square (6 5/16") envelopes that would actually fit the shorter (wood background) card in... in a fashion!
So sorry (as the stamp set says!)... no time for a total re-design this week... so I have to quickly move on... and I will just have to remember to make up a bespoke envelope when the time comes!!
But... for your information... both cards are 14cm/5 1/2" wide... the taller at 6 3/4"(script background) and the shorter at 6 1/4" (wood background)
And being honest... me being me... I would re-make to a 14cm/5 1/2" Square card if I was starting from scratch! Especially the wood background one... which would then just be the same as the recipe shared here...
Subscribe to:
Posts (Atom)