Showing posts with label Split Panel Cards. Show all posts

Friday, 15 November 2019

Double Gap Stitched Stars Card for Fun Fold Friday


Sometime the simplest of ideas for a card fold work... and sometimes they don't so much... but I will let you decide which way this card fold went... 
So for today... whilst I keep you guessing... 

I would love to hear your thoughts... and any guesses as to how this Double Gap Card is made... and what about it made me 'laugh out very loud" ...

You can use comments below OR the feedback form down the right hand side (or email me
And in the meantime... I will point you this way to see more information on the Stitched Stars parts and decoration... 

Friday, 1 November 2019

Don't miss out... New month...New products...

New product news... and a creative share for you too...

First up... we have the new Stampin' Up! Trimmer... which I have been "road testing" and so far so very very good... especially at so good a price point... just £23...
The blades are so much deeper...  as you can see on this other demonstrators shot below... 
Which I guess accounts for the improved cut... (I was able to cut 2 pieces of thick card and 3 thin card or papers at a time) and in turn for the longevity of the blades...  and for the improved score too... 
The joining section has added measurements so there is now a very little "missing" measurement section... yay!
It is lighter... and easier to handle as it feels a bit more robust... and even has a "hook" so you can hang it up out of the way! Inspired!!
And a last factor that I will have to get used to... and indeed will... There is an "auto lock feature" which holds the card nice and tight and straight... so it is GREAT news!! But sometimes it made it difficult for me to slip the card quickly across to the next measurement... as I am used to just grabbing that cut bar and lifting it up! But I know this is a feature I will just get used to... in time... But a tip for you... if the blade is mid-cut blade then then the lock is much less strong - probably harder at all when I get used to operating it!!!! If it is at the top/bottom then I couldn't push the piece of card through... 

Though... in the spirit of openness and honesty...  I do have to point out 2 other "big" things...

(1) There are no centimetres on the cut bar... aka the up and down bar!... we are waiting to hear how Stampin Up will be handling this going forward... but for now just inches on the cut bar and the surface grid..
(2) Blades will probably not be available until January next year... but I don't see this as a problem... as my blade has been put to over-use for the last month and it is still cutting as strong as the day I got it!!
And last but not least... don't forget to take your protective layer off! I can't tell you how many fellow demonstrators I have seen complaining about the trimmer "peeling"... and all they need to do is to peel that thin layer off!!!

And then there is the gorgeous Christmas Time is Here product medley...
Go on spoil yourself!
But thinking out loud... come back Sunday for more details on this suite as this post is getting a tad long already !! Yes Sunday... not tomorrow... as I have something more special for you tomorrow...
And last but not least another Gap Card... one that many of you spotted in the group shot at the end of yesterday's post... so thought I should share the solo shot!
Yes another Garden Lane Gap card using one of the other paper patterns... 
Actually ... I think this is the other side of the "leafy piece"... but I can't go and delve down to pick up my papers (to check) yet!! But I'm getting there... recovery still progressing nicely... 


Monday, 28 October 2019

Brightly Gleaming Stitched Stars Gap Card

This may seem familiar... but different...

Turn the prepped piece of paper over at a Craft Spa class... and this is what you get... shiny, bright and warm for the season!!  Everyone loves this piece of paper!!! Both sides...
And... seeing as I forgot it the first time round... the link for the tutorial for this card is here... just turn it round so that the card is portrait!

Talking of the Brightly Gleaming papers... which are unorderable as demand is so high... More are due in this week (maybe even today) so head on over to the product page in my Online Store by clicking here ... Add to Cart... and a message will pop up asking you to enter your email address to be notified when the stock comes in... and then you can order when that email hits your inbox... but please don't delay...
And whilst you are at it... same goes for the Feels Like Frost papers which you can find by clicking here ...

Click here to see the original Stitched Star Gap Card with further details...

Oh... and anyone else for the Pretty Peacock kit!!?
Edited to Add:- Thank you so much for all your messages checking how I am! So the op went fine on Saturday with no complications... I was back home within 6 hours! And recovery so far so good! I will have to have 1-2 weeks taking it easy (which I will find somewhat difficult!!!) but the bloggio is already organised in advance as they say!!! Fret not!!!!


Saturday, 19 October 2019

Something Special for Saturday - Feels like Frost Gap & Scrap cards

So I shared my Feels Like Frost Gap & Scrap cards with the tutorial here a few weeks ago...

You know the one ... the card I like to call Gap card (for simplicity and cos it rhymes with Scrap!) but it also gets called Peekaboo Card, Split Panel card, Floating card, Floating Die Cut Frame card, Floating Frame card... and another new name I saw in the last week that I now can't remember...

And my lovely demonstrator friend and team-mate Barbara got busy and made a few of her own... and is still making more as I type!
But I had to quickly pop on and share these... aren't they just stunning ... and so arm... in the reds!  Really special... And I would never have thought of that... Love it when our creative CASE-ing circle brings such beautiful results....

Thank you so much for sharing with me (us) Barbara... And I can't wait to see your other colour combinations!!
Want to make some of your own... as you kinda get to make 2 cards at a time... then just click here to find out how...

SU! Products used
Stamps & Dies - Frosted Foliage


Thursday, 17 October 2019

Brightly Gleaming Bauble Gap Card

Oops forgot to schedule for the right time of day! So a late post today...

So where there is one... there is usually two...

I shared the simple Brightly Gleaming Stitched Star Portrait Gap Card here on Monday... and now you have the Landscape Gap Card one...
Complete with greetings, baubles and holly care of the co-ordinating stamp & punch set Christmas Gleaming... and a Copper Foil die cut Christmas using the Merry Christmas dies...

Bauble a 3D one by stamping and punching 3 baubles... scoring down the centre of each and valley folding... then sticking one to each side of each other...

And click here for the A6 Landscape Gap Card Tutorial...


Saturday, 12 October 2019

Simple Stitched Star Gap Card for Christmas...

This is possibly the simplest of the Gap cards I have made... but it had quite a reaction... and there was a rush in class to make it first!! And I have to admit that I will be making some for my Christmas cards with any papers I have left over this year!!

Combining the Brightly Gleaming papers... just gone unorderable again... but lots more coming in a few weeks time...
The Stitched Stars dies
And the Merry Christmas dies (Merry in Copper Foil)
And the bit that no-one could work out...

The Christmas greeting is the Merry Christmas text block image in the Christmas Gleaming stamp set stamped in Pretty Peacock on Very Vanilla... and then cut into parts... other part coming another day!

Though I do have to "laugh" at everyone's super-excited-over-the-colour reaction to the Pretty Peacock colour every time I use it... but sadly no-one has bought any of it???

Must be about time ladies...  so I think I can feel the need for a Pretty Peacock Kit coming on!!! Remember to ask me when you "see me"... or email me if you are interested!

Tuesday, 24 September 2019

Tuesday Tutorial - Feels Like Frost Gap & Scrap cards

Another Feels Like Frost & 
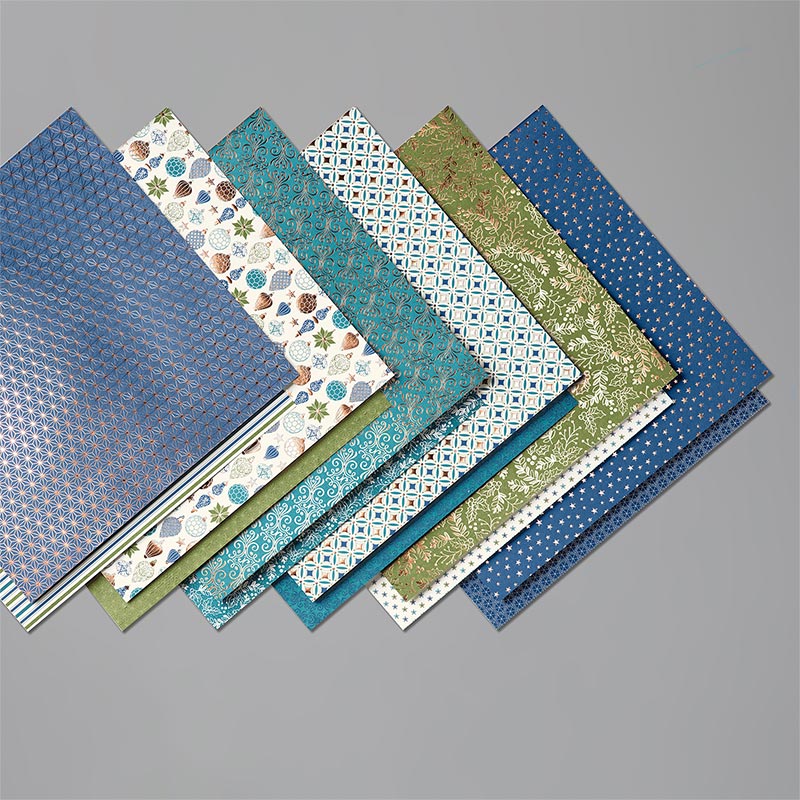
Frosted Foliage card for you... check out the shiny foiled side of these papers!

But be warned... as I am loving this card! It is just a perfect format with these beautiful 
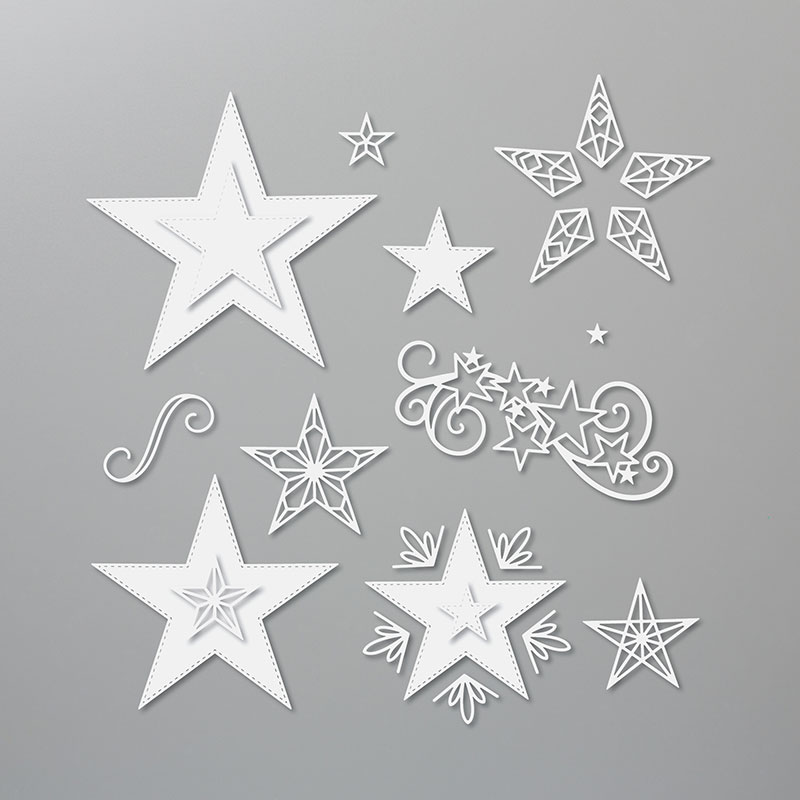
Frosted Frames die cuts...
And as promised... one tutorial... but for 2 cards...

So I am calling this a "Gap card"... as
(1) I just think that just sums it up...

And (2) Gap just happens to rhyme with Scrap...

Which is what I called this co-ordinating card I shared yesterday... as that is just created with the paper scrap left from my Gap card...
Though I know there are other names for this card fold out there... such as Split Panel card ... Floating Card (though the more recent  Floating Die Cut Frame card or abbreviated Floating Frame card or Floating card or has kind of taken over for that name)... as well as Gap card... 

And so onto the Tutorial for you... photos from a remake going on behind the scenes for my non Christmas classes this week! Hence the change in colours and papers... and the front panel! Sorry for any confusion that causes!!! But I thought best to share with photos than without...
Craft Spa Recipe 
Gap Card - Seaside Spray 10.5 x 24.8cm
Scrap Card - Thick Whisper White A4L x 10.5cm (scored LANDSCAPE at 14.8cm)
Papers 10 x 4.5cm (x2) and Scrap
Seaside Spray 6.6 x 7.4cm (x2)
(D) (Fancy Frame)Whisper White 10.4 x 14.8cm 
(S, D) (Stitched Frame)Thick Whisper White 7 x 8cm (x2)
(D) (Snowflakes) 3.5 X 6CM Clear Glimmer, Seaside Spray, Silver Foil
(D) (Leaves) Silver Foil  
where (D) is for die cutting and (S) is for stamping 

Craft Spa Tutorial
1.       Large panel LANDSCAPE

2.       Cut at 5cm

3.       Move along and Score at 5cm

4.       Bone Fold

5.       Adhere papers

6.       Put temporary glue on back of small panel

7.       Line up at bottom of main card & temporarily adhere TIP – use grid paper to aid your eye in getting things all straight
8.       Thinking about where you need your glue, apply glue to top and bottom of fancy die cut frame ( or matted stitched rectangle as in this example!)
TIP – I tend to just use a finger or thumb to eyeball where I don’t want my glue to go…but you can mark the back of the card as shown here…
9.       Adhere the frame
10.   Decorate as required
TIP – I used a ½” Circle Punch (now retired) to trim the 4 corners of my Seaside Spray mat to match the corners of the die cut greeting frame)
11. Rub off the temporary glue (I just used my finger... but the retired Adhesive Remover works a treat too!
12.  Adhere the left over piece of paper to the front of a standard A6 card blank… and decorate as required… 
And here are the 2 cards together... 
And apologies to my American subscribers... I will be back with measurements for an A2 version sometime soon... I had an unexpected but lovely visitor today... so the time just went...