Showing posts with label Ornament. Show all posts

Thursday, 24 October 2019

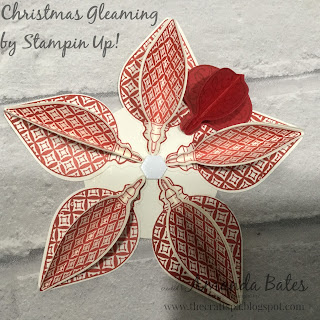
Christmas Gleaming Ornaments #2 - Tutorial and The Table Light Decoration

So whilst I was making my Christmas Gleaming ornament in the coppers to co-ordinate with my own tree...  click here to see that one...

I realised that embossing on foil was a dodgy process... Firstly as it blisters if you don't heat and move quickly enough... and secondly as the glue doesn't dry so quickly... so it makes the assembly of those little baubles much more difficult than it needs to be!!!
So everyone moved onto Real Red and Very Vanilla in my classes... to stunning results... and they all co-ordinated better with their trees too...

So I had to make a few of my own... as I had had a few other ideas for the use of my ornament ... such as the simple table decoration complete with battery operated tealight you can see here...
And that has given me the chance to provide a photo tutorial too...

Inkup, stamp and punch 15 large and 15 small baubles... plus a 2 1/2" circle and die cut the Stitched Stars...
Score each bauble down the centre and bone fold...and stick three together...

Place a large Stampin Dimensional (3D foam pad) in the centre of the punched circle...

Place and adhere the 5 large trios equally around the circle... just touching the 3D foam pad in the centre
 Use your die cut star to eyeball where your smaller baubles need to go...

 Place and adhere the 5 smaller bauble trios...
 Pop your star on top...
Pop your tea-light on top... You could probably work out a way to stick the tealight onto the star and still be able to operate the switch... but this way works fine too!
Slightly different if you are producing an ornament... or fancy tag! As I have stacked up about 3-4 3D foam pads on top of each other.. and then stuck the star down onto the first 3D pad...
Then the thread gets added... with another plain punched large bauble and punched circle to cover up the back...
 And a Metallic Element on the centre to finish...


Thursday, 17 October 2019

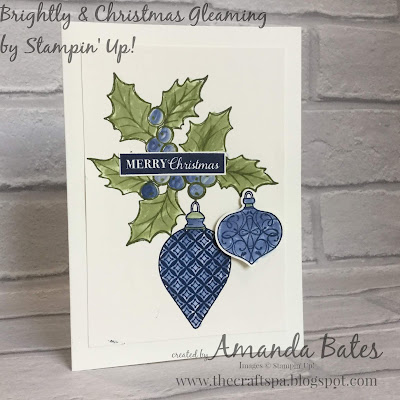
Brightly Gleaming Bauble Gap Card

Oops forgot to schedule for the right time of day! So a late post today...

So where there is one... there is usually two...

I shared the simple Brightly Gleaming Stitched Star Portrait Gap Card here on Monday... and now you have the Landscape Gap Card one...
Complete with greetings, baubles and holly care of the co-ordinating stamp & punch set Christmas Gleaming... and a Copper Foil die cut Christmas using the Merry Christmas dies...

Bauble a 3D one by stamping and punching 3 baubles... scoring down the centre of each and valley folding... then sticking one to each side of each other...

And click here for the A6 Landscape Gap Card Tutorial...


Thursday, 10 October 2019

Christmas Gleaming Ornament for 3D Thursday...

Oops... a quick share today as I have an All Day class and I thought I had written up a post... but hadn't! Good job I checked...

So I was asked to do an ornament... and so here it is! A Christmas Gleaming and Stitched Stars multi punched 3D extravaganza...
Hope they like making this today!

I certainly did... and I have another idea for one of these for another day... fingers crossed I get there on the makes list!

However I won't get as far down my Christmas makes list as usual.. as I do now have my operation booked for 26 October - yes a Saturday!! (for a chole-wotsit-as-I-call-it AKA gallbladder removal AKA cholecystectomy as the surgeon likes to call it!) 

And so I will be indisposed for a while after that... and am burning the midnight oil getting projects made for all my October, November and December classes before then! No pressure!

Thursday, 3 October 2019

3D Thursday - Brightly Gleaming Shadow Box Frame

Sharing the last of the Quarterly Team Training projects using the Brightly Gleaming suite of products...

And this one was definitely not the least!
Designed by Monica ...

Something very special and 3D for our Christmas home decor this year...
Click here for more details on the Suite... or here for the products in the Online Store

And scroll back to Monday and Tuesday this week for the Brightly Gleaming cards we also made at Training...

Tuesday, 1 October 2019

Tuesday Trio - Christmas Gleaming

Sharing the other cards we made at our last Quarterly Training...

These being designed by the lovely Monica Gale... as we had a shared Jems & Passionettes teams event this time round... which was lovely as we made new friends as well as meeting up with old ones too...

Three cards designed to suit the 3 types of crafters we have attending our events...

One for the Beginner Crafter... or as I find more at my events... the Clean & Simple Crafter
One for the Casual Crafter... or the "I like it to look special but I don't want it take too long" Crafter
The right hand bauble being stamped and the berries being coloured using the new Delicata Copper ink pad... 
And finally one for the "avid"... or the "I want it Fancy and Special" Crafter... with copper embossed baubles, ribbon and star embellishments too...
Now which type of crafter are you?

Oh and note the change from the designed blue berries on the CAS (first) card to copper ones... it just had to be done as I finished off my cards....  as then I was armed with my metallic Copper ink pad too...

And so here are the 4 cards we made at Training... the Fancy Fold on the top right being shared yesterday...

Monday, 30 September 2019

Merry Monday - Brightly Gleaming Triangular Tri Fold Card


An interesting Fancy Fold card we made using the Brightly Gleaming papers and Christmas Gleaming stamps and punches at Quarterly Training a few weeks ago... 

But before I start... promotion finishing today.... The Paper Sale - Buy 4 Pay for 3 - click here for more details... Offer ends 10.30pm today.

So back to the Triangular Tri Fold Card... which opens like so....
Click here for a video tutorial by Julie...

Saturday, 2 December 2017

Honeycomb Bauble Ornamernt for Christmas Decorations Blog Hop...

Hello and welcome to the Jems monthly Blog Hop from Amanda Bates at The Craft Spa ... featuring Christmas Decorations... so you are in for some lovely and inspiring projects when you hop around today...
I for one have already shared my main Christmas Decorations class projects already... so I thought I would share a new and simpler project ... but also give you a quick recap of the larger class Christmas Decorations projects... which have duly filled my house with very large boxes of the component parts!!

So first up...  I have a Merry Music honeycomb bauble or ornament to share... these are such fun to make!
Visit the lovely and talented Kim Oliver here for a step by step to help you along your way... though I have done a couple of  things differently with mine... including punching my circles for speed....

I coloured my Mini Ornament with the Dark Cherry Cobbler Stampin Blends pen as shown here... though crafter beware... as mine is lovely and solid... but my ladies ended up with a partially coloured ornament for some reason as it "split" (we reckoned maybe greasy hands on the ornament as it was an after lunch project!)
And before final assembly... I also coloured the edges with the same pen... added Versamark...and chucked red glitter embossing powder (retired) all over and heated it... subtle enough to not show in these photos... but lovely and glittery...

And I have to admit that I loved these so much I ended up with a list of about 20 other ideas to try... but sadly that list will have to carryover to next year!
And here are my "Golden Balls" or "Red Balls" Topiary... and Christmas Lantern that are being made in classes this month... just click on the photo to go to the original post...
Though I really must photograph and share my updated Christmas Lantern... I finally got the desired lights which changed a couple of things in the details... but more on that another day...
Thank you for visiting me today... and now it is time to pass you onto the lovely Samantha... just click on the arrow pic below to go straight there...