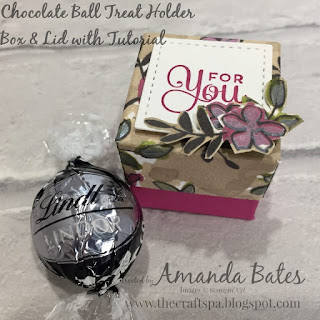
A re-make of this very popular Ferrero Rocher or Lindor ball treat holder (in Foil Frenzy papers)... as requested by my lovely ladies! Re-made in the Share What You Love papers this time round...
And... as a result ... I realised that I didn't share the Tutorial at the time... so now there is a Tutorial for you all.... a simple little cube box with lid... be it for chocolate treats... or rings... or even earrings...
Recipe
Base - A4 card- 10.5cm (4 1/8") Square ( I used Berry Burst here)
Lid - Paper (or Card!) 3" (7.6cm) Square
Tutorial
1. Base cardstock panel. Score at 3.5cm (1 3/8") on all 4 sides
2. Lid paper panel. Score at 2 cm (3/4") on all 4 sides (Note that I used 2 cm which is actually a generous 3/4" for those of you in the US that have no choice with your equipment...)
3. Dart 2 score lines on 2 opposing sides.
Tip - for neatness - I cut straight up the inside of the score lines on either side of the central section... but then with a slight diagonal dart on the narrow/outside sections...
4. Assemble and stick Base
5. Assemble and stick Lid (using your Base to stick it on... so you know your lid fits!!!)
6. Decorate as necessary.
I used a Stitched Shapes die cut small square, with Cake Soiree greeting and a few fussy cut flowers from the same Share What You Love paper
Oh and if you are using stripes or a paper with a particular pattern orientation... click here to check out how to get the pattern the same all the way round the lid! Simple but effective!


No comments:
Post a Comment