Showing posts with label Window Frames Framelits. Show all posts

Wednesday, 21 October 2015

Making the large NOEL from your Hearth & Home Window Dies

As requested and promised... a brief series of pictorials for you to show you how I created my large alpha NOEL this year... hope these pictures are worth a 1000 words...

Just one thing to note - I now make bolder letters( see above) and do less cuts than when I first shared my NOEL Double Box Frame Card here.... you could say... practice makes perfect!!

But before I begin - don't forget to check out the new 3 Weekly Deals for this week scrolling off to the right....

Grab your Hearth & Home Framelit dies and some card....
Die cut windows as required - 2 required for N, E and L (with a wreath for the O as above) or 3 required for NOEL...

So to make your N...
 

To make your O...
 
And finally your E and your L
Ignore the fact that I have used Cherry Cobbler and Real Red for my examples here - it just happened that way!!!!

Back to the rest of the alphabet then!!! Really hope these dies carryover as I really love this size of letter for projects!


Sunday, 13 September 2015

Jolly Peaceful Pines through the Window

A quick and simple card for you today.

Doubled up die cut Hearth & Home Window Frame in white plus Sahara Sand frames. Those decorative lines produced by this die are SO SO handy! Snippity snip on the lines and away you go...l
Mossy Meadow sponged tree (over a Soft Sky sponged background) using a Peaceful Pines die cut template I made

Let the ink dry! Swoosh with embossing buddy...oops I forgot these 2 steps for my sample.... So please don't look too closely...
Over-stamp with Dotty tree from Peaceful Pines in Versamark...

Tip Heat & Stick powder over. Heat with heat gun to activate the glue...
Tip Dazzling Diamonds over. Heat with heat gun to set glitter into the glue...

Die cut Gold Glimmer paper JOLLY using Christmas Greetings dies...
Stamp and die cut Mossy meadow boughs  (with pine cones over- coloured using Early Espresso marker pen and then coloured in using Tip Top Taupe) using Festive Fireplace stamps and Festive Fireside dies

Stamp and die cut Basic Black planter using Festive Fireplace stamps and Hearth & Home dies

Assemble all parts

Thursday, 3 September 2015

Hearth & Home and Festive Scenes - Looking outside again!

 
Another simple as simple can be... but I have to admit that this is one of the favourite cards I have made... it is simple but stunning in the flesh.... and one that will probably make it to the family annual Christmas card bulk make....

This is a card where I have to thank Stampin' Up! SO MUCH...for finally bringing us Thick Whisper White cardstock... as I can finally revert to my simple on layer(ish) style side ...with a great quality white card in terms of card bases and stamping quality too ... 
Simple stamping of the Happy Scenes image three times across the card...using the fantastic new Archival Basic Black ink pad

Masking off the images below the snow line ( I make a template by just stamping one image on a piece of card and cutting along that snow line!) and sponging using Soft Sky and Lost Lagoon inks.
Adding the snowflakes (open blobs!) using Lost Lagoon ink. Colouring in the snowflakes and snow on the trees with the white Signo gel pen...

Adding glitter on the snowflakes and snow on trees "inside the window image" using the Dazzling Details glue 
Archival Black greeting. (also in Happy Scenes) 
Die cut Hearth & Home window 3D foamed to add depth... 

And all finished off with a Lost Lagoon coloured Snowflake element and an Iced Rhinestone embellishment. My two favourite NEW embellishments for Christmas....
Hope you like this simple card as much as I do!?

Tuesday, 12 February 2013

Stampin’ UP! Sale A Bration– Patterned Occasions meets Lattice Die or Honeycomb Embossing to make Baby Quilts!

2013_01 Jems Training ,Amanda Bates, The Craft Spa, SAB, SU 010

So here is Part 7 of my Sale A Bration project share!! These cards were ones that prompted  huge amounts reaction and comment at Team Training… a bit of a  “different” colour combo for me… particularly for  a Baby card….. but everyone else loved it!!!

You may spot the new Amanda die-fetish here too….. I am really loving the Lattice die… wouldn’t be without it!! More uses of this die definitely coming this way….. Can’t wait to use it on some real material…. can you imagine the “real” patchwork quilt you can make…. And spot the Essentials Paper Piercing pack used on this card to add the pierced circle around the white base circle – you can also get this for free with a £45 order during SAB….

2013_01 Jems Training ,Amanda Bates, The Craft Spa, SAB, SU 006

And of course the new Honeycomb Embossing Folder – a definite must have!! Loving the look… very now & happening…. The honeycomb paper pieces are just made by embossing Designer Series papers and then cutting the shapes out by hand…. great value for people on a budget… ( but I still await the punch Stampin’ Up! – Fingers crossed!!)
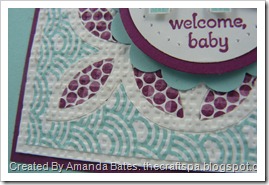
2013_01 Jems Training ,Amanda Bates, The Craft Spa, SAB, SU 011And here is a close up the textured face of both of these cards – still loving the Square Lattice Embossing Folder to add this effect.  A little extra that makes the biggest of difference!!


Stampin’ Up! Supplies

Stamps – SAB Patterned Occasions; Sweet Essentials; Petite Pairs; That’s The Ticket; Ciao Baby; Hearts A Flutter

Dies – Lattice; Window Frames Framelits; Circles #2

Embossing Folder – Honeycomb

Punches – Scallop Circle 2 3/8”; Circle 1 3/4”; Ticket; Scallop Circle 7/8”(NEW) ; Circle 3/4”

Paper Piercing Pack – Essentials

Papers & Ribbon – SAB Sycamore Street