


Don't know about you...but I quite often find that I have a lovely standard sized card all ready to go but it is just not special enough for my recipient at the time! So this is a Box Frame specially sized to fit an A6 card panel...
So now... you can come to a class and make a standard quick and easy A6 card... and then come back home... quickly make up a Box Frame... pop the card panel in... and have a special card all ready to go...

Shadow Box Frame Card Tutorial – A6 panel with 1cm Box Sides and Top
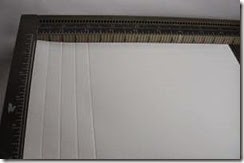
Start off with a 25 x 20.7cm piece of Thick Whisper White cardstock cut from a piece of A4 card...
1. Score at 1, 2, 3 and 4 cm on all 4 sides.
Tip - start with the short side (ie with the card panel PORTRAIT)

2. With the panel LANDSCAPE - make an “extra short score” at 5cm & 20cm from top to 2ndscore-line down .

3. Turn 180 degrees and repeat (2)
4. Cut up these extra score lines and diagonally across to the 3rd score line

5. Cut out the “16-bit” sections/squares at each corner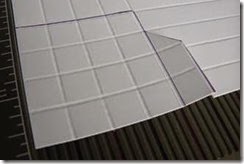

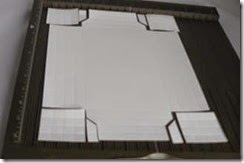
6. Bone fold all score-lines
8. Apply glue to folded side of outer-most sections on all 4 sides
NOTE - I now use my trusty Tombow on the straight sides – applying a bead onto the base of the frame next to the inner scoreline -which works a treat – no wet glue on my fingers as I roll the section around and over…
9. Apply Tear & Tape OR Sticky Strip across back of 4 diagonal sections 
9. Assemble straight sides first. Remove part of red protective cover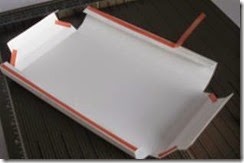
10. Line up outer edge to inner score-line at that end & press down flat to stick. 
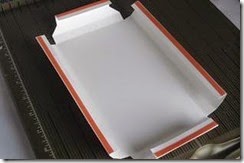
11. Line up outer edge to inner score line at other end & pull out rest of red protective cover to stick. Now your box section should pop up … nice and square and straight!!
12. Repeat for other straight edge
13. Now onto the 2 notched ends …. Repeat process for the 2 straight sides BUT…. and this is the MOST important TIP…. Remove red protective cover on the 2 small diagonals and cover with some longer lengths of scrap red protective cover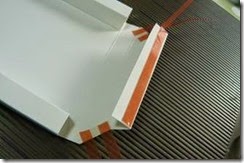
14. Fold the straight edge down as before & glue into place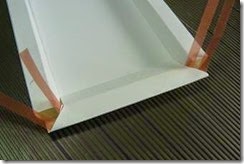
15. Then push the sides up & over the square/box side sections, get the mitres/diagonals in place & then pull the red protective cover out (concentrating on one corner at a time!)
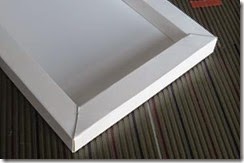
16. Repeat for the other notched side.
And to finish it off as a LANDSCAPE card that opens and closes – cut a 25.4 x 17cm THICK Whisper White panel - scored in half LANDSCAPE at 12.7cm - to the back.
Now I think I will need to work out an envelope size too! Back on that another day...

No comments:
Post a Comment