Showing posts with label Stampin Up classes. Show all posts

Thursday, 13 December 2018

Dashing Deer in the Winter Woods Snowglobe for 3D Thursday

So it appears that a lot of my class ladies love a snowglobe!

So one of these had to be made... 2 versions... one with stamped & die cut trees... the other just with die cut Whisper White trees...
Globe from Hobbycraft (though I can't now find online so maybe they had sold out this year!)... but everything is from Stampin' Up! as usual!

5 Winter Woods die cut trees. Optionally stamped in Mossy Meadow... Die cut...  then scored down the middle... and finally all stuck together on one tree half to form a 3D ( well 5D actually!) tree... finished off by lavishly covered with Tombow glue and glitter...

Tall Dashing Deer deer stuck to one side of the tree using Mini Dimensionals...
And then the short deer stuck to the back on the next side of the tree... virtually a perfect cover up! Couldn't have planned it better myself..
I designed a Tab Stand to stick into the tree whilst assembling... so that the tree could then be stuck onto a 2 1/4" punched circle...which was then stuck with tape to the Globe base (as I discovered that neither Tear & Tape or Cool Melt glue would do the trick on their own!)

And then we covered the top of the disc with Tombow glue and covered it with artificial snow...

And the base covered with 2 Farmhouse Christmas die-cut fences (plus one section from a 3rd fence to get the sizing right)... Simples! Oh and do note that the Farmhouse dies are well reduced ( by 20%) in the Year End Close Out Sale
And another group of very happy ladies! Next year we will attempt one with water!

Friday, 9 February 2018

Sweet & Sassy meets Picture Perfect Party...

All on a Pop Out Swing card... 

As we have been having a run on made up plain white Pop Out Swing cards as I demonstrate step by step in my classes - which means another blank one ready to go at the end of each class!
Have to admit that this is my favourite pattern in the Picture Perfect Party pack of papers...so me!!

And I couldn't resist just popping on a heart whilst the Sweet & Sassy dies were out... though I couldn't face any more red....
And my next Pop out Swing card will be decorated with papers all over... got them all ready to go for this weeks' class...
And then I will be back with the updated Tutorial for you... just not enough hours in the day this week... 


Tuesday, 16 January 2018

Picture Perfect Birthday Gift Bows card...

Quick little card using the lovely Picture Perfect Birthday stamps and a couple of the new ribbons in the Spring Summer catalogue... 3/8" Lemon Lime Twist stripe in the Tutti Frutti suite and 1/8" Bermuda Bay Satin (which is one Sale A Bration free item that can be earnt with every £45 order)
First and second stamping of the Lemon Lime Twist and Bermuda Bay gift bows to achieve the four... then same again but the other way round with the filler in stamp... finished off with the lovely greeting in Archival Black

I used the largest Stitched Shapes frame...a 7cm square Lemon Lime Twist mat... and set on a small Bermuda Bay 9.9cm square card

Friday, 1 December 2017

Festive Celebrations for Global Stamping Friends Blog Hop

Hello and welcome to our monthly blog hop from Amanda Bates at The Craft Spa in the UK... featuring Festive Celebrations...

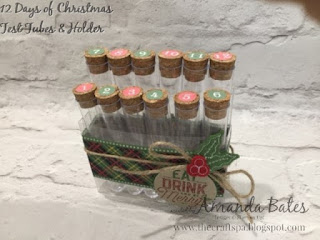
Now I do like to celebrate the Festive period with a special advent calendar and a 12 Days of Christmas project each year... and although I have creations from through the years that get re-used... this year was time for a new 12 Days of Christmas project... or as it is known in my house... my 12 Gins of Christmas treat! And boy is it a treat each year!
I also like to make these for friends and family as a special treat to open and savour through the next 12 days of the festive period... so it also becomes the 12 Drinks of Christmas treat for the menfolk... featuring Port and/or Whiskies mainly! Or just 12 Treats of Christmas for the younger ones... featuring mainly chocolate! They always go down very well!
So take 12 test tubes... fill with whatever the recipient will most fancy... and pop in beautifully but simply decorated packaging... care of the Treat Tubes, Acetate C6 Card Boxes, Christmas Around the World paper, Stitched Felt embellishments and Jute Twine with numbers 1-12 care of my PC and a 1/2" circle punch...

Love how those back tubes appear to be floating in mid air....
And now it is time to say goodbye from me and thank you for visiting me today... and pass you onto the lovely Kristie in the USA ... just click on the arrow below to go straight there...
And here is the Blog Roll List if you prefer to hop that way - or in the event of any broken links...:

10. Amanda Bates (YOU ARE HERE!!)

Wednesday, 20 September 2017

Card Front Builder dies meet Lovely as a Tree

A further little play with one of my favourite cards made so far this year.... click here for the original card details... 

After demoing at a lot of my classes.... I had quite a few of the misty panels made up and ready to go... so I thought I would try something different... so the Card Front Builder dies came out and the Lovely as A Tree stamps went away... 
So Tranquil Tide for the trees duo die cut... Silver Glimmer for the die cut little deer.... and a punched Dazzling Diamonds Glimmer circle to finish...

Tranquil Tide greeting from Half Full... which happened to be out at the time...

Thursday, 7 September 2017

Winter Wonder meets Merry Little Labels

Now this card makes me happy! Beautiful embossed Winter Wonder snowflake with a bit of extra shine!!

And the gorgeous label from Merry Little Labels... All inked up in Soft Sky and then marker direct action over the top... Soft Suede on the deer and Tranquil Tide everywhere else...
And a simple Tranquil Tide In Color Bitty Bow to finish....

Now yes I did say shine.... I quickly covered the embossed snowflake in Precision Fine Tip glue... and then covered in Dazzling Diamonds glitter... so so sparkly!! Though I don't think the photos will do that justice...
Craft Spa Recipe
Soft Sky Card Blank 5 1/2" Square 
Tranquil Tide Mat 4 3/4" Square
Thick Whisper White panel 4 1/2" Square


Wednesday, 9 August 2017

Lovely as a Tree on a Misty Morning #1

I love this card! Simple but SO effective... and will probably be one of my bulk cards this Christmas...

So I have used the long standing ever popular stamp set, Lovely as a Tree... this being the only set that has been around in Europe since Stampin UP! started to supply our shores nearly 10 years ago... and it is still going strong!

I CASED this card made by Kim Costello in 2007 shown here... which has probably been on my Pinterest CASE board since Pinterest began...
Though Kim's card uses Versamark & chalks... whereas I went Soft Sky brayering and stamping the trees in Soft Sky & Tranquil Tide double-stamped-off to achieve the misty morning background through an aperture mask... And yes the Tranquil Tide inked tree definitely needed stampin off twice on scratch paper before stamping over the aperture...

Then with the mask removed... the main tree was inked in Tranquil Tide, the ink removed from the trunk using a Blender Pen and then re-coloured using a Soft Suede marker pen... and the tree stamped in full...
And then I added glitter to the main tree and it all just popped... though I doubt you will be able to see that subtlety in the photos!

And an admittance... you may remember something rather similar in effect last week... yes this dinosaur Clean & Simple card was then created using the same layout... and I don't think it will be the last to get this brayered and sponged treatment! Looking forward to making some more...
So much so I have recreated my aperture mask using the Window Sheets...all ready to go...

Want to make a mask of your own... Start with an A6 piece (or whatever your standard card size is!) of Window Sheet... cut out at 2cm (3/4") for the top and 2 sides and at 2.5cm (1") for the bottom using your trusty trimmer... and keep the rectangle you have just cut out too... I may have another plan for that part!

Stampin Up Products Used
Lovely as a Tree
Christmas Pines
Window Sheets
Inks - Soft Sky, Tranquil Tide
Markers - Soft Suede
Sponge Brayer


Tuesday, 14 March 2017

In The Meadow Cornfield.... using Watercolor Pencils #5

Quick share of another Watercolor Pencils card today.... made me feel quite the artist!

I will be back another day to explain the technique I used for the background.... but for today... spot the three little birds... just 3 little hand-drawn ticks using my Early Espresso marker pen... about the only thing I can draw!!
Remember it is not too late to join us for the Watercolor Pencils class next Wednesday 22 March 2017 10.30am-3pm... just £25 including your Watercolor Pencils to take home with you... just email me to book in by clicking here

Products Used
Colouring Tools - Watercolor PencilsAquapainter
Ink Pad - Early Espresso


Wednesday, 10 August 2016

Time For Christmas...

Oh I love this time of year! The Autumn Winter Catalogue is on its way.... and yes, I am SO excited!!! 

And I can promise you that there are LOTS of gorgeous new products coming your way... I cannot wait to get my pre-order box and start to make projects to share with you all...

The online catalogue will go live on 1st September... but the hard copies will be in my possession by the end of the week! Just contact me to get your own copy. Though arrangements are already in place for anyone placing an order with me for the last 12 months...

I will be running a Launch Party and Grand Sale again this year ... more details to follow as I now have a few other dates to sort out with my change to plans for August.... 

But in the meantime just contact me here to register if you fancy a trip over to half way between Harrogate & York (UK) to rummage through my extensive retired items from 8 years of being a SU! demonstrator. Probably 1st week September... The more the merrier!
Oh and before I go.... I have just updated my Classes & Events page with the event dates for September to January. Product Bundles and Individual Class Details to be added shortly....

Friday, 27 May 2016

Tardis for Alice....

Here is the Tardis made by the lovely Heidi for her daughter, Alice... 

She was under strict instruction to make the signage more authentic... but still handmade... no birthday or christmas greetings here... just a white gel pen or navy marker and a steady hand... 

Nice one Heidi.... who now has a very happy and content daughter.... who appreciated her mum's creative talents wholeheartedly! But now I have been given a Dr Who Class Challenge for the summer holidays.... so watch this space...

Want to make your own... go here for the Dapper Denim Birthday version... and/or go here for the original tutorial ( with the Tardis dressed up for Christmas...)


Sunday, 14 February 2016

Best Mother Ever in Blushing Bride Glimmer...

You may think you have seen this duo before... and you are kind of right.... but the card to the left had an over haul... a de-pinking!!!
So Rose Red flowers were replaced by Sahara Sand ones... and the greeting changed to one suitable for Mother's Day wishes...
Much more subtle than the original.... 
But which one do you prefer? The original Friend or the de-pinked Best Mother Ever... 

Built for Free Using: My Stampin Blog

Saturday, 13 February 2016

Bloomin Butterfly...

So amongst all the beautiful & glittery hearts in this week's class...
There was one simple little card....
That most fired everyone's heart & imaginations...
And this is it...
Die cut butterfly on the front panel - along with a simple greeting... black heart stuck onto the card front... butterfly aperture front panel 3D foam adhered on top... and finished off with a few rhinestones...


Built for Free Using: My Stampin Blog

Friday, 12 February 2016

Bloomin' Love Mother's Day 5" Square Joy Fold Card with Tutorial

A few stories behind this card... but here is a 12.5cm (almost 5") Square Joy Fold Card specially dressed for Mother's Day...
First off... a Mother's Day card in February!? Isn't this usually the month for Valentine's, Wedding Anniversary and even Weddings at The Craft Spa classes! But this year in the UK... Mother's Day is so early in March that I suddenly realised I had to make Mother's Day cards for classes too...
Secondly... I haven't made a Joy Fold Card for years! Probably about 4-5 years at least.... But I had some papers to use for class... and I suddenly felt the urge! Then I discovered that I was out of large 6" square envelopes... so I had to quickly design a 5"ish (12.5cm really) version to fit in the only square envelopes I had!
And I am liking this shrunken version...the central card being just 3" and really cute!
Simple ... but very effective... and seeing as it is Friday... Fancy Fold Friday! A very quick Tutorial for you....

Recipe
A4 card Crumb Cake 12.5 x 19cm
A4 card Crumb Cake 3" x 6"
A4 card Whisper White 2 3/4" Square (x2)
Papers - Front LHS & Inside LHS - 6 x 12cm (x2 - different papers)
            - Front Back - 12 cm Square
            - Inside RHS -  2 3/4" Square

Instructions
1. Score LANDSCAPE larger Crumb Cake panel at 12.5 cm
2. Score LANDSCAPE smaller Crumb Cake panel at 3"
3. Adhere all parts

If you need pictures/videos to aid you visually... then please just check out the Joy Fold Card Tutorial in the Split Coast Stampers resources section here... the dimensions will of course be different... but the principle is the same...
Built for Free Using: My Stampin Blog