Showing posts with label Dr Who. Show all posts

Tuesday, 9 August 2016

Last Tardis on a Tuesday! And the Round Up picture....

So here is a round up picture of the Tardis Convention class in July .... the original Tardis box that inspired the class appears to have gone AWOL when I took this photo though....

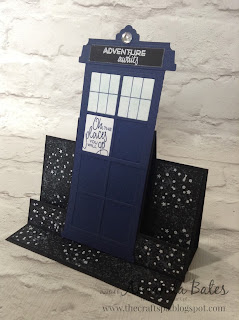
The final project was a re-make of the Going Places Centre Step Easel card shared here
Instead of the retired papers I just stamped using Whisper White craft ink on black card with the Touches of Texture "galaxy" stamp for the galaxy background (to top left of product picture!) and then white embossed the Holly Jolly Greetings stars & blobs.
Greetings are both from the Places You'll Go stamp set

Directions for making the Tardis and the Box version here...
More pictures and details of the Mini Book here...
And more pictures and details of the Chocolate Pull Holder here...
Ok... no more Tardii for  while!!!


Tuesday, 26 July 2016

Another Tuesday... Another Tardis... Chocolate anyone!?

Anyone for Chocolate? In a cosmic universe!!?
In a Pull out slider treat box...
Last 2 photos being the one that Alice made... clever girl that she is!


Tuesday, 19 July 2016

Time for a Tardis on Tuesday!?

Not made a Tardis for a while... but I was given a Tardii Convention Class Challenge!
So hows about a Tardis mini book... just to prove that it is bigger on the inside...
I used the Floral Boutique papers and Washi tape...as the colours just suited...
Lots of room for photos... or Dr Who memorabilia!

And here is the one that Alice made... love her central stamped panel much more than mine! Lot more subtle....!
Though I have to admit to the polka dot papers on Alices' version being retired ones... I had a major mistake on prepping!! Oops...
And back to mine...


Tuesday, 31 May 2016

Centre Step Easel Tardis Card for Tuesday!

My Tardis has been causing a bit of a reaction amongst Stampin' Up! demonstrators around the world!! As a result Friday night and Saturday was very busy on this blog...

So whilst I was packing my Going Places paper stack leftovers away from the month's classes.... my eyes suddenly spotted the 2 paper designs I had left... and I felt inspired to make a card for all the Whovians out there... many of whom I know have started to follow me over the weekend... so hello and welcome to you!!
So without further ado ...as these papers will not be available in a few hours time..... here is my Centre Step Easel Card dressed up with a Tardis in space...

But now I have made this card... I know I can go one better!!! I know the very card... So please feel free to comment on this post and so guilt trip me to making the other card I have in my head... even though the papers will have gone for good by then...
And before I go...a Top Tip for you with the windows of your Tardis... grab your clear Wink of Stella and wink away... they seriously now look rather life like!
Thank you Lynzie for this fabulous Top Tip.....(as she had opened up her new Wink of Stella seconds before she started to make her Tardis... and so it just had to be used immediately!! To such great effect....)

Friday, 27 May 2016

Tardis for Alice....

Here is the Tardis made by the lovely Heidi for her daughter, Alice... 

She was under strict instruction to make the signage more authentic... but still handmade... no birthday or christmas greetings here... just a white gel pen or navy marker and a steady hand... 

Nice one Heidi.... who now has a very happy and content daughter.... who appreciated her mum's creative talents wholeheartedly! But now I have been given a Dr Who Class Challenge for the summer holidays.... so watch this space...

Want to make your own... go here for the Dapper Denim Birthday version... and/or go here for the original tutorial ( with the Tardis dressed up for Christmas...)


Tuesday, 26 April 2016

Time for... the Tardis on Tuesday!

I think this may have been the On Stage Stampers Showcase project I got most immediate feedback about!! Thank you to all of you that found me and gave me that feedback... it really was appreciated! Especially those of you that were squealing with delight!!! So funny!! So satisfying!! So happy to share!

This was the first project that I had to do when I saw the new 2016-18 Dapper Denim colour... perfect colour!!
Though I had an immediate obstacle... no more Rotary alphabet stamp to do my POLICE BOX wording... but the Crazy About You stamp set came to the rescue... which has resulted in an improvement in my book...

So... for those of you that have been patiently waiting... grab your Hearth & Home dies and 3 pieces of A4 card... and here is the link to the tutorial ... Enjoy...!
The only other differences (apart from the Christmas decoration/wording and Night of Navy card) is the use of the Tags & Labels dies for the roof on this version as much simpler!

I also trimmed the sides of 2 of the 4 planters for the lid... as I reckon it is neater that way... and a lot simpler than the scoring for the corners I did before...! The front and back of the box got the full versions with the trimmed ones on the sides...
And here is another version made with handmade but more authentic signage!

Tuesday, 3 November 2015

Hearth & Home Tardis Tutorial

For all you Dr Who Loving fans... and as it is Tuesday Tips, Tricks & Tutorials today - a tutorial as promised a while ago! Knew I would get there eventually.... 

A simple enough little box & lid  - just dressed up with another version of my doors...
But before I start... here are the links to a couple more versions...

New 2016-18 In Colour Dapper Denim version made for On Stage Telford display in April 2016...
One with more authentic signage...

Recipe
Box - Night of Navy A4 Card (or 12" x 8 1/4")
Lid - Night of Navy 4 3/8" Square (11.3cm); Basic Black 2 1/2" x 3/8" (x4) [6.4 x 1cm]

Directions for Box
1. LANDSCAPE. Score 2 3/4", 5 1/2", 8 1/4" & 11" (7,14,21, 28cm)

2. PORTRAIT. Score 1 3/4" (4.5cm)

3. Dart base sections & adhere together as an open box

4. Die cut 8 Night of Navy windows. Snip and glue! Note - do retain your cut off parts...

This is just another version of my doors... This time the 2 windows are adhered together using just one thin section (rather than the thicker 3 sections on the original doors) and those final centre panes are not snipped to make the long inside panels ie the window panes are left as they are!

5. Pick up 9 Whisper White window panes ( know you have lots of these lying around by now!)

I sponged 8 of them using Soft Sky and then used my Night of Navy marker pens to draw in the lines.

As I was doing a few...I drew on my grid paper to aide my lining up... on the centimetres side... my 2 vertical lines are at 0.8 and 1.6cm ( about 1/3" & 2/3") - and my 1 horizontal line is at 1.5cm ( almost 5/8")

And the 9th was stamped with the Celebrate the Season stamp from the Happy Scenes stamp set - one word at a time...

Directions for Lid
1. Score 3/4" (2cm) on all 4 sides

2. Dart 2 lines on 2 opposing sections & adhere together using the tabs

3. Die cut 4 Night of Navy planters

4. Pick up 4 x 3-section Night of Navy window cut offs - adhere to planters

5. Ink up & stamp Whisper White POLICE BOX using your Rotary Stamp Alphabet (x4) on the 4 black panels...

6. Die cut 2 x Night of Navy Small Festive Fireside Tags & adhere together

7. Die cut 2 x Night of Navy Perfect Pines plant pots. Score & bone fold at 1/8" (3mm) from straight edge. Adhere notched edges to either side of your double tags and use the scored sections to adhere to your lid.  Add a large Iced Rhinestone embellishment to finish
8. Decorate with boughs and stockings for the season! My stockings are just coloured using Old Olive and Real Red marker pens. And the boughs are stamped on Old Olive - using Mossy Meadow ink pad plus over-colouring of Early Espresso marker on the cones - stamped - and then the cones coloured in with my Tip Top Taupe marker . And Cherry Cobbler Dazzling Details for the berries...


Built for Free Using: My Stampin Blog

Thursday, 8 October 2015

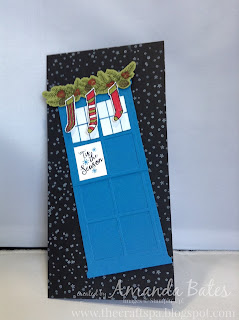
Christmas Card from another time and dimension!

Now I know quite a lot of you are Dr Who & Tardis fans from the response  to my Hearth & Home Tardis box a few weeks ago
 
So I thought I should share a simple card featuring a Tardis....
 
 This card only took me a few minutes to throw together....cough!
 Well... the brighter Pacific point Tardis was ready... the boughs and stockings were ready...
So I just had to grab a "blobs" stamp from Holly Jolly Greetings and Whisper White ink pad  - and stamp away on a Basic Black DL card. And it was done!!

Personal I prefer the Tardis in Night of Navy - what about you?

By the way - I will be writing up the tutorial for the Tardis box... along with a few other projects that have proven popular... just need a few more hours in a day ( or two) first!! I cannot start to tell you how busy the last 5 weeks have been

Built for Free Using: My Stampin Blog

Tuesday, 8 September 2015

Hearth & Home - Tardis for you Dr Who fans!

As soon as I started playing (working very hard!) with the Hearth & Home dies - this project went straight to the top of the list!
So for all the Doctor Who fans out there... young and old... your very own Tardis... simply made with the help of the Hearth & Home dies....
Just a simple box ...with a lid.... 
And here he is all dressed for Christmas.....


What will you put in for your young Dr. Who fan... a Cyberman... Dr. Who... a Dalek... or just some treats for Christmas!


Stampin᾿ Up! Supplies
Table built by craftingbecky.com