Showing posts with label Baby Wipe Swoosh. Show all posts

Thursday, 17 February 2022

Thursday Trio - In The Moment scene...


Here are some more of my cards using the triple combination of the Grassy Grove die-cut, New Horizons papers and In The Moment stamps... 

This first one also combines Paper Piecing for the shirt... with Baby Wipe Swoosh (or Swipe) for the background

Whereas the other 2 have the images coloured using Stampin Blends alcohol markers... and have a sheet of the New Horizons as the background...

All on a Simple Diorama card that can be used for all occasions... Click HERE for the card tutorial...

All just so.... peaceful...

And do be sure to have a close look at the images... as my trusty Paper Snips scissors have been busy cutting away parts of the images I didn't want on these occasions...


Sunday, 6 February 2022

Sunday Swap - Grassy Grove

From time to time... part of our team of intrepid (and incredibly talented and creative!) demonstrators create a set of cards and then swap with each other to provide each of us with samples of different products, projects and styles...

And this month was the time for our latest Team Swap! I created a set of 10 cards using the Grassy Grove dies... which I have to admit may prove to be my most popular die of all time!!

My original plan was to use the wonderful New Horizons papers... but delays to stocks being in place in Europe meant I had to come up with a Plan B... though my papers did turn up the day after the deadline! And they are indeed perfect for this little scene...

So a bit of Baby Wipe Swoosh ( or Swipe) on Shimmery White card was the order of the day... using Soft Succulent and Balmy Blue to produce a dreamy backdrop... with a touch of Soft Succulent stamped grasses at the bottom...

Added a couple of deer to my 3D scene... and finished off with the beautiful greeting from Nature's Harvest in Evening Evergreen... I just thought this was the perfect sentiment for my little scene...

And I had to share the full set of backgrounds... as I love that they changed as time crept on... as the Baby Wipe got less and less moist... 

Oh .. and did I mention... I designed a simple but fun fancy fold whilst I was at it... as I found that the die cut card blank wanted to splay... and so collapse! So an extra insert was the order of the day... and so I guess you could call this a Simple Diorama Card Fold...

Just a 14.8 x 5cm piece of card scored whilst portrait at 1, 2.5 and 4cm... folded valley, mountain, valley... and stuck to the bottom of the card... (For my US friends... 5 1/2" x 2"... scored whilst portrait at 3/8", 1" and 1 5/8")

And yes you've guessed it... I now have 9 wonderful swapped cards to share at some point... though I have quite a lot of other projects to share first... including some New Horizons versions... so they will be for another day! 

Saturday, 2 July 2016

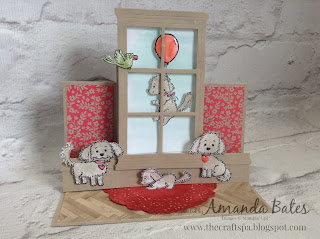
How Much is that Doggy in the Window... and the Jems Blog Hop

Hello and welcome to the Jems Monthly Blog Hop post by Amanda Bates at The Craft Spa. This month's theme is Animals... which would normally be a bit of a challenge for me with my usual stamp collection... but not this time...
Let me introduce you to Bella & Friends... so so cute! Available in wood or clear mount. So how much is that Doggy in the window... £25 in wood or £18 in clear mount.
But for those of you that know me and my creations... well I am just not that into colouring... but Touches of Texture came to my rescue... why colour when you can just stamp!
I think my little friends look quite furry (or feathery) and realistic as a result... though you do have to like a bit of fussy cutting if you go this way! Spot the shiny nose, collar, bone and balloon too... all care of the Fine Tip glue
The card is one of my Centre Step Easel cards... tutorial here.  I cut down my card to 28.9cm this time so that I could just fold the base into the card for posting in a standard C6 envelope...

You might also spot that I have not added any "stop" to prop up the easel card... to be honest I don't think you need one when you add this base to a Centre Step card...unless you want to use it for effect with a greeting... or to do this as an alternative....
I just couldn't resist... rug care of the new Delicate White Doilies which was coloured using the Watermelon Wonder ink pad direct and the little puppy is scored along his tummy to make him the easel card prop!
I have used 2 different papers... the Serene Scenery parquet flooring and Affectionately Yours flowery wallpaper were both just perfect for the card... Actually it was the parquet floor that made this a card that HAD to be made!
And I am particularly pleased with my window! Not only the triple aspect... more on that later! But the new Foam Adhesive Strips were fabulously easy for making it a 3D frame - and my dog and balloon are 3D'd using Stampin Dimensionals as well. Really pops!

And some more of the detail...

The sky background is just a swoosh of a baby wipe loaded up with Pool Party ink onto a Whisper White card panel. I used a 6.3 x 11.5cm (2 1/2" x 4 1/2") piece

Spot the Subtles Enamel Shape shape on the dog collar... too cute!
So time for a quick photo tutorial of the window....

1. Die cut 2 Hearth & Home windows
2. Chop off top of one and bottom of other - leaving just a single slat...
3. Put the chopped off bits aside... you need those for something else later...

4. Apply glue to upper section of bottom window
5. Stick top window to bottom!
6. Apply Foam adhesive strip to back of window
7. Stick your stamped sky panel to back of window. 

8. Grab your chopped off window pieces and make your skirting board like so...

Sorry to keep you so long...! But I hope that you like this creation as much as I do!!! It got an EEK!

It is now time to carry on with the Blog Hop... Carry on by pressing the NEXT or BACK buttons here... Your choice which way! Either way you are in for a treat with Julie next or Sarah previously...


Monday, 27 June 2016

CAS Butterfly Basics

Keeping it simple for a Beginners Class I taught the other week... using Butterfly Basics stamps and Bold Butterfly dies...

Background care of a baby wipe picking ink off the Pool Party ink pad lid and swooshing across Whisper White card... Mint Macaron leaves, Sahara Sand honeycomb, Tip Top Taupe postmark on both cards. 

Rich Razzleberry wording and top small butterfly, Sweet Sugarplum small butterfly and die cut white butterfly aquapainted with Sweet Sugarplum & Rich Razzleberry on the right...
Pool Party dashed border, Tip Top Taupe greeting and diecut white butterfly on the right hand side card.
And as my display of the set of cards was SO popular... we will be making these (amongst others) again this Wednesday... couple of spaces left.... but if you let me know today so I can prep...

Wednesday, 18 November 2015

Silent Night & Baby Wipe Swoosh

Staying on Baby Wipe Swoosh theme... Just to prove that every sky is different!

But before I start - don't forget to check out this week's new Weekly Deals (25% off)... I will be ordering next on Friday night 20 November...  

So just in case you missed the rest of this week's excitement... here are the details for the Stamps on Sale with 20% off (until this Friday 20 November) ... and here is the Autumn Winter Catalogue Retiring List... 

So I swooshed my white panel lightly with the baby wipe and Night of Navy ink... 

I used the cut-out houses from another make as a stencil on this one... Daubing Night of Navy ink through the cut-out parts - apart from the smoke on the left hand side house - marker was required for that one! Too fine...
And then I started to stamp the Silent Night wording from the co-ordinating Jingle All the Way stamp set... and thought...what a shame I don't have any All is Calm, All is Bright... and then I remembered that I do! So out came the Wonderland stamp set... job done!
Another quick & simple card for mass production - care of my favourite Sleigh Ride edgelits... 


Built for Free Using: My Stampin Blog

Tuesday, 17 November 2015

Baby Wipe Marbling Technique for Technique Tuesday

Now this card was such serious fun! 
After my Baby Wipe Swooshing on yesterdays Sleigh Ride card... I had another thought whilst the baby wipes were out...
And so  - for Technique Tuesday - can I now introduce you to the Baby Wipe Marbling Technique... 
The photos definitely do not do justice to the marbling effect and texture on this card...seriously amazing... almost looking like suede on some... though every make is different!
So first the image was heat embossed onto a Whisper White card panel... I used white embossing powder- though clear would work too... I also used the thinner coated Whisper White card as the coating just gives you a bit more "swooshability"... (probably not a real word...but a good one!)

Lost Lagoon ink was picked up with my baby wipe and swooshed over the whole panel...

Then the baby wipe was scrumpled, more Lost Lagoon ink picked up and the ink dabbed onto the panel...

Keep the baby wipe scrumpled, pick up Night of Navy ink and again dab away... building up the colour until you have the effect you want...

Then do a bit of Night of Navy baby wipe gentle swooshing around the edges...

Then pick up more Lost Lagoon ink and swoosh away solidly at the bottom to form that solid horizon and panel...

And finally, pick up a piece of kitchen towel and clean off the embossed image... and then it all really pops!

Leave to dry... and then stamp your greeting in Night of Navy ink...

Try it... you may become addicted... we all were...

And here is another version with the greeting pre-embossed in white too...
Love both versions.... Which do you prefer??
And still loving this Hostess set, Six Sayings - available in clear and wood mount...
Built for Free Using: My Stampin Blog

Monday, 16 November 2015

20% off stamps... and Sleigh Ride & Baby Wipe Swoosh Technique


This card was another firm favourite amongst the class - especially with the Winter Wonderland embellishments being at 15% this week on Weekly Deals...

But before I tell you more about the card... STOP PRESS!
20% Off Stamps
20% OFF SELECT STAMPS FROM TILL 20TH NOVEMBER... link here - please note that the prices on the first screen are the catalogue price ie before the 20% discount... there are some GREAT BUYS on here...

BUT also... AUTUMN WINTER CATALOGUE RETIRING LIST PUBLISHED... go here for my 2nd blog post today with all the details...

And here are a couple of photos of the flyer... discounted prices shown...
 20% off select stamps

 20% off select stamps. 16-20 Nov 2015
Want a quick visual of the discounted stamps in action... check out the Stampin Up! Pinterest board...

Right back to the card... Simple & stunning in the flesh ... and so much fun creating the background...
A bit of Baby Wipe Swoosh technique...

Grab a Baby Wipe and an ink pad...
Press the top of the closed ink pad so that ink transfers onto the inside of the lid...

Open up the ink pad and dab your baby wipe onto the lid to pick up the ink...
Swoosh your baby wipe across your piece of card... 

Swoosh & build up colour & texture until you are happy...
But wait... I wasn't finished with the baby wipes quite yet! Another instalment on its way...

Built for Free Using: My Stampin Blog