Showing posts with label Bird. Show all posts

Monday, 4 February 2019

Mini Monday #simplestamping make

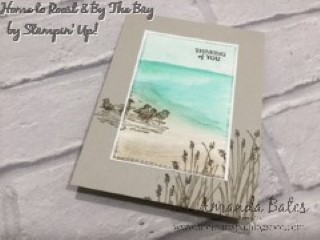
Just realised I didn't share this little #simplestamping By The Bay beauty at the time... although I did mention it... 
Same as this narrow notecard here... but with the stitched rectangle and mat removed...

Gulls inked up in Gray Granite and Pumpkin Pie legs & beaks using markers... and background scene Aquapainter watercoloured using Pool Party & Sahara Sand... Greeting in Gray Granite too...
And here is a Narrow Notecard mini trio for you...
The middle sea shell one being shared here...

Amanda's Quick Links
Just click on the relevant pictures below for catalogues and/or more information... 

If you are ordering today... do remember to add the Host Code shown below to earn yourself a gift and help support The Craft Spa at the same time... 


Please note that this host code does expire and change over time... but the current code is always shown at the top right hand side of my blog...

Just click on the relevant pictures below for catalogues and/or more information...


Tuesday, 15 January 2019

Tuesday Tutorial - By The Bay card

So back to this card that I shared last Friday... and the Tutorial and a few pointers for you if you would like to create one yourself... 

First up...the card size is not the standard A6 card size... as the Rectangles Stitched dies are a different rectangular shape/dimensions... but not to worry if you are working with A4 card... just chop your 14.8cm finished/folded card blank height down to 14cm... or just follow the Recipe/Tutorial for a Tent Fold Card like mine

And you may spot that I produced a couple of variants whilst I was at it!
Craft Spa Recipe
A4 Sahara Sand 10.5 x 28cm ( 4 1/8” x 11”)
A4 Thin Whisper White 7 x 10.4cm (2 ¾” x 4 1/16”)
Watercolor Paper 7 x 10.4cm (2 ¾” x 4 1/16”)

Embossing Folder – Seaside
Ink pads – Sahara Sand, Gray Granite, Early Espresso, Pool Party, Coastal Cabana, Bermuda Bay


Craft Spa Tutorial
1.     Score Sahara Sand card panel LANDSCAPE at 14cm (5 ½”)
2.     Bone Fold to make card blank

3.     Die cut Watercolor Paper (4th largest Rectangle Stitched die)
4.     Apply Temporary glue* to back of Watercolor Paper panel
5.     Stick to centre of card blank

6.     Wet top 2/3 of Watercolor Paper panel
7.     Apply Pool Party using AquaPainter
8.     Apply Coastal Cabana using AquaPainter to middle third
9.     Apply Bermuda Bay using AquaPainter to top and randomly!
10.   Leave to dry… or blast with Heat Gun

11.   Wet bottom 1/3rd of panel
12.   Apply Sahara Sand using AquaPainter to all of bottom third
13.   Apply Gray Granite using AquaPainter to bottom half (of bottom 1/3rd!)
14.   Leave to dry… or blast with Heat Gun

15.   Ink up & stamp Gray Granite birds to LHS.. about a third of the way up…
16.   Ink up grasses stamp with Sahara Sand (pad) all over and using Early Espresso marker direct onto grass heads
17.   Stamp to bottom RHS
18.   Ink up grasses and repeat 2 more times… varying the height as you go…
19.   Ink up & Stamp Early Espresso greeting

20.  Emboss the watercoloured panel using the Seaside Embossing Folder & Big Shot

*Bonus Tip: You can use Tombow Multipurpose glue… apply and leave to dry/go clear… as it is then forms a temporary glue

And here is the other version for you… without the Seaside embossing step… as guess who forgot first time round! Oops!!
And finally... the more observant of you will have noticed... in the embossed version below... that the sea area is kind of off to the right hand side of the scene from about the half way point to the left... and that it also looks like it has rolling waves... so for those that like the detail... a couple more Bonus Tips for you...
So I didn't quite wet all the way across to the left when I wet the top 2/3 for the blues... and then I wet a bit up that left hand side when I wet the bottom 1/3 for the neutrals... 

And the rolling waves... just appeared! A bit after drying... and then more after embossing... Now whether I could repeat this feature... only time (and another make) would tell!!

PS The tech eluded to in the last post will have to wait for another day... it didn't work - or not work- I just didn't get the chance to try it out - as the window went! - and it it may be a while before I get another one to try things out...

If you are ordering today... do remember the Host Code to earn yourself a gift ... and help support The Craft Spa at the same time...
And just click on the pictures below for more information...


Monday, 14 January 2019

Mini Monday - By The Bay #3

Thanks for all your lovely feedback on my By The Bay makes over the last couple of days... so I have another... though just a quick post today... but I will be back with more details on these makes shortly...
This lovely little Narrow Notecard (a product which I had forgotten about for a while!!)... features the gulls in the stamp set... and a bit of Aqua Painter water colouring...

All set on another of the Rectangle Stitched dies Shimmery White card die cut... as it is the perfect size for these notecards...
Really love these gulls...

And this also almost counts as a #simplestamping card... for which Stampin' Up! have given us the brief of...  stamps, inks and paper (aka card) on a notecard...  just the die cut rectangle that stops it meeting the brief then! Oh well... excuse for another day then...
Though maybe after I have finished by accounts and tax return!!! Why oh why do I leave it all so late every year!!

Ordering today... do remember the Host Code to help support The Craft Spa... and earn yourself a gift at the same time...
And just click on the pictures below for more information...


Any problems with those links... just go to this post...

Sunday, 14 August 2016

Thoughtful Branches Holly

And here is the last of my topiary trio... a holly bush dressed for Christmas...

Spot the details...
You probably won't be able to see this detail... but the leaf canopy is domed... adding real texture to the card. 

Really easy to do... after you have used your Big Shot Die Brush to remove all the die cut scraps... turn the leaf canopy over on the mat and give it another brush (or 3)... everything all pops up ( well down actually!)  to form the dome shape... 

It is also easy to glue down that way - just Tombow or Precision Tip Glue around the edges and be careful to leave the dome shape in the centre as you stick it down...

A double spoiler alert now... a red glitter-embossed Holly Berry Happiness punched bow... yes glitter embossing powders are coming your way... My initial glitter-embossing wasn't so deep in colour ( I think my Versamark needed a re-ink!)... so  - rather than go upstairs to get the Versamark refill - I cheated! I stamped the bow in Real Red, then I stamped over in Versamark, applied the Red glitter-embossing powder and heated to melt...worked a treat! Lovely and glittery

And 1/8" hand punched circle red glimmer paper berries...
Another Seasonal Bells punched and trimmer plant pot - a different bell this time! And banner again from Seasonal Bells...

And a tree trunk from a Soft Suede sliver stamped with the woodgrain effect stamp in Soft Suede from Timeless Textures...

And if this is the first of the Topiary Trio you have come across - and some of the new Autumn Winter/Holiday product names are new to you! Please feel free to go back a few days worth of blog posts when more is revealed...


Thursday, 11 August 2016

Thoughtful Branches Wreath

Now you know me and a slightly curved leaf stamp... I just can't resist creating a wreath!
Really quick share of a great simple little card today... as to be honest... I just do not feel very well! 
But I can't wait to share some of my other makes with you soon.... though my photo session came to an abrupt end... as...  I really do not feel very well!

And one detail to spot... the bow is from the new Burlap Ribbon... split in half to make it narrower (a great tip from our Stampin Up! Country Manager, Paula Gorry) which makes it easy to tie the bow and then you can sculpt the bow and the ends how you wish! Really raggy or tight together... Fabulous...

And please remember that this stamp is only available for August. Loads more inspiration on my Pinterest board shared on that linked post... It is definitely a keeper....!

Saturday, 13 December 2014

Curvy Keepsakes Die for Christmas– Robin

Many Merry Stars, Amanda Bates, The Craft Spa 012

Now I have been having great fun with my Curvy Keepsakes die! I officially LOVE it!!

It was one of my first purchases from the Autumn Winter Catalogue back in August when we demos could pre-order. And it was the first product that I picked up and wrote a long list of projects that I could make.

But time leapt away from me as it does – and so it was a few weeks before I went back to that list and started to create something… and then life leapt away again & lots of blog posts showing cards and stamp sets etc…and now it is months later…and I am finally beginning to share what I made!!

So first - here is my little robin redbreast…. I tried to get a photo of this with the real robin redbreast that sits on this bush… but he wasn’t playing ball!!Many Merry Stars, Amanda Bates, The Craft Spa 010

Now some of you will realise that he seems a bit familiar… yes I used the basic format (aka Angry Birds Chick!) that I shared  earlier in the year for the Tag Topper Punch Easter Chick Treat Holder and previously for the Fancy Favour Box version. Both of those projects were so popular – it just had to be done! So punch art tutorials linked there….

And yes Angry Birds were on my Curvy Keepsakes list too!!