Showing posts with label Label Love. Show all posts

Saturday, 25 April 2015

How I shall miss thee! Retiring List Stamps Review

As promised…here is my review of stamps on this years Retired List that I shall sorely miss using…. click on the product picture to go straight to my store or click on the project picture to go to the relevant earlier blog post…

So not in any particular order…..

Around The World. Gosh this has had a lot of use for mini books & Project Life. Think this will probably be a keeper… Still available in wood and clear.

Around the World

Around the World, Flashback, Flip n Fold Mini Book, INSIDE, Amanda Bates, The Craft Spa, 2014-07

Apothecary Art. Used this set so much over the years…really sad to see it go… still available in Wood & Clear. Ooh… Wood only £2 more than clear. Though the co-ordinating Labels Collection Framelits now out of stock so gone forever… Can’t believe I didn’t blog these Diorama cards before…

Apothecary Art

2012_10_The Craft Spa_Xmas Cards & Treats (30)

Memorable Moments. Really great Numbers and Words set. Hope there is a good “replacement” for me in the new catty…… or these will have to be another keeper! Still available in both wood and clear – again wood mount less than £2 more than the clear now….

Memorable Moments

2012_10_The Craft Spa_Xmas Cards & Treats (28)

@So Social. Just really really surprised to see this go so soon… We have had great fun using this is in our Project Life sessions and on quite a few cards too… Think this may have to be a keeper for me actually!! Still available in both Wood & Clear.

Sorry no projects to share as I can’t find them in my Pictures folder… but I can share one of the cards in its previous form… and note that the Make Note Rotary stamp in that one has also retired… and now I have just realised why all my customers have rushed to buy this little stamp at just £2.75!! I think there may be a few of you that will need the Word Window punch now too!!

(@)Sosocial Clear-Mount Stamp Set by Stampin' Up! Make Note This and That Rotary Stamp (English)

2014_04_Team Training_Stepped Up_Swap_Teen Male_iPhone5_Make Note (2)

Embellished Events. Many of you will be surprised to see this on here… but I use this stamp set for my “Beginners” classes…as there are great images and words too… so one stamp set, a couple of inks and a bit of card mean ladies go away with a simple kit they can make cards etc with for so many occasions straightaway….and then forever more… Only left in Wood…

It really is a great little set… and used for some of my favourite cards – whether the very very simple ones or the easy but fancier… none of which I appear to have blogged before…..

Embellished Events

Embellished Events, Amanda Bates, The Craft Spa, ind. Stampin Up UK Demonstrator  (24)Amanda Bates, The Craft Spa, SU UK demonstrator 038Embellished Events, Amanda Bates, The Craft Spa, ind. Stampin Up UK Demonstrator  (44)Embellished Events, Amanda Bates, The Craft Spa, ind. Stampin Up UK Demonstrator  (19)


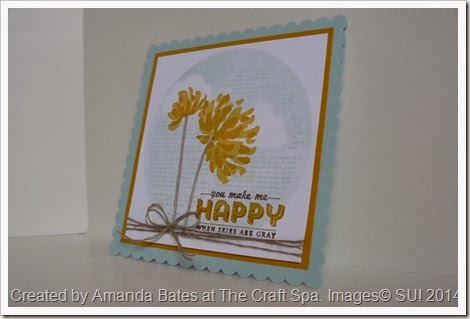
Label Love – still available in Wood & Clear. Artisan Label punch retiring too…. but punch has already gone forever…

Label Love

Scallop Tag Concertina Card,2014_03_Baby Girl Mia Ruby 017

Petite Pairs EDITED TO ADD… Appears this has had a reprieve – I can definitely see it in the new catty!!
I used this one SO much over the years. Though I am sure SU! will give me a good replacement in the new catty….. Still available in Wood and Clear mount. But no reduction on this one!

Petite Pairs

Wildflower Meadow So Sad! Still available in wood , clear and the embossing folder is still there too…

Wildflower Meadow

2013_06,Jems Team New Catty Swap,Happy Day, Wildflower Meadow (3)

And lastly my one definite keeper – Dictionary – gone for good in stamp form – though still available as a MDS download… I really hope that there is a great new alternative to this stamp….

Dictionary Stamp Brush - Digital Download

Remember my Convention swap card… which I naughtily nicknamed the car tax disc card!
2014_01, Amanda Bates, The Craft Spa, SAB, Jems Blog Hop, Too Kind, See Ya Later (1)

And  the Too Kind stamps used here are also on the Retiring List… still available in Wood only… Definitely one I will miss…

Too Kind

And here was a CAS Christmas Santa’s List card that I don’t appear to have shared on here before…

2013_08_Xmas Cards_Amanda Bates_The Craft Spa (16)

So another bit of a trip down Memory Lane here… and as a result - unfortunately for me - now a few more stamp sets moving over to the Keep Box… Maybe Memory Lane is not such a good idea for me after all!!!

Thursday, 17 April 2014

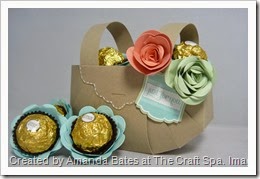
Large Easter Basket Tutorial

Large Easter Basket Tutorial_2014_04_Tag Punch_So Very Grateful 009

Following on from my tutorial for the Small Easter Basket yesterday. Here are the details for the large Basket I first posted here.

Mothers Day Basket_Ferrero Rocher_Spiral Flower_Tag Punch_2014_03_ Amanda Bates_The Craft Spa Photo of the previous one!

Some of you asked me for a tutorial so here it is!

But as some of you will notice  - I have now made a new & stepped up version. I love it when a basket looks like it has been woven !! And the SU! square lattice embossing folder is just so good to add that texture… So I faux stitched, embossed & stuck a few extra panels on! And now it really does look like a basket! And it is pretty strong too….

Cardstock Sizes

Crumb Cake – Basket 8"x10"; Scallop Flaps 4"x4 1/4"(x2) and Handle 11"x 1".

Plus for this version….some more Crumb Cake panels for embossing with the Square Lattice die to give you the basket weave….Side Weave panels 2” x 3” (x6); 1” x 3” (x8); Base Weave panel 1” x 10 1/4”

So here is how to make the Large Basket….. (note photos of the make-up of the basket are of the small basket as the process is the same!)

1. With large panel PORTRAIT on trimmer... Score at 3" & 5". 

2. Bone Fold

3. With panel LANDSCAPE on trimmer... cut the top & bottom sections using the Cut Bar … at 2", 3", 4", 6", 7" & 8" along the Top Ruler Bar

4. Score 2 smaller panels LANDSCAPE at 1 3/4” ( ie with 4 1/4” along the Top Ruler Bar)

5. Scallop Tag Topper “over the top” punch  the narrower sections to form the 2 flaps .

6. Corner Round bottom corners of sides.

7. Faux stitch the 2 Scalloped Flaps & 14 Side Weave panels using a white Signo gel pen  . Tip –  focus on just doing 3 faux stitches at a time – lot neater – and faster too!
Large Easter Basket Tutorial_2014_04_Tag Punch_So Very Grateful 002
Note  - just panels for one side in the photo. You need double!

8. Faux stitch the Base Weave panel and handle too ( oops forgot to put those in my camera shot!!)

9. Emboss the Side & Base Weave panels, the handle & the Scallop flaps with the Square Lattice embossing folder

10. Adhere the Side Weave panels to the basket panels

11. Pull the LH & RH sections upwards & towards each other to form the top of the basket

Tag Punch_Small Easter Basket_ Petite Petals_Craft Spa_2014_04_ (2)

12. Adhere on about 1cm of overlap

13. Pull up next LH & RH sections & line up so that bottom corners meet & adhere

Tag Punch_Small Easter Basket_ Petite Petals_Craft Spa_2014_04_ (3)

14. Pull up next LH & RH sections & line up top corners on top edge of basket & adhere

Tag Punch_Small Easter Basket_ Petite Petals_Craft Spa_2014_04_ (4)

15. Fold up central section & adhere

Tag Punch_Small Easter Basket_ Petite Petals_Craft Spa_2014_04_ (5)

16. Trim off top edge of basket

Tag Punch_Small Easter Basket_ Petite Petals_Craft Spa_2014_04_ (6) 

17. Adhere scalloped flaps onto sides

Tag Punch_Small Easter Basket_ Petite Petals_Craft Spa_2014_04_ (8) 

18. Adhere the Base Weave panel around the bottom of the basket

19. Adhere handle to inside ( I actually added another piece of Crumb Cake cardstock behind the embossed handle just to make it more robust)

Large Easter Basket Tutorial_2014_04_Tag Punch_So Very Grateful 008

20. Ink up & stamp flowers with black Staz on ink & colour in with marker pens. ( Yes different colour choice for me – but it does match with what I am putting inside!!)

21. Fussy cut flowers.
And no… I am not the neatest fussy cutter in the world… I just cheated a bit…. I added some Crumb Cake ink around the white edges of the flowers & leaves – so you can’t see any white parts!! You may be able to see that in this photo…. does the trick nicely… you don’t need to worry about being quite as precise in your cutting!!! Why have I never thought of doing that before!!

Large Easter Basket Tutorial_2014_04_Tag Punch_So Very Grateful 011

22.Fill your large basket with chocolate and/or stuff!!! It ends up about 5 1/2” wide, 2” deep and 3” high so it does hold a fair amount…

And here is a quick picture of the Small & the Large……

Easter Baskets_Little & Large_ScallopTag Topper Punch_Amanda Bates_The Craft Spa

SU! Products Used for Easter Basket

Stamps – So Very Grateful

Punches- Scalloped Tag  Topper, Corner Rounder

Embossing Folder – Square Lattice

Cardstock – Crumb Cake

Inks – Staz On Black

Markers – Signo White gel pen, Daffodil Delight, Crisp Canteloupe, Calypso Coral Strawberry Slush, Wild Wasabi, Garden Green


SU! Products Used for Mothers Day Basket

Stamps – Label Love

Punches- Scalloped Tag  Topper, Artisan Label, Corner Rounder

Dies – Spiral Flower

Cardstock – Crumb Cake, Pool Party, Pistachio Pudding, Crisp Canteloupe

Inks – Pool Party, Signo White Gel Pen

Tuesday, 11 March 2014

Revisit of 40th Birthday Tag Topper Punch Concertina Card

Tag Topper_Blues_Closed 007

Had to share my last minute change to a card I shared earlier in the week.

Just as it was going into its box envelope for postage – a little tweak just came to pass…. a quick cut and addition of a different paper from the Sale A Bration Sweet Sorbet pack… and it was done…. much happier with the reduction of colours and the final result…!

This is how it was before….. see more details of this card here…..

Scallop Tag Concertina Card, Petite Petals, Amanda Bates, The Craft Spa, 2014_03 (8)


Scallop Tag Concertina Card, Petite Petals, Amanda Bates, The Craft Spa, 2014_03 (6)

And a laugh (or two) for you…. I almost posted these cards without saying who they were from!!! ( which has been done a few  times before !!!) 

Now the recipients of Mia Ruby’s card will know exactly who it is from… but I am not sure that Alison (who is 40) will know! Though she would probably guess….

AND I just couldn’t write on the front of these cards!!! ….. so I had to add another panel to the back with my handwritten scrawl all over it!!

Monday, 10 March 2014

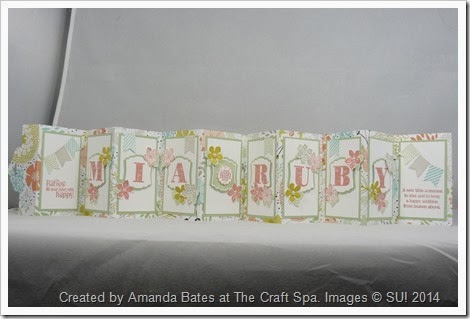
Welcome Mia Ruby – Baby Girl Scallop Tag Topper Concertina Card

Scallop Tag Concertina Card,2014_03_Baby Girl Mia Ruby 017

Here is the Baby Girl card I have been working on over the weekend. Full stretch above…. and closed in a different way as shown below…. (recipe for the box envelope for this version shown at the end of this post)

Tag Concertina Card, Baby, Mia Ruby, Amanda Bates, The Craft Spa , Closed (1)

So two versions for you here… the one that I am sending and one that I had “in the bank”…. My bank card is the BABY GIRL version… but this little one will be a very special one to me and my family …so something more personal was needed…so welcome to the world Mia Ruby….

Tag Topper Concertina Card_Baby Girl_2014_03_09_Amanda Bates_The Craft Spa (4)

And a couple of close up shots….

Scallop Tag Concertina Card,2014_03_Baby Girl Mia Ruby_ MIA (1)Scallop Tag Concertina Card,2014_03_Baby Girl Mia Ruby_ RUBY

Again…thank you to Julie for this gorgeous card format – I guess you can tell it is one of my favourites of all time!!!! So simple to make…yet so effective….

Here is the link to more details and Julie’s video tutorial….

And here are the dimensions  for a box envelope  to put it in……. (made using the Envelope Punch Board)

8 3/4” Square Cardstock.

First score 3 1/4”. Second Score 4 5/8”

SU! Supplies

Stamps – Label Love, Morning Post Alphabet, Cuddles & Kisses, Baby Prints, Banner Blast, Petite Petals

Punches – Scallop Tag Topper , Artisan Label, 1 3/4” Circle, SAB Banner , Petite Petals

Envelope Punch Board

Dies – Circle Framelits

Inks – Crisp Canteloupe, Pistachio Pudding, Sahara Sand, Summer Starfruit, Pool Party

Cardstock – Pistachio Pudding, Whisper White

DSP – SAB Sweet Sorbet

Embellishments -  In Color Stitched Summer Starfruit Ribbon, Pearls

Saturday, 8 March 2014

Another Tag Punch Concertina Card for a 40th Birthday–and 2 Tutorials….

Scallop Tag Concertina Card, Petite Petals, Sweet Sorbet, SAB 2014, Amanda Bates, The Craft Spa, 2014_03 (6)

Here is another version of the Scallop Tag Concertina Card we made at the last Jems Quarterly Training Day.

Julie stepped it up to make this gorgeous Mothers Day Card, and as this version was just in my favourite colourways….. I just had to CASE immediately and make one for a friends special birthday being celebrated this week – Happy Birthday Alison! Now everyone knows how old you are!!!

So I mentioned 2 tutorials….

Firstly here is Julies Video Tutorial on making the Scallop Tag Topper Punch Concertina Card – thank you Julie! It is a truly BEAUTIFUL card in the flesh……

And secondly I have added the measurements at the end of this post for the box envelope to post it in. This card has more bulk when folded up than the original card we made so it requires a 1” deep box envelope. So my Envelope Punch Board was out again – a quick calculation – and a box made so it was all good to go…..

Here is a view of the folded card.

Scallop Tag Concertina Card, Petite Petals, Sweet Sorbet, SAB 2014, Amanda Bates, The Craft Spa, 2014_03 (8)

And here it is at full stretch….

Scallop Tag Concertina Card, Petite Petals, Sweet Sorbet, SAB 2014, Amanda Bates, The Craft Spa, 2014_03 (2)

And here are some close-ups…..

Scallop Tag Concertina Card, Petite Petals, Sweet Sorbet, SAB 2014, Amanda Bates, The Craft Spa, 2014_03 (3)Scallop Tag Concertina Card, Petite Petals, Sweet Sorbet, SAB 2014, Amanda Bates, The Craft Spa, 2014_03 (4)Scallop Tag Concertina Card, Petite Petals, Sweet Sorbet, SAB 2014, Amanda Bates, The Craft Spa, 2014_03 (5)

And here are the dimensions for a 1” deep box envelope made using the envelope punch board….

Cardstock/Paper Size 7  1/2” Square

First Score 2 5/8”

Second Score 4 1/8”

Go to my earlier post here for the box envelope dimensions for the original card (3/4” deep) and for more general details on making these….

And there you have it… but more of these cards coming soon…. Baby Girl card being needed today…. they really are so truly stunning in the flesh….. I just can’t help myself…..

Sunday, 2 March 2014

Envelope Punch Board–Mini Series #4

2014_02_Envelope Punch Board Project by Amanda Bates @ The Craft Spa, North Yorkshire, UK  (25)

And these were the last projects we did with our Envelope Punch Board this month – though I took a bit of a risk here….. I had 2 ladies make 16/18 Christmas crackers in our last session before Christmas – so I thought they may not be happy with me at this point!!!! But I left the room unscathed….. it was OK……

I will admit that this was the first project I made with my Board when it arrived – it was noticeable during our demo pre-order month that we all went cracker mad with it – but it is just SO GOOD for making lovely little crackers…… or bon-bons as they are called elsewhere in Europe….

I used this brilliant step by step picture tutorial of Sara Rayners – as you get 4 crackers from a piece of 12x12 paper… which seems to make sense to me!! Thank you Sara…. The only thing I changed was Steps 3-5 as I added a quick short cut!! I lined up & punched each section at the 1 1/2” score –mark…. and then moved the paper across to the left and lined up at 4 1/2” & punched. Then I unfolded and refolded and repeated for the next section…. then I didn ‘t need the separate Step 5…..

The shaped ends were also made using the punch board…it was a bit of a Eureka moment for me at the time…though I am sure that it will have been done before…. I just made up the cracker…. put the ends up into the punch… the 2 paper thicknesses at a time… lined up the section in the centre of the punch and punched… then repeated for the other side… and then the other end. Hope that makes sense!! If not – please feel free to comment below and I will make another, photo those steps – and add to the post another day…..

And a few other views/alternatives….. Again the decoration was kept as simple as simple can be…. all about learning how to use the Punch Board in this class……

Amanda Bates, The Craft Spa, Envelope Punch Board Cracker, 2014_02 001 (3)

2014_02_Envelope Punch Board Project by Amanda Bates @ The Craft Spa, North Yorkshire, UK  (24)

2014_02_Envelope Punch Board Project by Amanda Bates @ The Craft Spa, North Yorkshire, UK  (22)

SU! Products Used

Envelope Punch Board!

Stamps – Label Love

Punches – SAB Banner Punch; Artisan Label

Thread – SAB Sweet Sorbet Accessories Pack – Pool Party or Crisp Canteloupe

Paper – Sweet Sorbet