Showing posts with label SAB 2014. Show all posts

Tuesday, 11 March 2014

Revisit of 40th Birthday Tag Topper Punch Concertina Card

Tag Topper_Blues_Closed 007

Had to share my last minute change to a card I shared earlier in the week.

Just as it was going into its box envelope for postage – a little tweak just came to pass…. a quick cut and addition of a different paper from the Sale A Bration Sweet Sorbet pack… and it was done…. much happier with the reduction of colours and the final result…!

This is how it was before….. see more details of this card here…..

Scallop Tag Concertina Card, Petite Petals, Amanda Bates, The Craft Spa, 2014_03 (8)


Scallop Tag Concertina Card, Petite Petals, Amanda Bates, The Craft Spa, 2014_03 (6)

And a laugh (or two) for you…. I almost posted these cards without saying who they were from!!! ( which has been done a few  times before !!!) 

Now the recipients of Mia Ruby’s card will know exactly who it is from… but I am not sure that Alison (who is 40) will know! Though she would probably guess….

AND I just couldn’t write on the front of these cards!!! ….. so I had to add another panel to the back with my handwritten scrawl all over it!!

Monday, 10 March 2014

Welcome Mia Ruby – Baby Girl Scallop Tag Topper Concertina Card

Scallop Tag Concertina Card,2014_03_Baby Girl Mia Ruby 017

Here is the Baby Girl card I have been working on over the weekend. Full stretch above…. and closed in a different way as shown below…. (recipe for the box envelope for this version shown at the end of this post)

Tag Concertina Card, Baby, Mia Ruby, Amanda Bates, The Craft Spa , Closed (1)

So two versions for you here… the one that I am sending and one that I had “in the bank”…. My bank card is the BABY GIRL version… but this little one will be a very special one to me and my family …so something more personal was needed…so welcome to the world Mia Ruby….

Tag Topper Concertina Card_Baby Girl_2014_03_09_Amanda Bates_The Craft Spa (4)

And a couple of close up shots….

Scallop Tag Concertina Card,2014_03_Baby Girl Mia Ruby_ MIA (1)Scallop Tag Concertina Card,2014_03_Baby Girl Mia Ruby_ RUBY

Again…thank you to Julie for this gorgeous card format – I guess you can tell it is one of my favourites of all time!!!! So simple to make…yet so effective….

Here is the link to more details and Julie’s video tutorial….

And here are the dimensions  for a box envelope  to put it in……. (made using the Envelope Punch Board)

8 3/4” Square Cardstock.

First score 3 1/4”. Second Score 4 5/8”

SU! Supplies

Stamps – Label Love, Morning Post Alphabet, Cuddles & Kisses, Baby Prints, Banner Blast, Petite Petals

Punches – Scallop Tag Topper , Artisan Label, 1 3/4” Circle, SAB Banner , Petite Petals

Envelope Punch Board

Dies – Circle Framelits

Inks – Crisp Canteloupe, Pistachio Pudding, Sahara Sand, Summer Starfruit, Pool Party

Cardstock – Pistachio Pudding, Whisper White

DSP – SAB Sweet Sorbet

Embellishments -  In Color Stitched Summer Starfruit Ribbon, Pearls

Saturday, 8 March 2014

Another Tag Punch Concertina Card for a 40th Birthday–and 2 Tutorials….

Scallop Tag Concertina Card, Petite Petals, Sweet Sorbet, SAB 2014, Amanda Bates, The Craft Spa, 2014_03 (6)

Here is another version of the Scallop Tag Concertina Card we made at the last Jems Quarterly Training Day.

Julie stepped it up to make this gorgeous Mothers Day Card, and as this version was just in my favourite colourways….. I just had to CASE immediately and make one for a friends special birthday being celebrated this week – Happy Birthday Alison! Now everyone knows how old you are!!!

So I mentioned 2 tutorials….

Firstly here is Julies Video Tutorial on making the Scallop Tag Topper Punch Concertina Card – thank you Julie! It is a truly BEAUTIFUL card in the flesh……

And secondly I have added the measurements at the end of this post for the box envelope to post it in. This card has more bulk when folded up than the original card we made so it requires a 1” deep box envelope. So my Envelope Punch Board was out again – a quick calculation – and a box made so it was all good to go…..

Here is a view of the folded card.

Scallop Tag Concertina Card, Petite Petals, Sweet Sorbet, SAB 2014, Amanda Bates, The Craft Spa, 2014_03 (8)

And here it is at full stretch….

Scallop Tag Concertina Card, Petite Petals, Sweet Sorbet, SAB 2014, Amanda Bates, The Craft Spa, 2014_03 (2)

And here are some close-ups…..

Scallop Tag Concertina Card, Petite Petals, Sweet Sorbet, SAB 2014, Amanda Bates, The Craft Spa, 2014_03 (3)Scallop Tag Concertina Card, Petite Petals, Sweet Sorbet, SAB 2014, Amanda Bates, The Craft Spa, 2014_03 (4)Scallop Tag Concertina Card, Petite Petals, Sweet Sorbet, SAB 2014, Amanda Bates, The Craft Spa, 2014_03 (5)

And here are the dimensions for a 1” deep box envelope made using the envelope punch board….

Cardstock/Paper Size 7  1/2” Square

First Score 2 5/8”

Second Score 4 1/8”

Go to my earlier post here for the box envelope dimensions for the original card (3/4” deep) and for more general details on making these….

And there you have it… but more of these cards coming soon…. Baby Girl card being needed today…. they really are so truly stunning in the flesh….. I just can’t help myself…..

Sunday, 2 March 2014

Envelope Punch Board–Mini Series #4

2014_02_Envelope Punch Board Project by Amanda Bates @ The Craft Spa, North Yorkshire, UK  (25)

And these were the last projects we did with our Envelope Punch Board this month – though I took a bit of a risk here….. I had 2 ladies make 16/18 Christmas crackers in our last session before Christmas – so I thought they may not be happy with me at this point!!!! But I left the room unscathed….. it was OK……

I will admit that this was the first project I made with my Board when it arrived – it was noticeable during our demo pre-order month that we all went cracker mad with it – but it is just SO GOOD for making lovely little crackers…… or bon-bons as they are called elsewhere in Europe….

I used this brilliant step by step picture tutorial of Sara Rayners – as you get 4 crackers from a piece of 12x12 paper… which seems to make sense to me!! Thank you Sara…. The only thing I changed was Steps 3-5 as I added a quick short cut!! I lined up & punched each section at the 1 1/2” score –mark…. and then moved the paper across to the left and lined up at 4 1/2” & punched. Then I unfolded and refolded and repeated for the next section…. then I didn ‘t need the separate Step 5…..

The shaped ends were also made using the punch board…it was a bit of a Eureka moment for me at the time…though I am sure that it will have been done before…. I just made up the cracker…. put the ends up into the punch… the 2 paper thicknesses at a time… lined up the section in the centre of the punch and punched… then repeated for the other side… and then the other end. Hope that makes sense!! If not – please feel free to comment below and I will make another, photo those steps – and add to the post another day…..

And a few other views/alternatives….. Again the decoration was kept as simple as simple can be…. all about learning how to use the Punch Board in this class……

Amanda Bates, The Craft Spa, Envelope Punch Board Cracker, 2014_02 001 (3)

2014_02_Envelope Punch Board Project by Amanda Bates @ The Craft Spa, North Yorkshire, UK  (24)

2014_02_Envelope Punch Board Project by Amanda Bates @ The Craft Spa, North Yorkshire, UK  (22)

SU! Products Used

Envelope Punch Board!

Stamps – Label Love

Punches – SAB Banner Punch; Artisan Label

Thread – SAB Sweet Sorbet Accessories Pack – Pool Party or Crisp Canteloupe

Paper – Sweet Sorbet

Saturday, 1 March 2014

Envelope Punch Board–Mini Series #3

2014_02_Envelope Punch Board Project by Amanda Bates @ The Craft Spa, North Yorkshire, UK  (7)So here is a straightforward C6 envelope and a card to go in it!!

One of my ladies bought the Oval Framelits last month so I needed to use them to show her another simple way to use them…. so I wanted to do a simple oval aperture card. So it was time for another CASE of another card of Julie’s that WOWed me when I saw it back in January…. I just changed some of the colours to suit the Sweet Sorbet papers. So simple – but so effective. Add I wish I had taken some photos of the alternatives made this week…. the card looks great on its side too – and the wording from Simply Fabulous and Perfectly Penned looks great on their too…..

2014_02_Envelope Punch Board Project by Amanda Bates @ The Craft Spa, North Yorkshire, UK  (8)

And the new Texture Boutique machine was out in force again – the depth really is great with my extra shim….

SU! Products used

Stamps – Petite Petals; Perfect Pennants

Punches & Dies – Petite Petals; Framelits – Ovals

Embossing Folder – Beautifully Baroque

Embellishments – Pool Party Seam Binding; Gems

Cardstock – Naturals White

Inks – Summer Starfruit; Pool Party; Crisp Canteloupe; Pistachio Pudding; Coastal Cabana

Friday, 28 February 2014

Envelope Punch Board–Mini Series #2

2014_02_Envelope Punch Board Project by Amanda Bates @ The Craft Spa, North Yorkshire, UK  (2)

Here is another project we did using the Envelope Punch Board… a simple 6” envelope card with a belly band closure. I must thank Nic (aided and abetted by Sharon & Sam…) for their stunning samples at Nic’s Team Training inspiration station which inspired to try one of these cards… and I am so glad I did….

I kept everything really really simple on purpose …just the beautiful  Simply Fabulous words  and gorgeous punched Flower Shop flowers – including a paper pierced flower to throw in a new technique for most of my ladies! Oh and another Scallop Square – you still can’t keep them out of The Craft Spa!!!!

This class was really about showing everyone what to do with their board step by step – so more projects – less faffing!!!! But everyone still took home 7 finished projects… and their own Punch Board….and everyone loved doing everything with their Punch Board… step-by-step… and all at the same time… though we still can’t work out how that meant we did even more chatting than usual!!! Must be something to do with less memory power being required at the time!!!! And they all got a crib sheet too…..

But I cannot believe I took so long to buy the Simple Fabulous stamp set… as it is really is… Simply Fabulous…& Gorgeous… and i do use the expression A Million and One … a lot…by all accounts!!!!

And a few more photos for you ….

2014_02_Envelope Punch Board Project by Amanda Bates @ The Craft Spa, North Yorkshire, UK  (4)2014_02_Envelope Punch Board Project by Amanda Bates @ The Craft Spa, North Yorkshire, UK  (1)7

Back tomorrow with more of our Envelope Punch Board projects.

And then I will get to publish the details for the Scalloped Tag Topper Box Card I shared earlier in the week….. I know a lot of you are waiting for that….. I am in awe over the number of messages ands blog hits with that one!! Thank YOU so much. It has already hit my Top 10 blog posts ever…. WOW…. Amaze-Balls!!!

SU! Products Used

Stamps – Simply Fabulous; Flower Shop

Punches & Dies– Pansy & Square Framelits

Papers & Card – SAB Sweet Sorbet; Sahara Sand; Summer Starfruit; Pool Party

Inks - Sahara Sand; Summer Starfruit; Pool Party; Staz On Black

Thursday, 30 January 2014

Pop Up Presents Trio Card & Tutorial

2014_01, Amanda Bates,The Craft Spa, Jan Class, Banners & Presents Trio (5)2014_01, Amanda Bates,The Craft Spa, Jan Class, Banners & Presents Trio (4)

Another version of the Pop Up Presents card I shared yesterday… I am not sure that the photos do this card justice – it is a real WOW in the flesh…

More papers from the NEW Fresh Prints DSP stack. This time in Real Red & Crumb Cake – so more suitable for the males and teens in our life!

You can see the little part-punched pieces more clearly in this colourway – check out the extra embellishments on those little banners in the Glimmer Red– straights, chevrons; and layered banners – I can use any tiny scrap to add layers to my banners …. you never need to throw away a scrap of card or paper again!!!!

Remember just a £45 order will get you this Banner Punch for free….!!! 

Here is the detailed imperial version by Lisa Young that I used . But I converted the measurements to a metric version for use in a standard European A6 card...

So for the inner insert - you will need…

Whisper White Cardstock 8” x 140mmW

Scored & Folded at 4”

You can mark & cut as Lisa has - but I used a trimmer to do the cutting –  I find that much easier – so the folded edge of the insert is placed LANDSCAPE up to the top horizontal ruler bar of the trimmer , lined up to a measurement and then you use the vertical cutter bar to make the cuts!

A quick tip though – I found that cutting 2/3 times ensured that my trimmer went all the way through the 2 layers of card neatly – though maybe that was just a sign of me needing to replace my blade!!! Going back to repeat when you discover that the blade hasn’t quite cut through makes for a messy cut!!

So for the first cut – line up your folded edge LANDSCAPE on the top ruler bar at 2 cm – locate your blade at 5cm on the cutter bar – and cut up from 5 cm to the top – ie 0

Then at 6cm on the top - cut from 5 cm to 0

Then at 9 1/2cm on the top - cut from 3 1/2cm to 0

Then at 12cm on the top - cut from 2 cm to 0

And a quick pictorial for those of you that prefer a visual.

Amanda Bates,TheCraftSpa,2014-01,Pop Up Presents Tutorial Pic 001

The paper strips are of course a different size. As Lisa says though – do measure the lengths you need for each section and then trim – no 2 presents were ever the same. For class – I cut my pieces a bit longer so people could then trim to suit the width on their own creation. So these are the measurements with ( hopefully) a bit of overhang….. about 1/2 cm

Paper Sizes – 4 cm H x 10.5cm W; 3.5cmH x 7.5cm W; 2.5cm H x 4.5cm W


SU! Products Used

Stamps – Perfectly Penned

Papers – Fresh Prints DSP Stack (SSC); Red Shimmer

Cards & Inks – Real Red; Crumb Cake; Soft Suede

Punches – Banner (SAB)

Dies – Alphabet

Wednesday, 29 January 2014

Sale A Bration - get the MUST HAVE Banner Punch for free! And a creative share too…..

2014_01, Amanda Bates,The Craft Spa, Jan Class, Banners & Presents Trio (1)

Well it is beginning to look a lot like banners in The Craft Spa Room….

Call me smitten….. I cannot punch the punch down….. and I have to admit … for the frugal crafters…. that I can use any tiny scrap to add layers to my banners – straights, chevrons; and layered banners – check out the extra embellishments on those little banners in the Glimmer Silver…..

Banner Punch yours for free with a £45 order. And whilst you are at it – get the coordinating stamp set for free too…. just another £45 order.

And I have to point out these fabulous papers – Fresh Prints Stack in the new Spring Summer Catalogue. Gorgeous.. and 24 different patterns to go at – will share another version of the card/papers tomorrow

2014_01, Amanda Bates,The Craft Spa, Jan Class, Banners & Presents Trio (3)

Card front based on this fabulous card by Louise Sharp. Guess which stamp set is popping onto my next order!!!

Card Inside design made using this fantastic tutorial by Lisa Young. Come back tomorrow for my metric version to suit the new Trimmers…..


image

SU! Products Used

Stamps – Perfectly Penned

Papers – Fresh Prints DSP Stack (SSC); Silver Shimmer

Punches – Banner (SAB)

Dies – Alphabet

Tuesday, 28 January 2014

Sale A Bration, New Spring Summer Catalogue, new Texture Boutique Embossing Machine

2014_01_28_SAB ORDER_q1_sab_cust_jan2814_uk

Lots new to share today.

Sale A Bration promotion starts today… click on any of the pictures to go to the leaflet.

2014_01_28_SAB SHOP_button_SAB_Dec0113_UK_01

2014_01_28_SAB JOIN_button_SAB_Dec0113_UK_03

2014_01_28_SAB HOST_button_SAB_Dec0113_UK_02

New Spring Summer Catalogue launches today.Click on the picture below to go straight to the catalogue.

2014_01_28_SSC_q3_occasions2014_cust_jan2814_eu

And if that is not enough… we also have the new Texture Boutique embossing machine for you. Click for more information. Embosses only – does not die cut.

2014_01_28_Tex.Boutique_q4_textureboutique_customer_jan28_na

See the video showcasing this little beauty here.

And if they are not enough…… just so you have a round up!!

Whole Lotta Love Valentine Promotion product availability extended until 14 Feb…..

2013_12_awholelotoflove_stamps2013_12_flyerTH_wholelotoflove_demo_12_1-1_27_2014_EU

As well as the Autumn Winter catalogue is still live until 1st Feb. No time to waste with these.

2013_08_to1Feb_20130829_AutumnWinter_en-EU

The Single Christmas stamps are still available until 31st January… No time to waste with these.

2013_09_FlyerTH_SingleStamps2Christmas_UK

The Best Of Stamp sets are all still available. See here….

And of course….

Clearance Rack

Envelope Punch Board

Thinlit Card Dies

Undefined Stamp Carving Kit – or see the video here

So there is the round up ….. I will be back very soon with more details and projects using the wonderful new products very soon….. But I thought this was enough news for now!

Sunday, 26 January 2014

Sale A Bration Blog Hop

photo (5)

Hello and welcome to our blog hop.

But please feel free to come back here for more details on Sale A Bration and the new Spring/ Summer Catalogue on Tuesday 28th Jan! Also for details on the Craft Spa SAB Club running Jan-March….

The Stampin’ UP! annual Sale A Bration promotion starts this Tuesday, 28th January… you know the one… a free product for every £45 you spend. Or become a demo – and get £150 product for your £99 ( £20 more free to you and me! )

Now, we demos cannot show you pictures of the products but we can show you completed projects made with those products  - so here is a blog hop to show you the range of the products that can be yours for free….. along with a few other Stampin UP! must haves….. including some from the Spring Summer Catalogue … which is also due for release on Tuesday 28th Jan……

So I chose the stamp set  - See Ya Later –  4 images in the set  to work with  - all of some beautiful wording plus a small included image - so 5 cards to show you here…..SO KEEP SCROLLING……though I appear to have only used one of the small images !!  

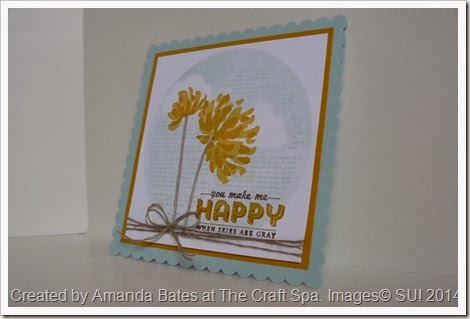
First - This one makes me SO happy…
2014_01, Amanda Bates, The Craft Spa, SAB, Jems Blog Hop, Too Kind, See Ya Later (1)

Many of you will recognise this as my 2013 Stampin’ Up convention swap card using the Too Kind stamp set … but updated to incorporate a number of things going in my life this month!!

Firstly the colours, we started a new team challenge this week – Wade’s Weekly Challenge – read more about that here. But the colours chosen by Julie just fit in perfectly with what I wanted to achieve with this card – sky, grey(ish) and yellows for happy! So thanks again Julie – perfect combi!! Soft Sky, Crumb Cake, Soft Suede, Crushed Curry  - plus Daffodil Delight as the paler background yellow on the Too Kind flowers

Secondly the step up of the card  - as my ladies were making this for themselves in classes this month. 3 additions to the base card I swapped – a scallop square; some linen thread and oh… clouds in the sky!

Now whilst at Convention – many people asked how I created the background circle – so I better share that here…. just a hole, stamping and sponging!!

I covered my Whisper White square with a large circular aperture (you could die cut a circle out of paper – but  I used the plastic stencil/mask from the Build A Banner kit in the Autumn/Winter catalogue – still available until 1st Feb folks! Great masks/templates even if you don’t want the banner parts…..highly recommended….) And on this stepped up version -  I also punched 2 cupcake tops with the Cupcake Builder Punch & laid them within the circle.

I stamped over the top with the Dictionary background stamp ( Soft Sky) then I sponged more Soft Sky ink around the hole! And then it was time to remove my mask. Simple, fast & very effective… Though it does still remind me of a UK car tax disc!!!

Second – more to keep me happy…..

2014_01, Amanda Bates, The Craft Spa, SAB, Jems Blog Hop, Petite Petals,  See Ya Later (1)2014_01, Amanda Bates, The Craft Spa, SAB, Jems Blog Hop, Petite Petals,  See Ya Later (2)

Not only a peak of another SAB stamp image ( see the “hi” banner…. the Banner Blast stamp set and a Banner punch can be yours for free ladies!!) but a new product from the Spring/Summer catalogue here… one that will be VERY popular – 6 different small flower images – with …. a co-ordinating punch!! YAY! Petite Petals is one to look out for!! And the colour choice…. Coastal Cabana, Crumb Cake, Real Red… because of the gorgeous new Paper Stack in the Spring/Summer Catalogue – Fresh Prints. Loving these papers – 24 different patterns in the stack!

Third – one for a Birthday. Again coupled with the punched out  Petite Petals stamp set flowers. And Banner Blast banner of course. Very addictive are these banners!!! Gorgeous….

2014_01, Amanda Bates, The Craft Spa, SAB, Jems Blog Hop, Petite Petals, See Ya Later (1)

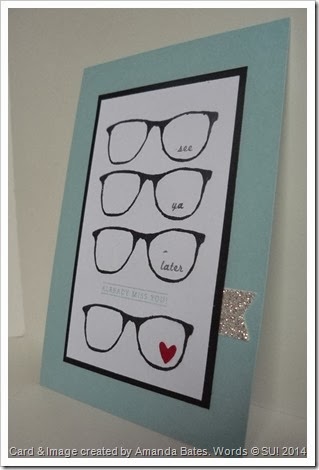
And now for something completely different for me……  I was asked for  a geek chic Valentine card – you know the moustaches and glasses –  well Stampin’ Up! don’t have one for me – so I have also been playing with my Undefined stamp carving kit and I created my own!!! GREAT FUN…. and there was the perfect wording in the See Ya Later set… not only for the Valentine card… but also for another idea!!
Amanda Bates, The Craft Spa, Undefined, See Ya Later, SAB 2014 045Amanda Bates, The Craft Spa, Undefined, See Ya Later, SAB 2014 047

So …for more shares from the team … just press on the icons…. NEXT for those going round that way … or PREVIOUS if you are working backwards!!

SO assuming you are all going to hit NEXT to the RIGHT… I give you…. a gorgeous card OR mini album created by Julie Kettlewell. I was lucky enough to make this for myself yesterday… it will be shared in Craft Spa classes coming soon!!! LOVE it….
Next Post

Previous Post


Need to go quickly to a blog you have been to…. here is the complete blog roll list….


Karyn Davies - http://kdcrafts.blogspot.co.uk/2014/01/bloghop-day-0-welcome-to-our-bloghop-by.html

Debbi Taylor - http://beecraftyandstamp.blogspot.co.uk/2014/01/julies-jems-sale-bration-bloghop.html

Rebekah Cornford - http://craftingbecky.blogspot.co.uk/2014/01/sale-bration-sneak-peek-blog-hop.html

Julie McCartney - http://crafty-angelwings.blogspot.co.uk/2014/01/julies-jems-sab-bloghop.html

Amanda Bates - http://thecraftspa.blogspot.co.uk/2014/01/sale-bration-blog-hop.html

Julie Kettlewell - http://juliesjapes.blogspot.co.uk/2014/01/julies-jems-sale-bration-blog-hop.html

Allie Jolliffe - http://jollicrafts.blogspot.co.uk/2014/01/julies-jems-sale-bration-blog-hop.html

Sharon Glynn - http://shari-anne-happycrafter.blogspot.co.uk/2014/01/jems-sale-bration-blog-hop.html

Angie Hutton - http://feathertassel.blogspot.co.uk/2014/01/hello-and-welcome-to-jems-2014-sale.html

Kate Martin - http://kraftsbykatemartin.blogspot.co.uk/2014/01/sale-bration-blog-hop.html

Liz Youd - http://stampinandcreatin.blogspot.co.uk/2014/01/the-julies-jems-sale-bration-blog-hop.html

Fiona Cullen - http://www.the-create-escape.blogspot.co.uk/2014/01/let-go-to-bloghop.html

Caroline Lovett http://carolinescraftsandmore.blogspot.co.uk/2014/01/bloghop.html
Kylie Henshaw - http://hellostamper.blogspot.com/2014/01/sale-bration-blog-hop.html