Showing posts with label Dazzling Details. Show all posts

Sunday, 8 November 2015

Glitter Trees

Oh I do like to see trees all covered in glitter...
This is a concept card I made to demonstrate different types of glue plus glitter... Dazzling Details vs Fine Tip Glue Pen plus Dazzling Diamonds... 
The nuances do not show up on these photos... but trust me when I say that the sparkle across the room is amazing! So I ended up finishing the card off...
Oh - and different amounts  - and ways of application (squiggle or blobs!) of glue too... which you may be able to see the extra on the central trees...

And finally a blurry photo to attempt to show the level of sparkle...
 

Built for Free Using: My Stampin Blog

Saturday, 7 November 2015

Sparkly Wonderland Antlers

Another idea for my favourite trio stamping of Antlers...
Trio of antlers stamped in black without re-inking in between...
Add a panel of Winter Wonderland antler paper...
And a strip & a bow of Silver ribbon...
And then finish off your stamped antlers with glue and a sprinking of glitter... can't remember if I used Dazzling Details - or Fine Tip glue plus Dazzling Diamonds fine glitter...! Either works...
Sparkles, glistens & causes a WOW in the flesh...but simple to make... got to love that!

Built for Free Using: My Stampin Blog

Thursday, 22 October 2015

Wonderland Wreath

Been working hard with my Wonderland stamps... and surprised at my favourite creations!

First off... the wreath... 
The pine-cone spray is perfectly angled to create this wreath...

Edited to add - How To Pictorial for you here....

Have the pine-cone spray  stamped up on your Stamp A Ma Jig sheet...
Draw round a Circle Framelit with pencil (or Frixion pen in my world!) on your piece of card - I used the 2 5/8" external diameter one!

Place your Stamp A Jig sheet so that the pine-cone curls round your circle....
Ink up all the stamp in Mossy Meadow - then grab your Early Espresso marker- and colour over the pine-cone with Early Espreso

And stamp...

Repeat the last 3 steps again and again until the spray meets...
Note that you do have a little wiggle room for error in one place - it is called the ribbon bow! Though mine actually fit round perfectly...

The greeting is from Embellished Ornaments - it was just too perfect not to use! Again that is inked  all over with Mossy Meadow - and the Early Espresso marker used to highlight particular words...

And all finished off simply with gold Dazzling Details "berries" and a gold glitter ribbon bow.

Simple but perfectly formed...


Built for Free Using: My Stampin Blog

Friday, 25 September 2015

Reflection and Cat in the Doubled Window...


Finally got my acetate out out to back my window! Love the reflection in the photo!! Something is definitely shining down!

This card went down really well on my Training Inspiration Station - and in classes this week too... everyone was surprised at how simple it was to re-create... 
So a doubled window.... Die cut 2 windows...snipped off left side of one...and right side of the other...and stuck one on top of the other down the centre... really simple and easy and quick... and no messing around with Big Shot/plates/overhangs required.... 
Covering up the joins with the Festive Fireside/Fireplace cat at the bottom and boughs at the top... and a Happy Scenes double scene behind...
Now I could pretend that this is some lovely simple Fancy Fold card ( as it is Fancy Fold Friday so I do normally post one)... but it isn't...it is just a plain A6 Tent Fold Card.... with the window stuck on top
Life, classes, training and technology have definitely conspired against me this week ( well 3 weeks actually!) ... it is late at night (and dark!) and the project photo cupboard is bare...but never fear lots more makes to photo tomorrow! Onwards.... 
Check out the reflection on this one...even has the chimneys over the road!! And what looks like The Angel of The North! ( very large statue in the North of England for my international friends who haven't got a clue what I am talking about...)

And a funny story about the cat.... I have only just realised yesterday that there is a cat stamp in the set... hence my plain die cut black cats...which I thought had a very strange "nobble" on its face...which I was going to cut off... but forgot! When I look at the stamp... the nobble is for the whiskers...obvious!! Bet my next cat is stamped with its ever-so-cute whiskers....


Built for Free Using: My Stampin Blog

Friday, 18 September 2015

Swing Easel Card for Fancy Fold Friday - Shut the Door!

 
Seeing as my Swing Easel Card Tutorial  has proven SO popular for the last 2 weeks. (actually quickly shooting up to no 6 in my All Time Top 10 posts)  I thought I would have a go at another variant.... re-sized to suit my favourite Hearth & Home dies.
So here you have one resized with a narrower centre panel for the perfect front door to swing open and shut! (well more like up and down really!!).
My favourite trio of stamps and matching dies used again - Hearth & Home, Festive Fireside/ Fireplace and Peaceful Pines
And the gorgeous NOEL Label Bracket from a new Autumn Winter Catalogue hostess stamp - Antique Tags. Love this one!
The trees are dressed with Dazzling Diamonds glimmer behind the die cut holes to the left - and stamped with Versamark/Heat & Stick  plus Dazzling Diamonds Glitter to the right... wish I had gone red - but hey - next time!
Now I know that a lot of you will be surprised to a Real Red front door on here.... but I will let you into a secret - last year all my ladies changed my white front doors to bright red ones for their Christmas cards.... so I thought I had better brighten things up a bit for them this year.... But don't worry - I am sure my next front door share will be white....
And last - but not least - spot the boughs under the NOEL tag - that is just a snippety snip of the Festive Fireside/Fireplace boughs and mount either side...

Saturday, 5 September 2015

Centre Step Hearth & Home Easel Card – Looking outside

Festive Scenes Hearth & Home Card by Amanda Bates at The Craft Spa  (37)
So same variant of my Centre Step Easel card as yesterday’s Hearth & Home card…
Festive Scenes Hearth & Home Card by Amanda Bates at The Craft Spa  (34)
But an outside view using Happy Scenes rather than an inside view using Festive Fireplace….
Festive Scenes Hearth & Home Card by Amanda Bates at The Craft Spa  (35)
Spot the double window…. mine are all like this one now!! So easy to snip -  the die gives you the lines to just simply cut along!
Festive Scenes Hearth & Home Card by Amanda Bates at The Craft Spa  (36)
Full Sahara Sand window… snipped down Whisper White Window on top
Festive Scenes Hearth & Home Card by Amanda Bates at The Craft Spa  (38)
Finished off with a Festive Fireplace Mossy Meadow bough on white card plus Cherry Cobbler Dazzling Details for the berries...
Festive Scenes Hearth & Home Card by Amanda Bates at The Craft Spa  (33)
With the black Celebrate the Season planter as the Easel pop up mechanism for holding the card in place….

Monday, 31 August 2015

Peaceful Pines meets Snow is Falling

Another Sneaky Peek of the new stamp set... Peaceful Pines... 
A fabulous collection of trees, accessories & greetings...along with the fantastic set of Perfect Pines co-ordinating dies in a Stampin' Up! bundle (which means 15% off for the bundle!)
This is a set that has attracted the eyes of most when first viewing the new 2015 Autumn Winter/ Holidays catalogue...so I will be running a Peaceful & Perfect Pines class in due course...so there will be more projects to share using this set in the future...
Not that you can really see in these photos... but the Snow is Falling embossing is finished off with highlights (blobs!) using my trusty Dazzling Details...rather therapeutic! Giving texture, glitter and dimension all in one go!

And on a final note... the 2015 Autumn Winter/Holidays catalogue is revealed to the world tomorrow, 1st September ...so don't forget to come back tomorrow and check it out!!

I will also be sharing a project or two made with my favourite product from the new catalogue! Warning...I have got quite carried away with one particular product!! Anyone like to take a guess which...

Friday, 12 December 2014

White Christmas Glitter Disaster!!

And now for something different… I suppose you could call this a blooper… or a disaster if you had been standing where I was… but I learnt 2 new things from it...so I thought I should share….

First of all I read a blog post in the morning by Bryan King, one of our talented Stampin Up! demonstrators in the US  - where he shared his dislike of glitter and mess – and a picture of a bottle of Dazzling Details that said a 1000 words about glitter and mess!!… I even hear myself utter the word “oops – how did that happen!”….. so not that I am blaming Bryan…but…

Later that evening… picture the scene… my table about to be cleared & set up for my class the following night

Glitter Glitter everywhere.. (4) 

And a final tweak to my BIG 8” Square Flap card… just the addition of silver glitter to the roofline of the house using my bottle of Dazzling Details ….. when the un-thinkable happened… I pressed so hard….that a glitter shooting star shot 7 foot across the table as the plug shot out & across the table….

First of all, here is the glitter mountain on my finished card….

Glitter Glitter everywhere.. (1)

Then, here is the glitter iceberg for the polar bear on the second version of the card panel I had made for demo purposes … that card is half way up the table – about 4 foot away…. just in front of the Simply Scored board…

Glitter Glitter everywhere.. (3)

With the final eruption landing on my guillotine… and the plug finally coming to rest behind the bone folder!! At least 7 feet away from me….
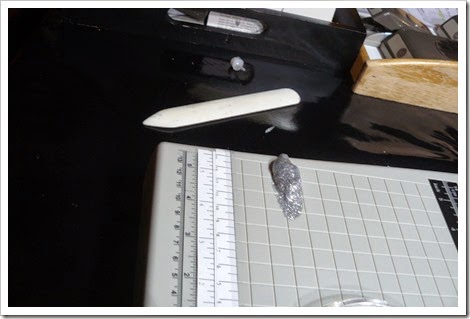
Glitter Glitter everywhere.. (5)

Now I cannot possibly repeat the words I uttered when this happened…..  But as I said… I learnt 2 very important things about Dazzling Details….

Firstly… there is SO much in that little bottle…. as you can see a huge amount landed in each of the 3 positions…. but that little bottle is still mainly full!!! And the plug just went back in – and it is back in use ( but I won’t be squeezing it hard like that again!!)

Secondly… that it just wipes away!!! I acted fast and there isn’t a speck of silver glitter remaining on my cards etc. And so my class was saved…. phew….

Any of your crafting bloopers you would like to share with me…. I am sure you would make me feel much better!!