Showing posts with label Snow is Falling. Show all posts

Sunday, 23 December 2018

Simple Sunday Snowman card

 
Or should I call this... Want to build a snowman?
I love this card... though it is probably one of the quickest ones I have put together this year!
Put together being the operative wording... as all the parts were leftovers from other projects that just magically went together... as you do...
Quite  lot of products used though... Farmhouse Christmas bare tree, Rooted in Nature fir tree duo, Santa's Workshop papers snowman and elf... and greeting and snowflakes from Snow is Glistening (which was only available in November)
Spot that the last 2 photos are of an even more simple version...no snowflakes in the air! Though I think they are necessary bearing in mind the Snow is Glistening greeting!

Wednesday, 12 December 2018

Wednesday WOW... a really special... Spirited Snowmen... card...

to me ... from Hilda...

I have to share this beautiful card as well... a true Spirited Snowmen, Large Letters & Softly Falling embossing folder stunner... that  I feel so honoured to receive...

Got to love being a crafter amongst such talented friends at Christmas!!!

Though some bad news... Spirited Snowmen is on the Retiring List... so last chance to order...
Thank you again Hilda... absolutely fabulous!

And guess what... yes it is on my display... and yes... everyone has picked it up and oohed and aahed!!!

So cute...We all love it!  You should have never doubted that!

Saturday, 9 September 2017

Merry Little Labels in Falling Snow...

Another quick and simple card for you today... well I had to do a few whilst this gorgeous Merry Little Label stamp was still out... bundle available in wood mount and clear mount...

So a Small Square card today (10.5cm Square aka 4 1/8" - but 4 1/4" makes more sense with US Letter cardstock)

A Softly Falling embossed 9.9cm (4" for US 4 1/4" card) white panel for the background... 
The label is embossed using Versamark and White embossing powder, sponged or brayered with Night of Navy ink and then punched out... though of course you can punch and then sponge if you prefer it that way!

And Night of Navy Crinkled Seam Binding ribbon and bow to finish.... though the eagle eyed amongst you will have spotted that I have folded the ribbon in half for the length and the tying of the bow as I wanted a thinner ribbon than how it comes...

Tuesday, 20 September 2016

Detailed Santa - The Red Trio

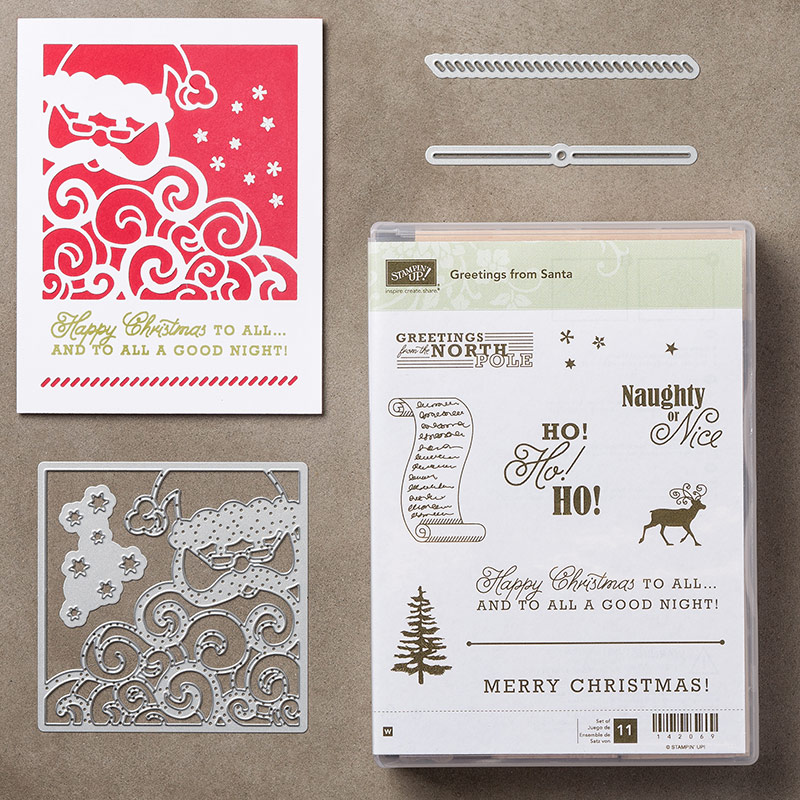
Forgot to share the Round Up pictures... so here they are... a lovely trio of Detailed Santas 
And this is the bundled Greetings From Santa with the Detailed Santa dies...
Available in Wood Mount and Clear Mount... Stamps and dies available separately - but 10% off everything when you buy the bundle...

Saturday, 17 September 2016

Dear Detailed Santa....

Here is Detailed Santa looking very serious reading his Dear Santa letter...

Dressed up with Pom Pom trim bobbles... hand drawn eyes,  Real Red hat, marker coloured face, Greetings From Santa letter scroll & greeting, Candy Cane Bakers Twine
And set on a Softly Falling snowy embossed background 
And (as I can!) here is the same without the add of those eyes... see what I mean about those being the perfect finishing touch... 


Saturday, 21 November 2015

Houses in the Snow...

Another little house scene care of the Sleigh Ride edgelits...
Houses aqua painted with Smoky Slate...
Back panel embossed with Softly Falling (carrying over - so I finally might have to buy another one to replace the one I lost! Long story...)
Finished off with the beautiful wording from Embellished Ornaments in Night of Navy and a satin silver bow...
All very serene... but still simple enough to mass produce!

Built for Free Using: My Stampin Blog

Monday, 12 October 2015

Peaceful Pines Duo

 
Simple little duo using the Peaceful Pines stamp set and the marbling technique...
Straightforward on white... 
Or Softly Falling embossed on Lost Lagoon...

Colour combination Mint Macaron, Lost Lagoon & Night of Navy... been using this combination rather a lot recently! And this marbling technique...which is very effective in the flesh!


Built for Free Using: My Stampin Blog

Sunday, 11 October 2015

Woodland & Softly Falling embossing

 
Just found another card I made using 2 of the christmas embossing folders... Woodland and Softly Falling...
Silver/smoky Slate and Real Red colour theme this time...
Still loving my Christmas Greetings Thinlits dies and Holly Jolly Greetings stamps...


Built for Free Using: My Stampin Blog

Wednesday, 23 September 2015

Hearth & Home - iPad -Technology Series Part 2

Following on with my mini series of some technology based Fancy Fold Cards for the men and teens in our life - using the fantastic Hearth & Home window dies...
This is the card that started me off! IPad time....
On its docking station with speakers!

Edited to add: I had a bit of a first with these technology cards...  as I posted this card... I happened upon a timely challenge on a Technology theme... and so I entered them in a Challenge over at Less is More... I have always had entering Challenges on my bucket list... and now I have started! May it long continue...

This is a variant of my Centre Step Easel Card. Just sized slightly differently...but more of that on another day... Tutorial for this version now added here...
The iPad is just a snipitty snipped Smoky Slate die cut window frame - with a Basic Black back - mounted on a Thick Whisper White small rectangular die cut Project Life card. Handheld punched 1/4" & 1/8"white circles for the button ( Smoky Slate ink around the smaller) and 1/16" black circles for the camera.

And the apple motif... loving this! Punched apple using the Tree Builder  Punch... then re-punched out using a 1/8" Circle Hand Punch... but be warned ...this bit is trickier than it looks! Think I had 5 attempts to punch in the right place...

The keyboard is just a trimmed die cut planter - also from the Hearth & Home die set... again the white embossed wording being from the Bravo stamp set

And the speakers... whilst I lamented the lack of my trusty Square Lattice embossing folder for the job of adding the texture... I had a brain wave... and the Softly Falling embossing folder came to my rescue! Who would have thought!
And as  final inspiration for an iPad... here is the first one I made using the Hearth & Home window die... 

Smaller but still perfectly formed ( though a bad photo!). The outer white frame being a snipped white window - corner rounded to finish it off...

I just need to find "the window!" (of time that is... ) to be able to make and pop it on a card I have in mind.... though that may be a little while now... so hopefully I will have  Part 3 of my Technology series later!

Built for Free Using: My Stampin Blog

Monday, 31 August 2015

Peaceful Pines meets Snow is Falling

Another Sneaky Peek of the new stamp set... Peaceful Pines... 
A fabulous collection of trees, accessories & greetings...along with the fantastic set of Perfect Pines co-ordinating dies in a Stampin' Up! bundle (which means 15% off for the bundle!)
This is a set that has attracted the eyes of most when first viewing the new 2015 Autumn Winter/ Holidays catalogue...so I will be running a Peaceful & Perfect Pines class in due course...so there will be more projects to share using this set in the future...
Not that you can really see in these photos... but the Snow is Falling embossing is finished off with highlights (blobs!) using my trusty Dazzling Details...rather therapeutic! Giving texture, glitter and dimension all in one go!

And on a final note... the 2015 Autumn Winter/Holidays catalogue is revealed to the world tomorrow, 1st September ...so don't forget to come back tomorrow and check it out!!

I will also be sharing a project or two made with my favourite product from the new catalogue! Warning...I have got quite carried away with one particular product!! Anyone like to take a guess which...

Friday, 28 August 2015

Centre Step Easel Card Tutorial for Fancy Fold Friday

Remember this from last week? The Centre Step Card that doesn't flop down on the mantelpiece!

I meant to have another couple of examples made for you by today...but ...being honest... Christmas crafting with my new goodies turned my head!!

Which is code for lots of new samples made and... AN Other version of this card coming up soon.... I decided not to confuse you with the new variant yet..... maybe next week!

Well here is how to make it... both the Metric (centimetres) version from A4 and the Imperial (inches) from 12x12

Centre Step Easel Card Tutorial ( Metric Version from A4 card)
1.      Cut A4 cardstock to 14.8cm wide ( xA4L ie 29.7cm long)

2.      PORTRAIT at 2.5cm on Top Bar RHS ( ie to Right Hand Side)
3.      Cut 2.5 to 13cm
4.      PORTRAIT at 2.5cm on Top Bar LHS ( ie to Left Hand Side)
5.      Cut 2.5 to 13cm
So you end up with cuts as so...

6.      LANDSCAPE. With cuts to Left Hand Side… Score as per dotted lines...
7.      2.5 cm on Top Bar (LHS) Score outside sections ( ie 0-2.5cm; LIFT; 13.3 to 14.8cm)
8.      5cm on Top Bar (LHS)  Score outside sections
9.      13cm on Top Bar (LHS)  Score  outside sections

10.   LANDSCAPE. With cuts to Left Hand Side…
11.   10.5cm on Top Bar (LHS) Score across middle section. ( ie 2.5 to 12.3cm)
12.   21cm on Top Bar (LHS) Score across whole card drop ( ie 0 to 14.8cm)

13.   Fold lightly… 
      Outer Sections – 2.5 cm Mountain, 5cm Valley, 13cm Mountain
Middle Section at 10.5cm – Mountain
Whole Section at 21cm – Mountain
Ends up as so...


14.  Decorate as necessary. My papers and mats etc were as follows…

Base - Paper Polka Dots 14.3 x 8.1cm
Front - Paper Plaid 14.3 x 2cm
Sides - Paper Plaid 2 x 7.3cm (x2)
Front - Card Mossy Meadow 9.5 x 9cm
Front - Card Whisper White 9 x 8.5cm

And apologies for my US readers... 

I don't think this card would work from your standard 8 1/2 x 11" cardstock...as there wouldn't be enough of a lip at the front to mount a greeting/stop for the easel card format. 

It would work with 12" card however... In which case you would need to do as follows...
Please note that your papers and mats etc would have to be re-sized to suit...


Centre Step Easel Card Tutorial (Imperial from 12x12)
1.      Cut 12x12 cardstock to 6” wide (ie 6 x 12”)

2.      PORTRAIT at 1” on Top Bar RHS ( ie to Right Hand Side)
3.      Cut 1” to 5 1/8”
4.      PORTRAIT at 1” on Top Bar LHS ( ie to Left Hand Side)
5.      Cut 1” to 5 1/8”

6.      LANDSCAPE. With cuts to Left Hand Side…
7.       1” on Top Bar (LHS) Score  outside sections ( ie 0-1”; LIFT; 5-6”)
8.      2” on Top Bar (LHS)  Score  outside sections
9.      5 1/8” on Top Bar (LHS)  Score  outside sections

10.   LANDSCAPE. With cuts to Left Hand Side…
11.    4 1/8” on Top Bar (LHS) Score across middle section. ( ie 1-5”)
12.   8 ¼” on Top Bar (LHS) Score across whole card drop ( ie 0 to 6”)

13.   Fold lightly…
Outer Sections – 1” Mountain, 2” Valley, 5 1/8”Mountain
Middle Section at 4 1/8” – Mountain
Whole Section at 8 ¼” – Mountain

Decorate as necessary.

Monday, 24 August 2015

Holly Jolly Snow Place Penguin

 
Loving this gorgeous little penguin - he is just too cute for words - and I have lot of plans for him!
So another Sneak Peek - of another fabulous stamp set coming your way from 1st September when the 2015 Autumn Winter Catalogue goes live.

This time up -it is a set called Snow Place which includes this penguin, a couple of snowmen and lots of items to dress them up with! As well as some great greetings...
Along with the Snow is Falling embossing folder of course....and the Christmas Greetings Thinlits dies and co-ordinating Holly Jolly Greetings stamp set