Showing posts with label Special Age Card. Show all posts

Tuesday, 21 March 2023

Tuesday Tutorial - Extra Small Square Double W Fold Card #4


Carrying on with my Double W Fold Card series... with the fourth size variant so far... standing in at a mini 7.4cm (c3") square when folded... 

This is the easiest version so far... and one that makes best use of a piece of A4 card... giving you two cards from one piece of A4...

Click here for another version/decoration using the Perfectly Pencilled papers shared last week... with  more straightforward punched greeting circles...

Craft Spa Recipe - Extra Small Square Double W Fold Card (actually 7.4cm Square)

Main Card- Night of Navy A4L x 7.4cm (aka 29.8 x 7.4cm)
Inside Base sections - (Dots) paper 14.4 x 2.5cm (x2)
Inside Top- (Floral) paper 14 x 5cm (x2) [or 28 x 5cm if you are using 12" papers!)

Front Balmy Blue mat 5.5cm Square
Front paper panels - Floral 5 x 2cm... Dots 5 x 3.5cm
Ribbon Crinkled White x 9cm

Papers Regency Park (which are gorgeous IMHO!)
Circle Punches -1" (retired) and EK Success 1 1/8" & Dotty 1" 

This fits nicely into a 8.4cm envelope... as these cards are quite bulky when closed into the finished square card ... so need a bit of extra room in an envelope... and a a Large Letter stamp...


Craft Spa Instructions -  - Extra Small Double W Fold Card ( aka 7.4cm Square)
  1. Score LANDSCAPE Night of Navy panel at 7.4, 14.8 and 22.2cm 
  2. Concertina Fold (Valley, Mountain, Valley)

  3. Cut the two Top (Floral) LANDSCAPE paper panels in half to 7cm wide
  4. Adhere to top insides

  5. Fold the Base section (Dots) papers in half as a mountain fold (with dots on the outside)
  6. Fold each side up in half again (to form a valley either side AKA a W shape)

    For the 2 left hand sections of the card...
  7. Hold concertina base sections with 2 open edges and folded centre facing to the right
  8. Apply glue to back/bottom face  
  9. Stick concertina section down onto right of right hand section (lining up with the Top paper panels at the sides and the sme gap along the bottom edge of the card)
  10. With concertina panel still folded up... apply glue to top face
  11. Close left section of card onto the glued face

  12. Repeat with other concertina panel for 2 right sections of card...sticking the concertina base section (with 2 open edges and folded centre facing to the left) to the left side of the 2 left sections this time... and folding the right section of the card onto the top...

  13. Ink up, stamp, cut and punch as necessary
    I used the Alphabest stamps ... along with the 1" (retired SU!) and EK Success 1 1/8" & Dotty 1" Circle Punches to punch the greeting and the Balmy Blue and Night of Navy mats...
    And the BIRTHDAY greeting is from Enjoy The Rhythm

    I would have added some Petal Park flowers... but time was of the essence for my class so I kept things as simple as they can be...

  14. Decorate card
    Again I kept the front as simple as I could for this one


Monday, 25 July 2022

More on Monday - Awash with Beauty #2


Second card in my Awash With Beauty series... 

Pop Out Centre Panel card fold this time... for which more details are coming soon...

Kept very simple on the reverse... just somewhere to pop a greeting and a message...

Definitely stunning papers that make life very easy to make something beautiful... so don't hesitate to contact me if you might be interested in a co-ordinating paper & card kit... or more of the suite for that matter!


Tuesday, 16 March 2021

Tuesday Tutorial - A6 Double Fan Fold Card


Quickly coming back to the True Love A6 Double Fan Fold card I posted last Friday... with the A6 recipe and measurements for the A4 cardstock users... 

Edited to Add...But before I start... Free Shipping tomorrow... for orders £35+... 24 hours only... starting at 11pm tonight for us in the UK... 

And I have added the links to more detailed tutorials at the end for those of you that haven't made a Double Fan Fold card before... I used Carole's tutorial as my base for this size as it is the most similar... and there are some very useful photos in her post to make the steps clearer... 


Recipe

Basic Black cardstock 14.8 x 19cm.
Basic White cardstock 6.5 x 14.3cm (for back of card)
True Love Paper Front Panel 6.5 x 14.3cm
True Love Paper Long Side Triangle 2.5 x 14cm (x2)
True Love Paper Short Side (Top & Bottom) Triangles 2.5 x 5.7cm (x4)

Tutorial

(1) Score Black card panel when LANDSCAPE (ie 19cm length along top) at 3, 6, 13 &16 cm

(2) Score - when LANDSCAPE (ie 19cm length along top) - from upper left corner (0) to bottom 6cm score line (ie 2nd score line from left). Then score from top 6cm (2nd) score line to bottom left corner (0)

(3) Now score from upper 13cm score line (ie 3rd from left) to bottom right (19cm) corner. Then score from upper right corner (19cm) to bottom left 13cm (3rd) score line.

Cut the paper pieces at a diagonal…

(4) For the 4 small Short Side triangles… When PORTRAIT (ie narrow 2.5cm side along top) - cut from upper left corner to lower right corner for 2 of the pieces. Then, cut from upper right corner to bottom left corner for the remaining 2 pieces

(5) For the 2 Long Side triangles… Mark the top centre at 7cm when LANDSCAPE (ie along the 14cm side) Cut from that top centre point to bottom left corner and then from top centre to bottom right

(6) Adhere all papers

(7) Die cut Stitched Stars, Gold Foil numbers (retired) and Stitched So Sweetly label

(8) Add Matte Black Dots and Gilded Gems to centres of stars


Click the links below for detailed tutorials ...

(1) Originator Sam Calcott at Mixed Up Craft's  7x 5 version (with video)

(2)  Tina Shaw's 7x5 version (with video)

(3) Carole Baumgartner's A2 version with photos... which is the one I used...
This size does also fit in a standard C6 envelope in case you were wondering...

Friday, 12 March 2021

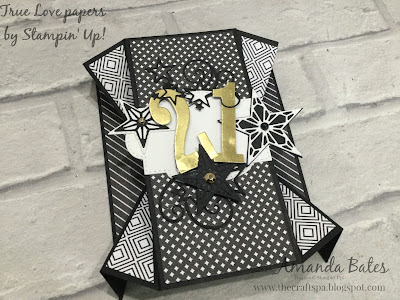
Fun Fold Friday - True Love A6 Double Fan Fold


Quickly popping on with another of the Double Fan Fold cards I made with the True Love pack of papers... 

Though I have just realised that this one is my A6 version from A4 card... so let me know in the comments if you are interested in the recipe and instructions... but I'll have to come back another day with those...

But for a young man this time soI didn't want any flowers... but as always ... the Stitched Stars dies came to the rescue... where would I be for the menfolk  - and for congratulations cards - without them!! Oh and the retired Large Letters of course - definitely can't be without those!

So it's a very happy 21st birthday Tom... from us to you... 

And remember I have put a True Love co-ordinated Paper Kit together for those of you that want to try without buying everything! Next Close date 22 March. Click here for more details... and scroll down...


Friday, 13 December 2019

A very special 100th Birthday Card

So this is a first! Celebrating 100 years of age...
A card created for a recipient of a "telegram" from the Queen... isn't this so special! Guess not many of us see one of these...
A very special card for DH's Uncle Joe... who has always been a special (and such a character) uncle!!!
But WOW... 100 years of age... Go Joe! A real legend with more than one book's worth of stories about his fascinating long life!
So I had to make the longest card in celebration... just so everyone in the place knew that Joe was 100!
Such an honour to share this very special day with Uncle Joe... and for my card to "sit" next to the Queen!!!
Click here for the Concertina Box Card Tutorial and more details on the card...

Stampin' Up! Products used
Noble Peacock Papers and Foils
Itty Bitty Birthday stamps
Large Letters dies (retired-sorry!)
Stitched Stars dies


Saturday, 16 November 2019

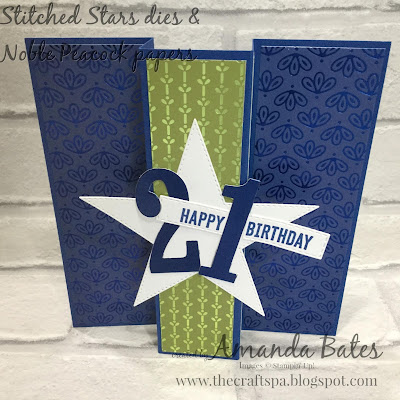
Something Special for the Weekend... Pop out Panel Card

Couple of back to back posts this weekend... as one creation creates the other!
Starting off with a favourite in last week's classes... for a special birthday... featuring Noble Peacock Papers & Foils, Stitched Stars dies, Stitched Rectangles dies, Itty Bitty Birthday... and retired Large Numbers dies...
Such a quick and easy card... and suitable for any age group... male/female...and most occasions... No idea why I hadn't made this one up before! And I reckon a few more to grace these pages as time moves on!! So more on this another day!
In the meantime... I just snipped the Stitched Rectangle between the 2 words on the greeting...so then it could pop behind the numbers... and be totally readable!!

Monday, 16 January 2017

18th Birthday Pop Up Panel Card for Adam

A very special age card made by Karen for her son Adam... who is 18 today! So first things first from me... Happy 18th Birthday Adam... I really can't believe my son and all his friends are all hitting 18 this year... 

We quickly switched the flowery papers on the original version for something more... masculine! And didn't add the flowery decoration.... But the rest of the card is as per the original Blooms & Bliss Pop Up Twist card....
And the front was quickly de-flowered too... 
And now it is time to grab a new Spring Summer or Sale A Bration stamp set - and set to work!! Well... play!!!